
Is your home showing signs of wood rot on the outside? If so, you’re not alone—and it’s something you can fix.
Wood rot doesn’t just look bad; it can weaken your house and lead to costly repairs if ignored. But don’t worry—you don’t need to be a pro carpenter to handle this. You’ll discover simple, effective steps to stop wood rot in its tracks and protect your home.
Keep reading, and you’ll learn how to save your house from damage before it gets worse.
Identifying Wood Rot
Wood rot can cause serious damage to the outside of your house. Identifying it early is very important. This helps you fix the problem before it gets worse. Wood rot usually starts small but spreads fast. Knowing what to look for makes a big difference. The following sections explain the common signs, types, and areas prone to wood rot.
Common Signs Of Wood Rot
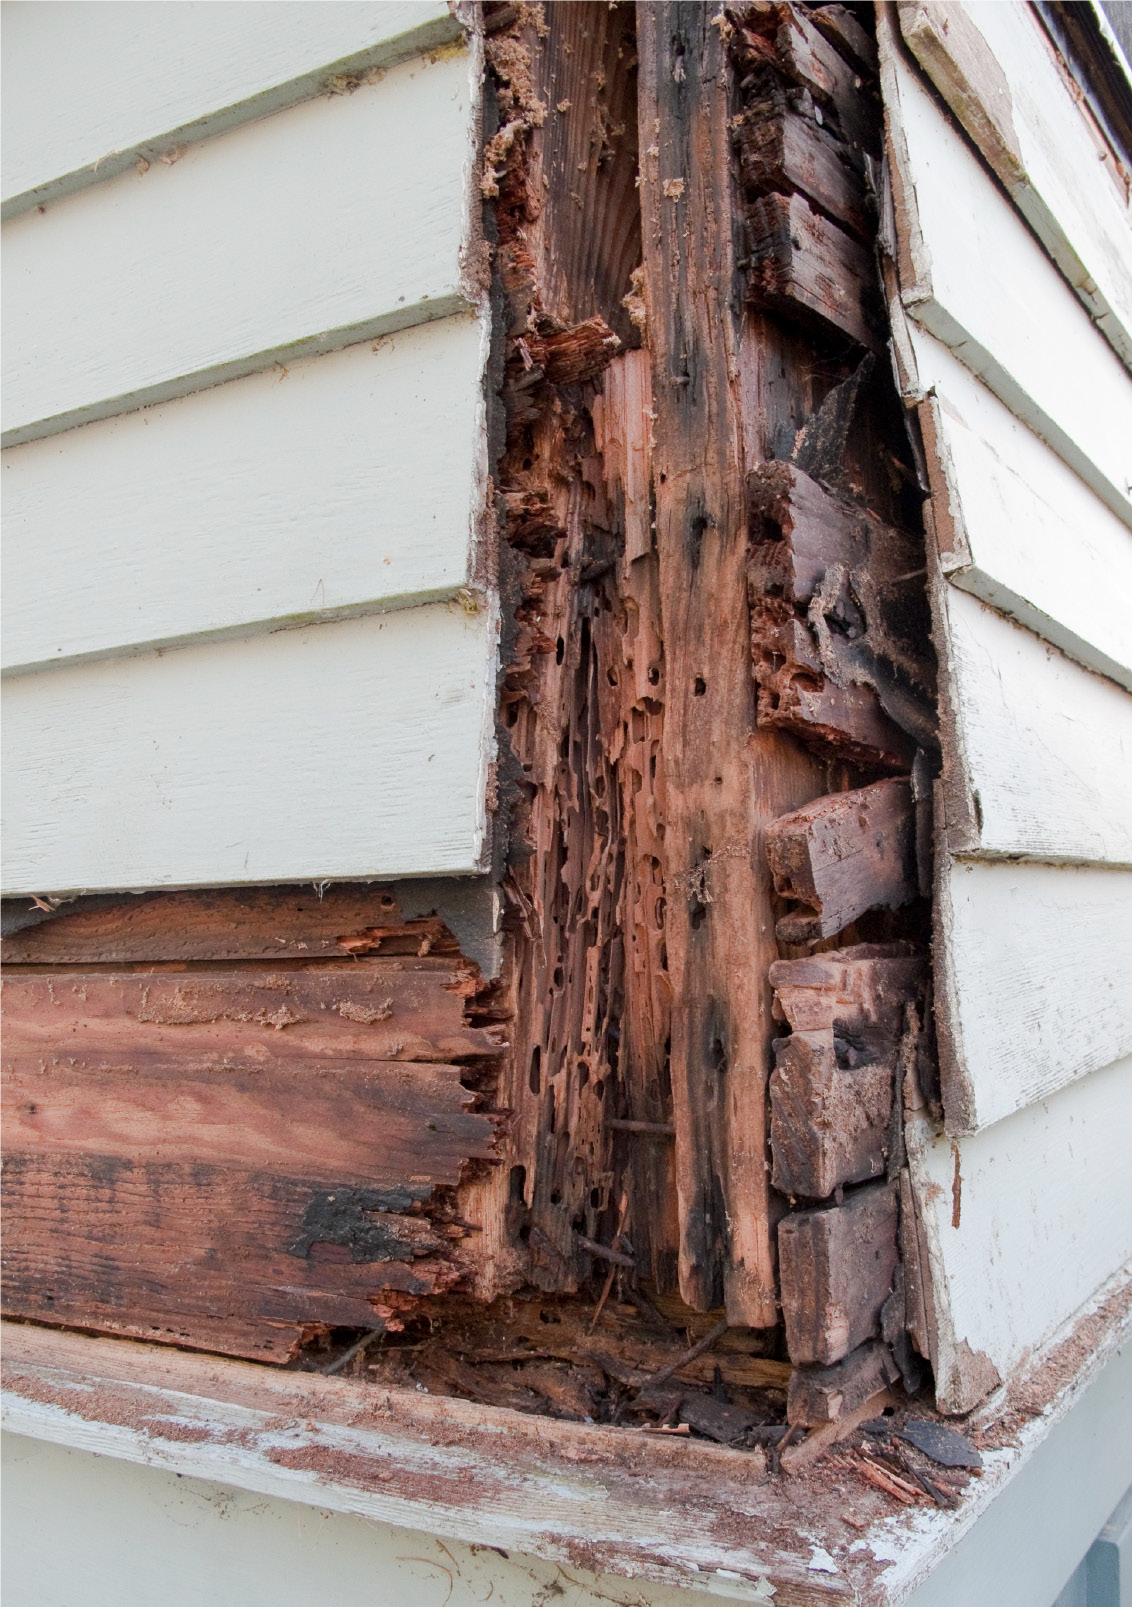
Look for soft or spongy wood on your house’s surface. Wood that feels crumbly or breaks easily may be rotting. Dark stains or discoloration can also signal rot. A musty or damp smell often comes from rotting wood. Peeling or bubbling paint might hide wood damage underneath. Check for small holes or cracks as well. These signs show the wood is weak and decayed.
Types Of Wood Rot
There are two main types of wood rot: dry rot and wet rot. Dry rot makes wood dry, brittle, and cracked. It spreads quickly through wood and walls. Wet rot happens in damp wood and makes it soft and dark. Both types damage wood strength and need fixing fast. Knowing the type helps you choose the right repair method.
Areas Prone To Rot
Wood rot often forms in places where water collects. Check window frames, door sills, and porch decks closely. Gutters and downspouts can leak and cause rot near the roof edges. Areas near the ground or soil also stay wet longer. These spots are common targets for wood damage. Regularly inspect these areas to catch rot early.
Preparing The Work Area
Preparing the work area is the first step to fix wood rot outside your house. It helps make the job easier and safer. Organizing everything before starting saves time and avoids mistakes. A clean, clear space lets you work without distractions or hazards. Follow these steps to get ready for the repair.
Gathering Necessary Tools
Collect all tools needed for the repair. Common tools include a chisel, hammer, wire brush, and putty knife. You will also need wood hardener, wood filler, sandpaper, and paint. Having tools ready helps you work smoothly. Avoid stopping to find something in the middle of the job.
Safety Precautions
Wear safety gear to protect yourself. Use gloves to avoid splinters and chemicals. Safety glasses shield your eyes from dust and debris. A dust mask prevents breathing in harmful particles. Check the area for nails or sharp objects. Work in daylight or use good lighting to see clearly.
Clearing Surrounding Area
Remove plants, furniture, or objects near the damaged wood. Clear the ground to create space for tools and movement. Cover nearby surfaces with a drop cloth to catch debris. This keeps your yard clean and protects other materials. A tidy area helps you focus and work faster.
Removing Damaged Wood
Removing damaged wood is a key step in fixing wood rot on the outside of your house. This process stops the rot from spreading and prepares the area for repair. Removing all the damaged wood ensures a strong, lasting fix.
Careful removal of the rotten parts helps protect the healthy wood nearby. It also makes sure that the repair materials will stick well. This step requires the right tools and some patience.
Cutting Out Rot
Start by cutting out all the soft, crumbly wood. Use a saw or a sharp knife for this job. Cut beyond the visibly damaged area to reach solid wood. Removing all the rot helps prevent future problems.
Using Wood Chisels And Tools
Wood chisels are great for scraping out smaller rotten spots. Use a hammer to tap the chisel gently. Be careful not to damage good wood. Other tools like a wire brush can help clean the surface.
Disposing Of Rotten Material
Throw away all the rotten wood pieces safely. Rotten wood can spread fungus and insects. Seal the waste in a plastic bag if possible. Dispose of it in your regular trash or at a waste facility.

Credit: www.imageworkspainting.com
Treating Remaining Wood
After removing the rotten wood, treating the remaining wood is important. Proper treatment stops rot from spreading. It also strengthens the wood. This step makes your house safe and durable.
Applying Wood Hardener
Wood hardener restores soft, weak wood. It soaks into the wood fibers. This strengthens and seals the wood surface. Apply it with a brush or cloth. Let it dry fully before the next step. It helps the wood hold paint or sealant better.
Preventing Future Rot
Keep wood dry to stop rot. Check for leaks and fix them quickly. Use paint or sealant to protect wood from water. Regularly clean gutters and downspouts. Trim plants away from wood surfaces. Good air flow helps wood dry faster after rain.
Choosing The Right Products
Pick wood hardeners made for outdoor use. Look for products that resist water and mold. Choose sealants that match your wood type. Read labels for safety and instructions. Using the right products gives long-lasting protection.
Filling And Repairing
Filling and repairing wood rot on the outside of your house is a key step to protect your home. After removing the damaged wood, the next task is to fill the gaps. This process restores the wood’s strength and prevents further decay.
Choosing the right materials and applying them carefully ensures a lasting repair. Sanding the surface smooth afterward creates a clean finish for painting or sealing. Follow these steps to fix wood rot properly and keep your home safe.
Selecting Wood Filler Or Epoxy
Pick a wood filler or epoxy made for outdoor use. Epoxy is strong and bonds well to wood. It works best for deep or large holes. Wood filler is easier to use for small cracks and shallow damage. Check the product label to confirm it is weather-resistant. Choose a product that matches the wood color if possible.
Applying Filler Correctly
Clean the damaged area from dust and loose wood. Use a putty knife to press the filler firmly into the hole. Overfill slightly because the filler may shrink as it dries. Smooth the surface as much as you can at this stage. Let the filler cure fully before moving to the next step. Follow the drying time on the product instructions carefully.
Sanding And Smoothing Surface
Use medium-grit sandpaper to level the filler with the surrounding wood. Sand gently to avoid damaging the repair. Switch to fine-grit sandpaper for a smooth finish. Wipe off dust with a damp cloth. The surface should feel even and ready for paint or sealant. Proper sanding improves the look and helps protect the wood.

Credit: fencearmor.com
Painting And Sealing
Painting and sealing are key steps to protect wood from future rot. After fixing the damaged wood, these steps help keep moisture out. They also improve the look of your home’s exterior. Proper painting and sealing extend the life of the wood.
Priming The Surface
Start by cleaning the wood surface well. Remove dust, dirt, and loose paint. Apply a wood primer that blocks moisture. Priming helps paint stick better. It also seals the wood pores to prevent water damage. Let the primer dry completely before painting.
Choosing Exterior Paint
Select paint made for outdoor use on wood. Look for paint that resists cracking and peeling. Choose a paint with mold and mildew protection. Pick a color that matches your home’s style. Use at least two coats for full coverage and protection.
Applying Sealant For Protection
After painting, apply a clear wood sealant. Sealants add an extra waterproof layer. They protect wood from rain, sun, and snow. Use a sealant designed for exterior wood surfaces. Apply it evenly and allow it to dry well before use.
Preventing Future Wood Rot
Preventing future wood rot is essential to keep your house strong and safe. Wood rot happens when moisture stays too long on wood surfaces. Stopping moisture from settling helps protect your home. Small steps can make a big difference. Focus on drainage, maintenance, and inspection to avoid wood damage.
Improving Drainage
Water should flow away from your house. Check gutters and downspouts often. Clear leaves and dirt that block water flow. Extend downspouts to direct water far from the foundation. Grade soil to slope away from walls. Avoid water pooling near your home’s base.
Regular Maintenance Tips
Look at wood surfaces regularly. Paint or seal exposed wood every few years. Replace cracked or peeling paint immediately. Fix leaks in pipes and faucets near wood areas. Clean debris from decks and porches. Keep vents clear to allow air circulation.
Inspecting Vulnerable Areas
Focus on places where wood meets soil or metal. Check door frames, window sills, and siding corners. Look for soft spots, discoloration, or mildew. Use a screwdriver to test wood firmness gently. Catching problems early stops bigger damage later.
Credit: www.homeownersclub.com
Frequently Asked Questions
What Causes Wood Rot On The Outside Of A House?
Wood rot happens when wood stays wet for a long time. Moisture and poor ventilation cause fungi to grow. These fungi break down the wood fibers, leading to decay.
How Can I Tell If My Wood Siding Has Rot?
Look for soft, crumbly, or discolored spots on wood. Wood that feels spongy or breaks easily likely has rot. Peeling paint or mold can also signal wood rot.
What Materials Do I Need To Fix Wood Rot Outside?
You will need wood hardener, wood filler, sandpaper, a putty knife, and paint. Gloves and a mask are also good for safety. Choose materials that match your wood type.
Can I Fix Wood Rot Without Removing The Entire Board?
Small rot spots can be fixed by removing only the damaged wood. Use a chisel to remove soft areas, then apply wood filler. Larger rot often needs board replacement for strength.
How Do I Prevent Wood Rot From Returning Outside?
Keep wood dry by fixing leaks and improving drainage. Paint or seal wood surfaces regularly to block moisture. Trim plants away to allow air flow around wood.
Conclusion
Fixing wood rot on your house protects its strength and look. Act quickly to stop damage from spreading further. Clean the area, remove soft wood, and apply wood filler or new wood. Seal and paint to keep moisture out. Check your home regularly to catch problems early.
Small repairs today save big costs tomorrow. Keep your home safe and strong with simple care.