
Are you tired of your old carpeted stairs and ready for a fresh new look? Switching from carpet to wood can instantly transform your home, adding warmth, style, and value.
But you might be wondering—how do you even start? This guide will walk you through every step, making the process simple and stress-free. By the end, you’ll know exactly how to turn your worn-out carpeted stairs into beautiful wooden ones that you’ll be proud to show off.
Keep reading to discover the secrets to a stunning stair makeover you can do yourself or easily oversee.
Choosing The Right Wood For Stairs
Choosing the right wood for stairs is a key step in remodeling from carpet to wood. Wood affects the look, feel, and safety of your stairs. It must be strong to handle daily use and fit your home’s style. The choice also depends on your budget and how much maintenance you want. Picking the right wood makes your stairs last longer and look beautiful.
Types Of Wood Suitable For Stairs
Hardwoods are the best for stairs because they resist wear. Oak is popular for its strength and classic look. Maple offers a smooth surface with a light color. Cherry adds warmth with its rich reddish tone. Hickory is very tough and shows natural grain well. Softwoods like pine are less common but can work if finished well.
Considering Durability And Style
Stairs face heavy foot traffic. Wood must be hard enough to avoid dents and scratches. Choose wood with a Janka hardness rating above 1000 for durability. Style matters too. Some woods have straight grains while others have knots and patterns. Match wood style with your home decor for a unified look. Think about staining or sealing to protect wood and enhance color.
Budgeting For Wood Materials
Wood prices vary widely based on type and quality. Oak and maple usually cost more but last longer. Pine is cheaper but may need more care. Also, consider extra costs like finishes and installation tools. Plan your budget to cover all materials and labor. Saving on wood might cost more in repairs later. Good wood is a smart investment for safe, attractive stairs.
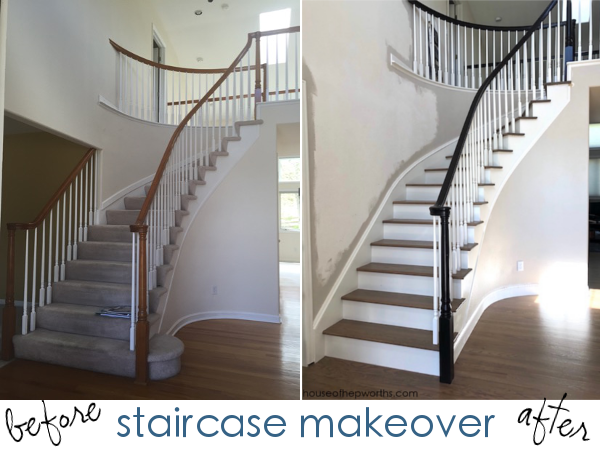
Credit: www.houseofhepworths.com
Preparing The Staircase For Remodeling
Preparing the staircase for remodeling is an important first step. It sets the stage for a smooth and successful wood stair installation. Taking time to prepare ensures the new wood will look great and last long.
Start by removing the old carpet and padding carefully. Then, check the stair frame for any damage or weak spots. Finally, clean and sand the surface to create a perfect base for the wood.
Removing Carpet And Padding
Begin by pulling up the carpet from the stairs. Use pliers to grip the carpet and pull it loose. Remove any staples or tacks holding the carpet down. Take off the padding under the carpet too. Dispose of all old materials properly. This clears the way for new wood installation.
Inspecting And Repairing The Stair Frame
Look closely at the stair frame after carpet removal. Check for loose or broken boards. Tighten screws or nails where needed. Replace any damaged wood to prevent problems later. Solid stairs provide a safe and strong base for wood steps.
Cleaning And Sanding The Surface
Clean the stairs thoroughly to remove dirt and dust. Use a vacuum and a damp cloth for best results. After cleaning, sand the surface lightly. Sanding smooths rough spots and removes old glue or paint. This helps the wood glue and finish stick well.
Measuring And Cutting Wood Components
Measuring and cutting wood parts is a key step in changing stairs from carpet to wood. This process needs care and exactness. Good measuring ensures the wood fits well and looks neat. Cutting the wood correctly helps avoid waste and extra work.
Take your time with each step. A small mistake in measuring or cutting can cause big problems later. Use the right tools and follow safety rules to protect yourself.
Measuring Treads And Risers Accurately
Start by measuring the stair tread, the flat part where you step. Use a tape measure to get the length and width. Measure each stair because sizes can differ. Next, measure the riser, the vertical part between treads. Write down all measurements clearly. Double-check each number before cutting.
Cutting Wood To Fit
Choose wood pieces that match your measurements. Mark the wood with a pencil where you will cut. Use a saw to cut along the marks carefully. Cut slowly to get smooth edges. Check the cut wood against the stairs for a perfect fit. Trim little by little if needed. Avoid cutting too much at once.
Safety Tips For Cutting Wood
Wear safety glasses to protect your eyes from wood dust. Use ear protection if the saw is loud. Keep your hands far from the blade. Use clamps to hold wood steady. Make sure your work area is clean and well lit. Follow the saw’s instructions for safe use. Stop and rest if you feel tired.
Installing Wood Treads And Risers
Installing wood treads and risers transforms stairs from old carpet to a fresh, clean look. This step requires care to ensure the wood fits perfectly and stays secure. Proper installation makes stairs safe and attractive for years.
Attaching Risers Securely
Start by measuring each riser carefully. Cut wood pieces to match the height and width of each step. Use a strong wood adhesive on the back of the riser. Press it firmly against the stair frame. Nail the riser in place with finishing nails for extra hold. Check that each riser stands straight and even before moving on.
Fixing Treads In Place
Measure the width and depth of the stair tread space. Cut the wood treads to fit snugly. Apply wood glue along the stair frame where the tread will sit. Place the tread on top and press down firmly. Nail the tread from the side and top to secure it. Make sure nails are flush with the wood surface.
Ensuring A Tight Fit And Alignment
Check that risers and treads meet without gaps. Use a rubber mallet to tap pieces gently into place. Sand edges lightly if needed for a perfect fit. Use a level to keep stairs even and aligned. Tight joints prevent movement and noise later on. Clean any glue spills immediately for a neat finish.
Finishing Touches For A Polished Look
Finishing touches make your stair remodel look complete and professional. These steps improve the wood’s feel and appearance. They also protect your stairs from daily wear and tear. Taking time to finish properly ensures your stairs stay beautiful longer.
Sanding And Smoothing Edges
Start by sanding the stairs with fine-grit sandpaper. Sand all surfaces until they feel smooth to touch. Pay close attention to edges and corners. Smooth edges prevent splinters and give a clean look. Remove dust with a damp cloth before moving on.
Applying Stain Or Paint
Choose a stain or paint that matches your room’s style. Apply it evenly using a brush or roller. Follow the wood grain for best results. Let the first coat dry completely. Add a second coat for deeper color and coverage. This step enhances the wood’s natural beauty or adds a fresh look.
Sealing For Durability
Seal the wood with a clear polyurethane or varnish. This layer protects against scratches and moisture. Apply two to three thin coats for strong protection. Allow each coat to dry before applying the next. Sealing keeps your stairs looking new for years.

Credit: www.youtube.com
Maintaining Wooden Stairs
Wooden stairs add beauty and warmth to any home. Keeping them in good shape takes some effort. Proper care helps your stairs stay strong and look great for years. Regular attention prevents costly repairs and keeps the wood shining.
Regular Cleaning Tips
Dust and dirt can scratch wooden stairs. Sweep or vacuum stairs often to remove debris. Use a soft broom or vacuum with a brush attachment. Clean spills quickly using a damp cloth. Avoid soaking the wood. Use wood-friendly cleaners to keep the finish bright. Dry the stairs after cleaning to stop water damage.
Preventing Scratches And Damage
Place mats or rugs at stair entrances to catch dirt. Avoid walking on stairs with sharp or hard objects on feet. Nail or felt pads under furniture near stairs protect wood. Keep pets’ nails trimmed to prevent scratches. Repair loose or damaged stair treads quickly to stop more damage. Avoid dragging heavy items on stairs.
When To Refinish Or Repair
Watch for dull or worn finish on the stairs. Scratches and stains that cleaning can’t fix need refinishing. Check for loose boards or creaks that need repair. Sanding and applying a fresh finish brings life back to wood. Large cracks or breaks require professional help. Regular checks help catch problems early.
Credit: www.homelight.com
Frequently Asked Questions
How Do I Remove Carpet From Stairs Safely?
Start by pulling up the carpet from the top step. Use pliers to remove staples or nails holding the carpet. Work slowly to avoid damaging the wood underneath.
What Tools Are Needed To Install Wood Stairs?
You will need a pry bar, hammer, measuring tape, saw, wood glue, and nails. Sandpaper and a finish like stain or paint are also helpful. These tools help create a smooth and sturdy wood surface.
Can I Install Wood Stairs Over Existing Stairs?
No, the old carpet and padding must be removed first. Clean the stair surface before installing wood for best results. This ensures a flat, stable base for the new wood.
How Long Does It Take To Remodel Carpeted Stairs To Wood?
It usually takes 2 to 3 days for an average staircase. Drying time for paint or stain can add extra hours. Planning ahead helps complete the project smoothly.
What Type Of Wood Is Best For Stairs?
Hardwoods like oak, maple, or cherry work best for durability. They resist wear and look attractive over time. Choose a wood that matches your home style and budget.
Conclusion
Remodeling stairs from carpet to wood adds a fresh, clean look to any home. Wooden stairs are easier to clean and last longer. The project takes patience but gives great results. Choose the right wood and tools for the best finish.
Follow safety steps to avoid accidents. Enjoy the new style and feel beneath your feet. Your home will feel brighter and more open. A simple change can make a big difference. Start small, take your time, and enjoy the process.