
Do you love the look of white oak but have red oak on hand? You’re not alone.
Many people want that clean, bright white oak appearance but don’t want to buy new wood or spend a fortune. What if you could transform your red oak to look just like white oak? It’s easier than you think. You’ll discover simple, effective steps to change the color and finish of your red oak.
By the end, you’ll have a stunning, fresh look that fits your style perfectly. Keep reading to learn how to make your red oak look like white oak—your space will thank you.

Credit: aloprofile.com
Choosing The Right Red Oak
Choosing the right red oak is key to making it look like white oak. The wood’s quality and grain affect the final look. Picking the best pieces helps you get closer to the white oak style. Focus on the wood’s texture and patterns for the best results.
Selecting Quality Wood
Start with solid, well-dried red oak. Avoid wood with cracks or knots. Smooth boards with even coloring work best. Freshly cut wood can warp or shrink. A stable, dry board lasts longer and finishes better. Quality wood takes stains and finishes evenly.
Identifying Grain Patterns
Red oak has a strong grain, but some pieces are softer. Look for straight grain with fewer swirls. White oak grain is finer and more uniform. Choose red oak boards with tighter grain lines. This helps the wood look closer to white oak after finishing. Grain affects how stains show up on the wood.

Credit: www.reddit.com
Preparing The Surface
Preparing the surface is the first step to make red oak look like white oak. This process helps the wood absorb stains and finishes evenly. It also removes any imperfections and old coatings. Proper preparation ensures a smooth and clean base for the transformation.
Taking time on this step will improve the final look and durability of your wood. It also prevents blotches and uneven coloring. Focus on sanding and cleaning to get the best results.
Sanding Techniques
Start sanding with medium-grit sandpaper, around 120 grit. Sand along the grain of the wood. This removes the rough outer layer and opens the wood pores. Avoid sanding across the grain to prevent scratches.
Finish with fine-grit sandpaper, about 220 grit. This smooths the surface and prepares it for staining. Use light, even pressure for a consistent finish. Wipe the dust away between sanding steps.
Cleaning And Dust Removal
After sanding, clean the surface thoroughly. Use a vacuum or a brush to remove large dust particles. Follow with a tack cloth to pick up fine dust.
Make sure the wood is completely dust-free before applying stain. Dust can cause uneven color and rough texture. A clean surface helps the stain soak in evenly and look natural.
Lightening The Red Oak
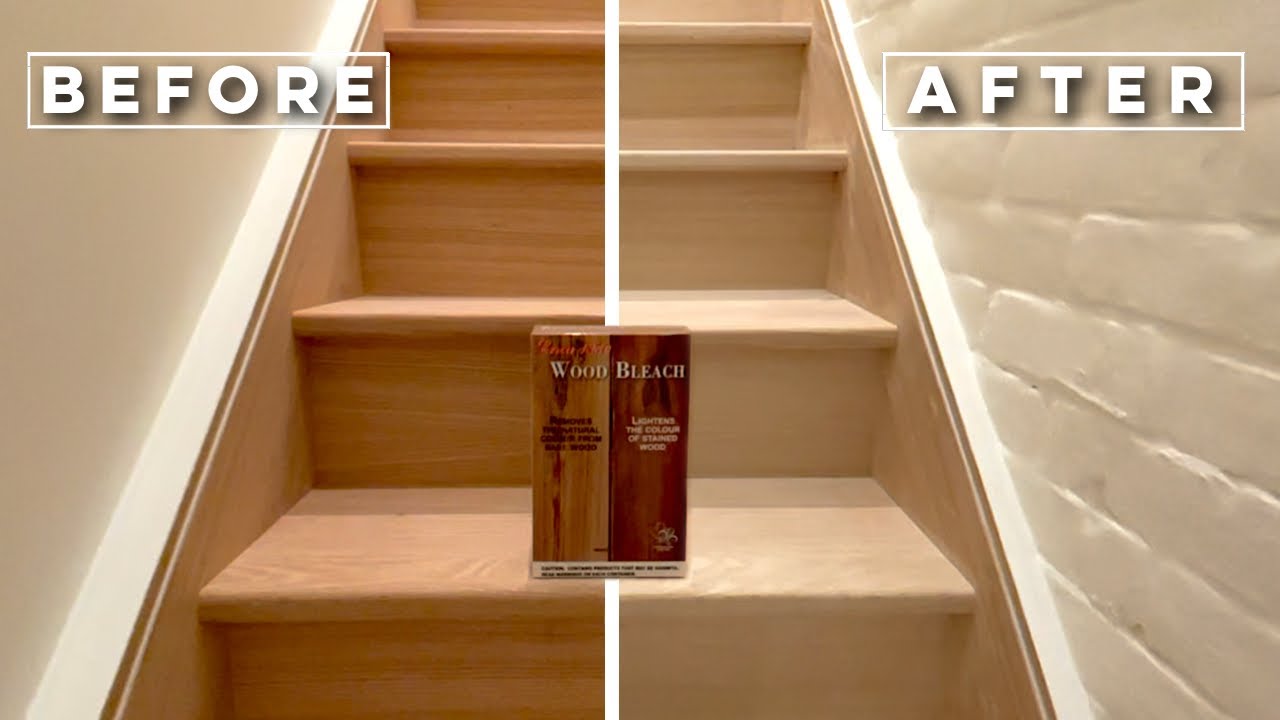
Lightening red oak is the first step to make it resemble white oak. Red oak has a reddish tint that is hard to hide. To achieve a lighter, more neutral tone, you must treat the wood carefully. The process needs patience and the right materials. Two main techniques help to brighten red oak: bleaching and using wood conditioners. Both methods change the wood’s color and prepare it for finishing.
Bleaching Methods
Bleaching is a popular way to lighten red oak. It removes the red pigments and brightens the wood. Use a wood bleach made for hardwoods. Apply it evenly with a brush or cloth. Let the bleach sit for the time recommended on the package. Rinse the wood well and allow it to dry fully. Sometimes, multiple bleaching sessions are needed for the best result.
Test the bleach on a small wood piece first. This avoids surprises on the main surface. Bleaching can make the wood look pale and close to white oak. It also opens the grain, helping stains and finishes absorb better later.
Using Wood Conditioners
Wood conditioners help even out the color after bleaching. Red oak tends to absorb stain unevenly. A conditioner seals the wood’s grain and prevents blotchy spots. Apply the conditioner before staining or finishing. Follow product instructions for drying times. This step improves the final look and gives a smoother finish.
Conditioners also protect the wood and keep it from soaking up too much stain. This control helps maintain a light tone similar to white oak. Use a quality conditioner designed for oak species for best results.
Applying White Oak Stains
Applying white oak stains is a key step to change red oak’s look. This process helps mimic the lighter, cooler tones of white oak. Staining also hides red oak’s natural reddish hues. It brings a fresh and modern appearance to your wood.
Choosing the right stain and applying it correctly makes all the difference. Follow the right steps for a smooth, even finish. The goal is to achieve the classic white oak color on red oak surfaces.
Choosing The Perfect Stain Color
Pick a stain with grey, beige, or light brown tones. These shades match white oak’s natural color. Avoid stains with red or orange tones. They will highlight red oak’s original color instead.
Test the stain on a small wood piece first. This helps see how it changes the wood color. Check the shade after the stain dries. Adjust your choice if the color looks too dark or too warm.
Proper Stain Application
Start with sanding the red oak smooth. Use fine-grit sandpaper for the best result. Wipe away all dust before staining. Dust can cause blotches and uneven color.
Apply the stain with a clean cloth or brush. Work in the direction of the wood grain. Use thin, even coats to avoid streaks. Let each coat dry completely before adding another.
Wipe off excess stain after a few minutes. This prevents dark patches and blotchy areas. Repeat the process for deeper color. Finish with a clear topcoat to protect your work.
Enhancing The White Oak Look
Enhancing the white oak look on red oak requires careful steps. Red oak has a reddish tone and strong grain. White oak shows a lighter, more subtle grain and color. To change red oak’s appearance, use the right techniques. These will soften the color and highlight the grain like white oak.
Simple methods include using glazes, finishes, and white wash. These improve the wood’s texture and tone. The goal is a natural, light, and even look. Below are two easy ways to achieve this effect.
Using Glazes And Finishes
Glazes add color and depth to red oak. Choose a light gray or white glaze. Apply it thinly to avoid hiding the grain. The glaze will tone down the red hues. It also evens out the wood’s natural color differences.
After glazing, use a clear finish. A matte or satin finish works best. It keeps the natural look of the wood. Avoid glossy finishes. They can make the wood look fake or shiny.
Highlighting Grain With White Wash
White washing is a simple way to brighten red oak. Use watered-down white paint or stain. Brush it lightly over the wood surface. Wipe off the excess with a cloth. This lets the grain show through.
White wash softens the red tone. It creates the pale look of white oak. Several coats may be needed for the right shade. Let each coat dry before adding the next. The result is a gentle, natural grain highlight.
Maintaining The Finish
Keeping the finish on your red oak looking like white oak takes some care. Regular maintenance helps preserve the color and protects the wood. A clean surface lets the finish last longer and keeps the wood healthy. Follow simple steps to maintain the look you worked hard to create.
Cleaning Tips
Dust the surface often with a soft cloth. Avoid rough materials that can scratch the finish. For dirt or stains, use a damp cloth and mild soap. Do not soak the wood. Dry it quickly with a clean towel. Avoid harsh chemicals or abrasive cleaners. These can damage the finish and change the color. Clean spills right away to prevent stains.
Reapplying Finish
Over time, the finish may wear down. This can dull the look of your white oak finish. Lightly sand the surface with fine-grit sandpaper before reapplying. Use a finish that matches your original coat. Apply thin, even layers to avoid streaks. Let each coat dry fully before adding the next. This keeps the wood protected and looking fresh. Reapply finish every few years or as needed.
Credit: www.youtube.com
Frequently Asked Questions
How Can I Change Red Oak To Look Like White Oak?
You can use wood stains and finishes to lighten red oak’s color. Sand the wood first, then apply a white or light gray stain for a white oak look.
What Type Of Stain Works Best For Red Oak Transformation?
Water-based or gel stains in white or light gray shades work well. These stains soak evenly and help mimic white oak’s pale tone.
Should I Sand Red Oak Before Staining It White?
Yes, sanding removes the red oak’s natural finish and opens wood pores. This helps the stain absorb better and look more even.
Can I Use Whitewash To Make Red Oak Look Like White Oak?
Whitewashing is a good option for a soft, white look. It adds a thin layer of white paint that lets wood grain show through.
How Long Does It Take For Red Oak To Look Like White Oak?
The process usually takes a few hours, including sanding and drying. Stain drying times vary but expect about 4 to 6 hours before finishing.
Conclusion
Transforming red oak to look like white oak takes patience and care. Choose the right stain and prepare the wood properly. Apply the stain evenly for the best effect. Sand between coats to keep the surface smooth. Take your time and follow each step closely.
The final result will bring a fresh, light look to your red oak. Enjoy the new style without buying new wood. Small changes make a big difference. Give your project a chance to shine.