
Are you looking to give your cabinets a fresh, stylish update without spending a fortune? Installing cane webbing on your cabinet doors is a simple way to add charm and a touch of vintage flair to any room.
But if you’ve never worked with cane before, the idea might feel a bit overwhelming. Don’t worry—you’re about to discover an easy, step-by-step method that anyone can follow. Keep reading, and you’ll learn exactly how to transform your cabinets into eye-catching pieces that make your space feel warm and inviting.
Your next DIY project just got a whole lot easier!
Materials And Tools Needed
Before starting your cane webbing project, gather all necessary materials and tools. This step saves time and helps avoid interruptions. Proper preparation ensures a smooth installation process and better results.
Types Of Cane Webbing
Cane webbing comes in different styles and sizes. Choose open weave for a classic look. Closed weave offers more privacy and durability. Natural cane is flexible and easy to work with. Synthetic cane lasts longer and resists moisture. Pick the type that fits your cabinet style and needs.
Essential Tools
You will need basic tools for installation. A staple gun or small nails secure the cane to the door frame. Scissors or a utility knife cut the webbing to size. A measuring tape ensures precise cuts. A flathead screwdriver helps remove old panels. Sandpaper smooths rough edges for a neat finish.
Preparing Your Workspace
Clear a large, flat surface to work on. Good lighting helps you see details clearly. Lay down a drop cloth to protect surfaces. Organize your tools within easy reach. Keep extra materials nearby for quick access. A tidy space makes the project faster and safer.

Credit: hhperkins.com
Preparing Cabinet Doors
Preparing cabinet doors is a key step before installing cane webbing. This phase ensures the surface is ready for a smooth and lasting finish. Proper preparation helps the cane webbing fit perfectly and look neat.
Removing Existing Panels
Start by taking out the old panels from the cabinet doors. Use a screwdriver or a small pry bar carefully. Avoid damaging the frame while removing the panels. Keep the screws and hardware safe for reuse.
Cleaning And Sanding Surfaces
Clean the door frames thoroughly to remove dust and dirt. Use a damp cloth and mild cleaner for best results. After cleaning, sand the surfaces lightly with fine-grit sandpaper. This step smooths rough edges and helps the glue stick better.
Measuring For Cane Webbing
Measure the opening where the cane webbing will go. Take the width and height accurately with a tape measure. Add a small extra margin for trimming. Correct measurements prevent gaps and ensure a tight fit.
Cutting And Fitting Cane Webbing
Cutting and fitting cane webbing is a key step in updating cabinet doors. It requires precision and care to ensure a neat, secure fit. Taking your time during this process helps avoid mistakes and achieves a professional look.
Measure carefully and cut the cane strips to fit the frame. Proper fitting is essential to keep the webbing tight and smooth. Adjusting the webbing for the right tension will make your cabinets look polished and durable.
Measuring And Cutting Cane Strips
Start by measuring the inside of the cabinet door frame. Measure each side to get the exact length for the cane strips. Use a ruler or tape measure for accuracy. Mark the cane webbing with a pencil before cutting.
Cut the cane strips with sharp scissors or a utility knife. Cut slowly to avoid splintering or tearing the cane. Cut each strip a little longer than the frame size for easier fitting.
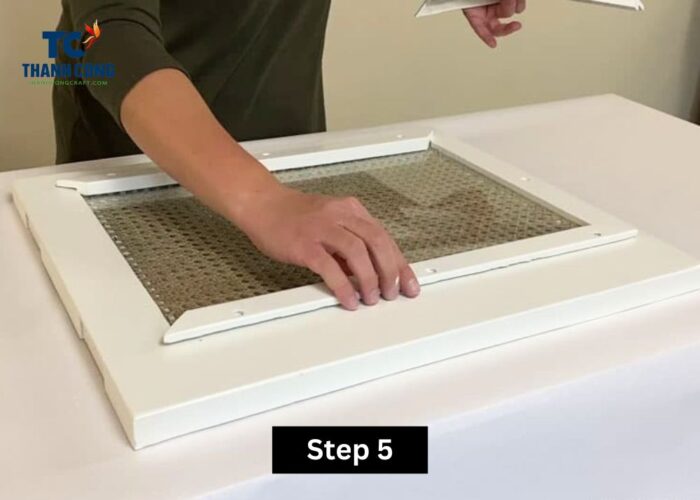
Fitting Webbing To Frame
Place the cane strips inside the door frame carefully. Begin with one side and press the webbing into place. Use a flat tool or your fingers to push the cane into the grooves or channels of the frame.
Work your way around the frame, fitting each strip snugly next to the last. Make sure the cane lies flat without wrinkles or bubbles. Use small nails or staples if needed to secure the ends.
Adjusting For Tightness
Check the tension of the cane webbing by pressing gently on the surface. The webbing should be firm but not overly tight. If loose, remove and reposition the strip, pulling it slightly tighter before securing.
Keep the cane webbing even to avoid sagging over time. Tight webbing lasts longer and improves the cabinet’s appearance. Trim any excess cane at the edges for a clean finish.
Securing Cane Webbing
Securing cane webbing to cabinet doors is a key step in the installation process. It keeps the webbing tight and in place. A well-secured webbing looks neat and lasts longer.
This section explains easy ways to attach cane webbing. It covers using glue, staples, and tacking. It also shows how to make the surface smooth and clean.
Using Adhesive Or Staples
Adhesive is a strong and invisible way to fix cane webbing. Use wood glue or contact cement for best results. Apply glue evenly on the door frame edges. Press the webbing gently but firmly on the glue.
Staples work well for quick and secure attachment. Use a staple gun with small staples. Place staples about every inch around the frame. Be careful not to tear the webbing with the staples.
Tacking Webbing To Frame
Tacking means pinning the webbing using small nails or brads. Use a hammer and tiny nails for this method. Push the webbing tightly against the frame. Then, tap the nails just enough to hold it without damage.
Start tacking from the center of one side. Move outwards to keep the webbing even. Repeat on all sides. Check for any loose spots and tack them securely.
Ensuring A Smooth Finish
Check the webbing surface for bumps or wrinkles. Smooth out any folds by pressing firmly. Trim extra webbing with sharp scissors close to the frame edge.
Use sandpaper lightly on the frame edges to avoid rough spots. This makes the finish clean and safe to touch. A smooth finish improves the overall look of your cabinet doors.
Finishing Touches
Finishing touches make your cane webbing look neat and last longer. This step ensures the project looks professional and holds up well over time.
Trimming, sealing, and reattaching complete the process smoothly.
Trimming Excess Material
Cut the extra cane webbing carefully with sharp scissors. Leave a small margin to avoid fraying later. Trim close to the frame edges without damaging the cane. Smooth edges prevent rough spots and give a clean look.
Applying Protective Coatings
Use a clear varnish or sealant made for wood and cane. Apply thin layers evenly with a brush. Protective coating guards against moisture and dirt. Let each layer dry fully before adding the next. This step keeps the cane strong and shiny.
Reattaching Cabinet Doors
Attach the doors back to the cabinet using the original hinges. Check that the doors open and close smoothly. Tighten all screws for a secure fit. Clean the cabinet surface to remove dust and fingerprints. Your cabinet now looks fresh and stylish.
Common Mistakes To Avoid
Installing cane webbing on cabinet doors can be a rewarding project. Avoiding common mistakes makes the process smoother. These errors can cause frustration and waste materials. Understanding these pitfalls helps achieve a clean, professional look.
Improper Measurements
Measuring incorrectly is a top cause of problems. Cut the cane webbing too small, and it won’t fit. Cut it too large, and it will bunch or wrinkle. Always measure twice before cutting. Use a tape measure and note exact dimensions. Leave a small margin for adjustments.
Loose Webbing Issues
Loose webbing looks sloppy and can fall out. Pull the cane tight when attaching it to the frame. Use a staple gun or small tacks to secure the edges firmly. Check tension often during installation. Tight webbing holds its shape and lasts longer.
Damaging Cane During Installation
Cane webbing is delicate and can tear easily. Avoid sharp tools near the cane surface. Handle the material gently to prevent cracks or holes. Do not stretch cane too hard; it may break. Take your time to keep the webbing intact and beautiful.
Maintenance Tips For Cane Webbing
Caring for cane webbing on cabinet doors is important. Proper maintenance keeps it looking fresh and strong. Small efforts can prevent damage and extend its life. Follow simple steps to keep your cane webbing in great shape.
Cleaning And Dusting
Dust cane webbing often using a soft cloth or brush. Avoid harsh chemicals; they can weaken the fibers. A vacuum with a brush attachment works well for deep cleaning. Wipe gently to avoid damaging the weave. Clean spills quickly with a damp cloth. Let it dry completely to stop mold growth.
Repairing Small Tears
Fix small tears right away to prevent bigger damage. Use clear wood glue on loose strands carefully. Press the strands back into place and hold until dry. For larger tears, replace the damaged section or call a professional. Quick repairs keep webbing strong and neat.
Extending Webbing Life
Keep cane webbing away from direct sunlight to avoid fading. Maintain stable humidity to stop cracking or shrinking. Avoid heavy pressure or sharp objects on the surface. Regularly check the condition for early signs of wear. Taking these steps helps cane webbing last longer.
Credit: thanhcongcraft.com

Credit: www.rockler.com
Frequently Asked Questions
What Tools Do I Need To Install Cane Webbing On Cabinet Doors?
You will need cane webbing, a utility knife, wood glue, a spline or reed, a hammer, and a measuring tape. These basic tools help ensure a smooth installation process.
How Do I Measure Cane Webbing For Cabinet Doors?
Measure the inside frame of the cabinet door where the cane webbing will go. Add an extra inch for trimming to get a perfect fit.
Can I Install Cane Webbing On Any Type Of Cabinet Door?
Cane webbing works best on cabinet doors with a recessed panel or frame. Flat doors may need extra support to hold the webbing securely.
How Do I Secure Cane Webbing To Cabinet Doors?
Apply wood glue around the frame groove, press the cane webbing into place, then insert a spline or reed to hold it tight. Let it dry completely.
How Do I Maintain And Clean Cane Webbing On Cabinets?
Use a soft brush or vacuum to remove dust regularly. Clean with a damp cloth and mild soap to keep it fresh and strong.
Conclusion
Installing cane webbing on cabinet doors adds a fresh, natural look. The process is simple and can update old furniture easily. Take your time to measure and cut carefully. Secure the webbing tightly for a neat finish. This project can improve your space without much cost or effort.
Enjoy the unique style and texture that cane brings. Try it yourself and see how it changes your cabinets. Small changes make a big difference in home decor.