
Cutting angles with a circular saw might sound tricky, but with the right tips, you can do it confidently and accurately. If you’ve ever struggled to get clean, precise angled cuts, this guide is made just for you.
You’ll learn simple steps that save time and reduce mistakes, even if you’re new to using power tools. Keep reading to discover how to turn your circular saw into a powerful tool for perfect angled cuts every time. Your next project just got a whole lot easier.
Choosing The Right Blade
Choosing the right blade for your circular saw is key to cutting clean and accurate angles. The blade affects the smoothness and precision of your cut. A good blade reduces tear-out and helps you work faster. Understand the types of blades and their features to pick the best one for your project.
Blade Types For Angle Cuts
Different blades suit different materials and cuts. Carbide-tipped blades work well for wood. They last longer and stay sharp. Fine-toothed blades give smoother cuts. They reduce splintering on angled cuts. For plywood or laminate, use blades designed to minimize chipping. Avoid blades with fewer teeth for angle cuts as they can cause rough edges.
Blade Size And Teeth Count
Blade size matters for depth and control. Most circular saws use 7-1/4 inch blades. Larger blades cut deeper but may be harder to control. Teeth count affects cut quality. Blades with 60 to 80 teeth give cleaner cuts on angles. Fewer teeth cut faster but rougher. Choose a blade with more teeth for smooth, precise angle cuts.
:max_bytes(150000):strip_icc()/100598714-6c99ed630b3a4cb7a0284dca7d8c1f4b.jpg)
Credit: www.woodmagazine.com
Preparing Your Workspace
Preparing your workspace is essential before cutting angles with a circular saw. A well-organized area helps you work safely and precisely. It lowers the chance of mistakes and accidents. Taking time to set up can save you effort later.
Setting Up A Stable Surface
Start by finding a flat, stable surface to work on. Use a sturdy workbench or sawhorses. Avoid uneven or shaky tables. Secure your wood piece with clamps to stop movement. This holds the wood steady during cutting. A steady surface ensures cleaner, safer cuts.
Marking Accurate Angle Lines
Mark the angle lines clearly on the wood. Use a protractor or angle finder for exact measurements. Draw lines with a pencil or marker that you can see well. Double-check the angle marks before cutting. Accurate lines guide your saw and improve the final cut.
Adjusting The Saw For Angled Cuts
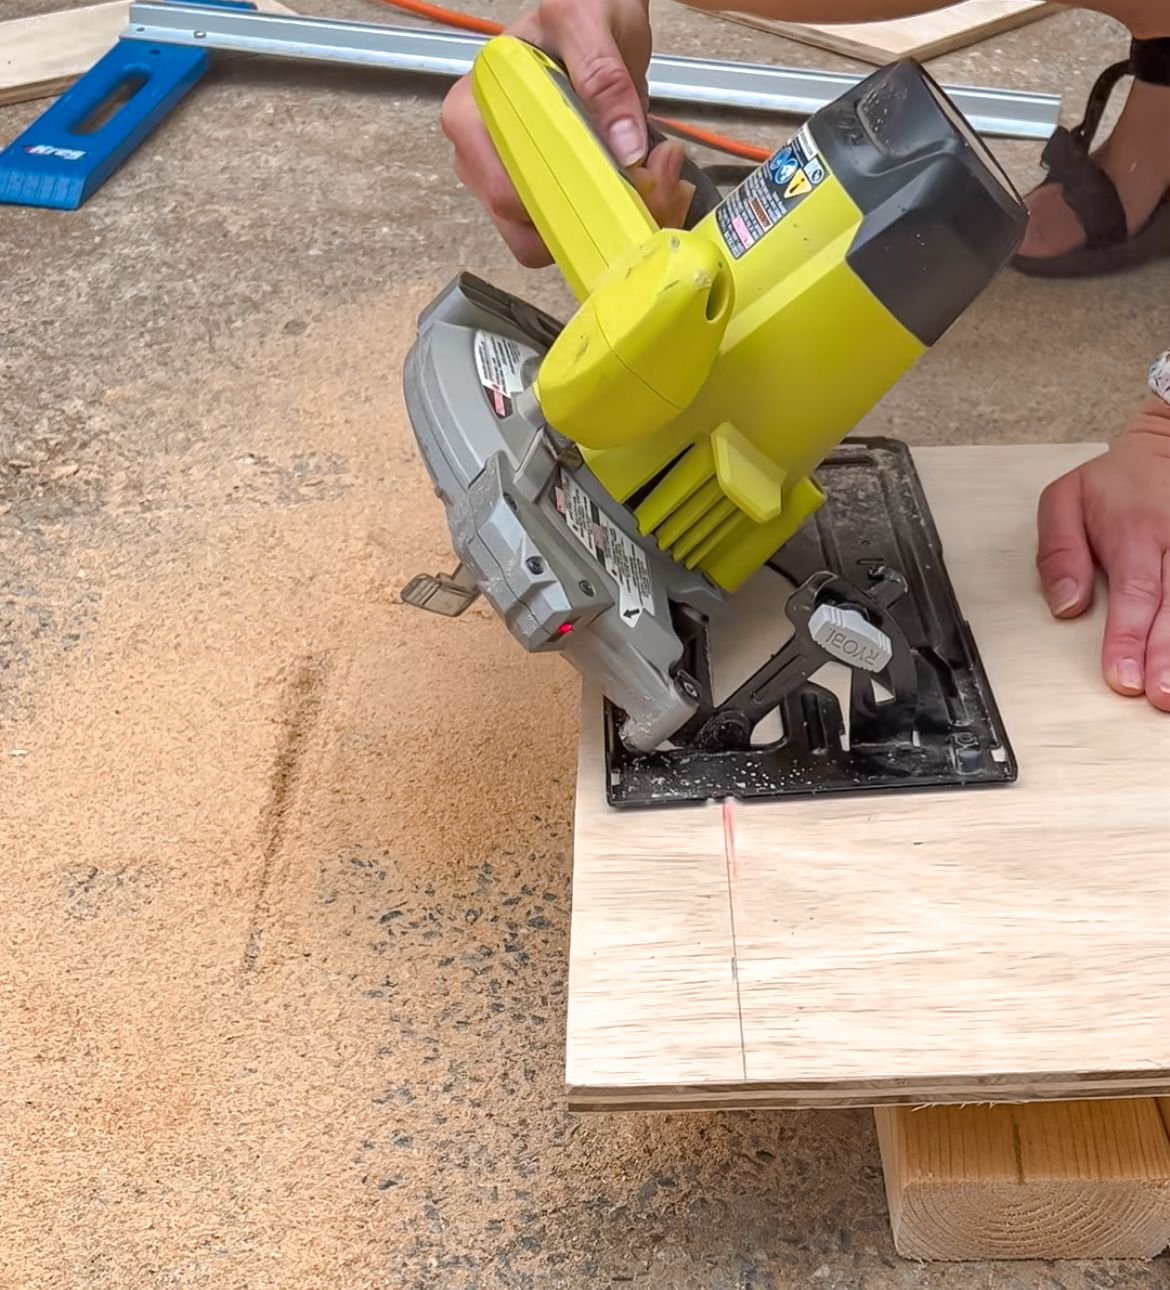
Adjusting the saw for angled cuts is an important step for accurate results. It changes the blade’s tilt to cut wood at the right angle. This adjustment helps create clean, precise edges for projects like frames or trim work.
Knowing how to set and lock the bevel angle ensures safety and accuracy. It also saves time by avoiding mistakes and rework. Below are simple steps to adjust your circular saw for angled cuts.
Setting The Bevel Angle
Start by unplugging the saw or removing the battery. Find the bevel adjustment knob or lever near the blade guard. Loosen it gently to allow the base plate to tilt.
Use the bevel scale marked on the saw’s base. Slide the base plate to the desired angle, usually between 0 and 45 degrees. Double-check the angle with a protractor for more precision.
Tighten the adjustment knob slightly to hold the angle. Make sure the base plate moves smoothly without resistance. Test the angle by sighting along the blade edge.
Locking The Saw In Place
Once the angle is set, lock the saw firmly. Tighten the bevel adjustment knob or lever fully. This prevents the base plate from shifting during the cut.
Check the stability by trying to move the base plate. It should feel secure and not wobble. A locked saw ensures safer cuts and consistent angles.
Before cutting, do a test cut on scrap wood. Confirm the angle is correct and the saw is locked properly. Adjust again if needed for the best results.
Techniques For Precise Angle Cuts
Cutting angles with a circular saw requires focus and steady hands. Precise angle cuts give your project a clean, professional look. Using the right techniques helps avoid mistakes and saves wood. Follow these tips to improve your accuracy and confidence.
Using Guide Tools
Guide tools keep your saw steady and straight. Use a speed square or an adjustable angle guide. Place the guide on your wood to mark the cut line. Clamp the guide firmly so it does not move. Run the saw along the guide edge for a clean cut. This method reduces errors and keeps your angles exact.
Controlling The Saw Movement
Hold the saw with a firm but relaxed grip. Start the saw before touching the wood. Push the saw forward slowly and steadily. Avoid forcing the blade; let it cut naturally. Keep your body balanced and your eyes on the line. Smooth movement results in cleaner, more precise cuts every time.
Safety Tips During Angle Cutting
Cutting angles with a circular saw requires careful attention to safety. This task can be risky without the right precautions. Protecting yourself helps prevent accidents and injuries. Follow these safety tips to work confidently and safely.
Wearing Protective Gear
Always wear safety glasses to shield your eyes from dust and debris. Use ear protection to reduce noise damage. Wear gloves to protect your hands from splinters and the saw blade. Avoid loose clothing that can catch on the saw. Proper footwear helps keep your feet safe and steady.
Avoiding Kickback
Kickback happens when the saw blade catches the wood and suddenly jumps back. Hold the saw firmly with both hands to control it. Keep the blade sharp to reduce the chance of kickback. Do not force the saw; let it cut at its own pace. Always stand to the side of the saw, not directly behind it.

Credit: www.youtube.com
Common Mistakes To Avoid
Cutting angles with a circular saw can be tricky. Many beginners make simple mistakes that affect the cut quality. Avoid these errors to get clean, precise angles every time. Focus on accuracy and patience to improve your work.
Incorrect Angle Settings
Setting the wrong angle is a common error. Double-check your saw’s bevel or miter angle before cutting. A small mistake here changes the whole cut. Use a reliable angle guide or protractor to confirm settings. Precision here saves time and material.
Rushing The Cut
Cutting too fast leads to rough, uneven edges. Take your time and let the saw do the work. Push the saw steadily and smoothly along the cut line. Rushing increases the chance of mistakes and accidents. Slow, controlled cuts produce better results and keep you safe.
Finishing Touches After Cutting
After cutting angles with a circular saw, the work is not quite finished. Small details matter for a clean and precise look. Finishing touches improve the appearance and safety of your project. Taking time for these steps ensures better results and satisfaction.
Sanding Rough Edges
Cut edges often feel rough or splintered. Sanding smooths these edges for a safer, cleaner finish. Use medium-grit sandpaper first to remove large splinters. Follow with fine-grit sandpaper for a smooth surface. Sand along the angle to keep the shape sharp. Take your time and check the edges by touch. Smooth edges prevent injuries and improve the look of your work.
Checking The Cut Accuracy
Accuracy is key after cutting angles. Use a protractor or angle finder to check the cut angle. Compare your cut against the project’s required angle. Check both sides to confirm the cut is even. Small mistakes can cause problems in assembly. Measure twice to ensure the cut fits perfectly. Correct any errors early to avoid wasting material. Accurate cuts lead to stronger, neater projects.
Credit: breezingthrough.com
Frequently Asked Questions
How Do I Set The Angle On A Circular Saw?
Most circular saws have an adjustable base plate with angle markings. Loosen the base lever, tilt to the needed angle, then tighten it securely. Double-check the angle before cutting.
What Safety Tips Should I Follow When Cutting Angles?
Wear safety goggles and keep hands clear of the blade path. Secure the wood firmly to avoid movement. Always cut slowly and steadily for better control.
Can I Cut A Perfect 45-degree Angle With A Circular Saw?
Yes, you can. Adjust the saw base to 45 degrees using the angle guide. Practice on scrap wood to ensure accuracy before cutting your project.
How Do I Prevent The Wood From Splintering While Cutting Angles?
Use painter’s tape along the cut line to reduce splintering. Cut with the finished side facing down for cleaner edges. Also, make a shallow scoring cut first.
What Blade Type Is Best For Angled Cuts On Wood?
A fine-tooth blade with at least 40 teeth is ideal. It makes smoother cuts with less tearing. Avoid using rough blades to maintain clean angled edges.
Conclusion
Cutting angles with a circular saw is simple with practice. Measure and mark your angles clearly before cutting. Keep the saw steady and follow the guide carefully. Always wear safety gear to protect yourself. Taking time and working slowly helps prevent mistakes.
Soon, you will feel more confident with angled cuts. Enjoy creating precise, clean edges on your projects. Practice is key to improving your skills. Don’t rush—accuracy matters more than speed. Your projects will look better with neat angle cuts. Keep these tips in mind for safe, smooth work.