
Installing wood fence panels on uneven ground can feel like a tough challenge. You might worry about gaps, wobbly posts, or a fence that just doesn’t look right.
But what if you could learn simple, effective steps to make your fence sturdy and beautiful, no matter how tricky your yard is? In this guide, you’ll discover easy techniques that save you time and money, while giving your fence a professional finish.
Keep reading, and you’ll gain the confidence to tackle uneven ground like a pro. Your perfect fence is closer than you think!
Credit: fenceall.com
Choosing The Right Fence Panels
Choosing the right fence panels is essential for uneven ground. The right panels make installation easier and improve the fence’s look. Consider the type, size, style, and material before buying. This helps the fence fit the land and last longer.
Types Of Wood Panels
Wood fence panels come in several types. Closeboard panels have vertical boards that overlap. This style offers good privacy. Picket panels have spaced boards, creating a classic look. Lattice panels add decoration with crisscross patterns. Choose a type that suits your yard and needs.
Panel Size And Style Options
Panels come in different sizes. Taller panels give more privacy but need strong support. Shorter panels are easier to handle on slopes. Styles vary from simple flat tops to decorative scalloped edges. Pick a size and style that fits your yard shape and fence purpose.
Materials For Durability
Wood panels must resist weather and pests. Cedar and redwood are naturally strong and resist rot. Pressure-treated pine is affordable and lasts well with treatment. Check the wood’s grade and treatment to ensure long life. Durable materials reduce repair costs and keep your fence looking good.
Credit: barrierbossusa.com
Preparing The Uneven Ground
Preparing uneven ground is a key step before installing wood fence panels. It ensures your fence looks good and stays strong over time. This process takes time and effort but saves problems later.
Start by checking the land carefully. Then clear the area and make it as flat as possible. Marking the fence lines clearly helps guide the installation. Each step makes the job easier and the fence better.
Assessing The Terrain
Walk along the planned fence path. Look for hills, dips, and slopes. Note any rocks or roots that block the way. Measure the height difference across the area. This helps decide how to adjust the fence panels.
Check soil type too. Soft soil may need extra support. Hard or rocky soil can be tough to dig. Understanding the terrain guides your tools and materials.
Clearing And Leveling Tips
Remove grass, weeds, and debris from the fence path. Use a shovel or hoe to dig out roots and rocks. Level the soil by filling low spots with dirt. Compact the soil by stepping or using a tamper.
Cut away small slopes with a spade to create flat sections. For big slopes, consider building steps or a retaining wall. Keep the ground firm to prevent fence panels from leaning later.
Marking Fence Lines
Use stakes to mark the corners and ends of the fence. Stretch a string tightly between stakes to show the fence line. Check the string for straightness and adjust as needed. Mark spots for posts along the line evenly.
Marking helps keep panels aligned on uneven ground. It also speeds up digging post holes in the right places. Clear, visible lines reduce mistakes during installation.
Tools And Materials Needed
Installing wood fence panels on uneven ground needs the right tools and materials. This helps make the job easier and the fence stronger. Preparing before starting saves time and avoids mistakes. Below is a clear list of what you will need.
Essential Tools List
- Post hole digger for digging fence post holes
- Spirit level to keep posts and panels straight
- Measuring tape for accurate measurements
- Hammer or nail gun to fix panels in place
- Saw to cut panels or posts if needed
- Drill with screwdriver bits for screws
- String line to mark a straight fence line
- Shovel for moving dirt and leveling ground
- Adjustable wrench for tightening bolts
Recommended Materials
- Wood fence panels designed for outdoor use
- Treated wooden posts resistant to rot and insects
- Concrete mix for securing posts firmly in the ground
- Galvanized nails or screws to prevent rust
- Gravel for drainage at the base of each post
- Wood stain or paint to protect and finish the fence
- Metal post brackets if extra support is needed
Safety Equipment
- Work gloves to protect your hands from splinters
- Safety goggles to guard eyes from dust and debris
- Hearing protection when using loud tools
- Dust mask to avoid inhaling dirt or sawdust
- Sturdy boots for stable footing on uneven ground
- Long sleeves and pants to protect your skin
Installing Fence Posts On Slopes
Installing fence posts on slopes requires careful planning. Uneven ground makes it tricky to keep posts straight and stable. Proper techniques help maintain fence strength and appearance. Follow these steps for solid post installation on sloped land.
Post Hole Digging Techniques
Dig holes deeper on the lower side of the slope. This balances the post height with the ground level. Use a post hole digger or auger to make clean, straight holes. Make holes about three times the post width for good support. Check the hole depth with a measuring tape to keep posts even.
Adjusting Post Depths
Set posts deeper on the downhill side to match the slope. This prevents leaning and keeps the fence level. Mark each post with a depth guide before placing it. Use a level to check the vertical position. Adjust the depth as needed to ensure posts stand straight.
Using Concrete For Stability
Mix concrete to a thick, workable consistency. Pour concrete around each post to hold it firmly. Fill the hole halfway, then tamp the concrete to remove air pockets. Add more concrete until the hole is full. Let concrete cure for at least 24 hours before attaching fence panels.
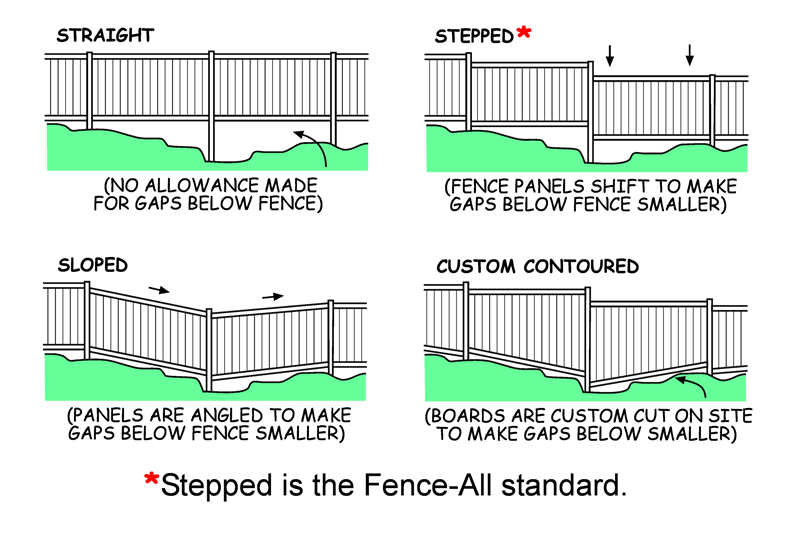
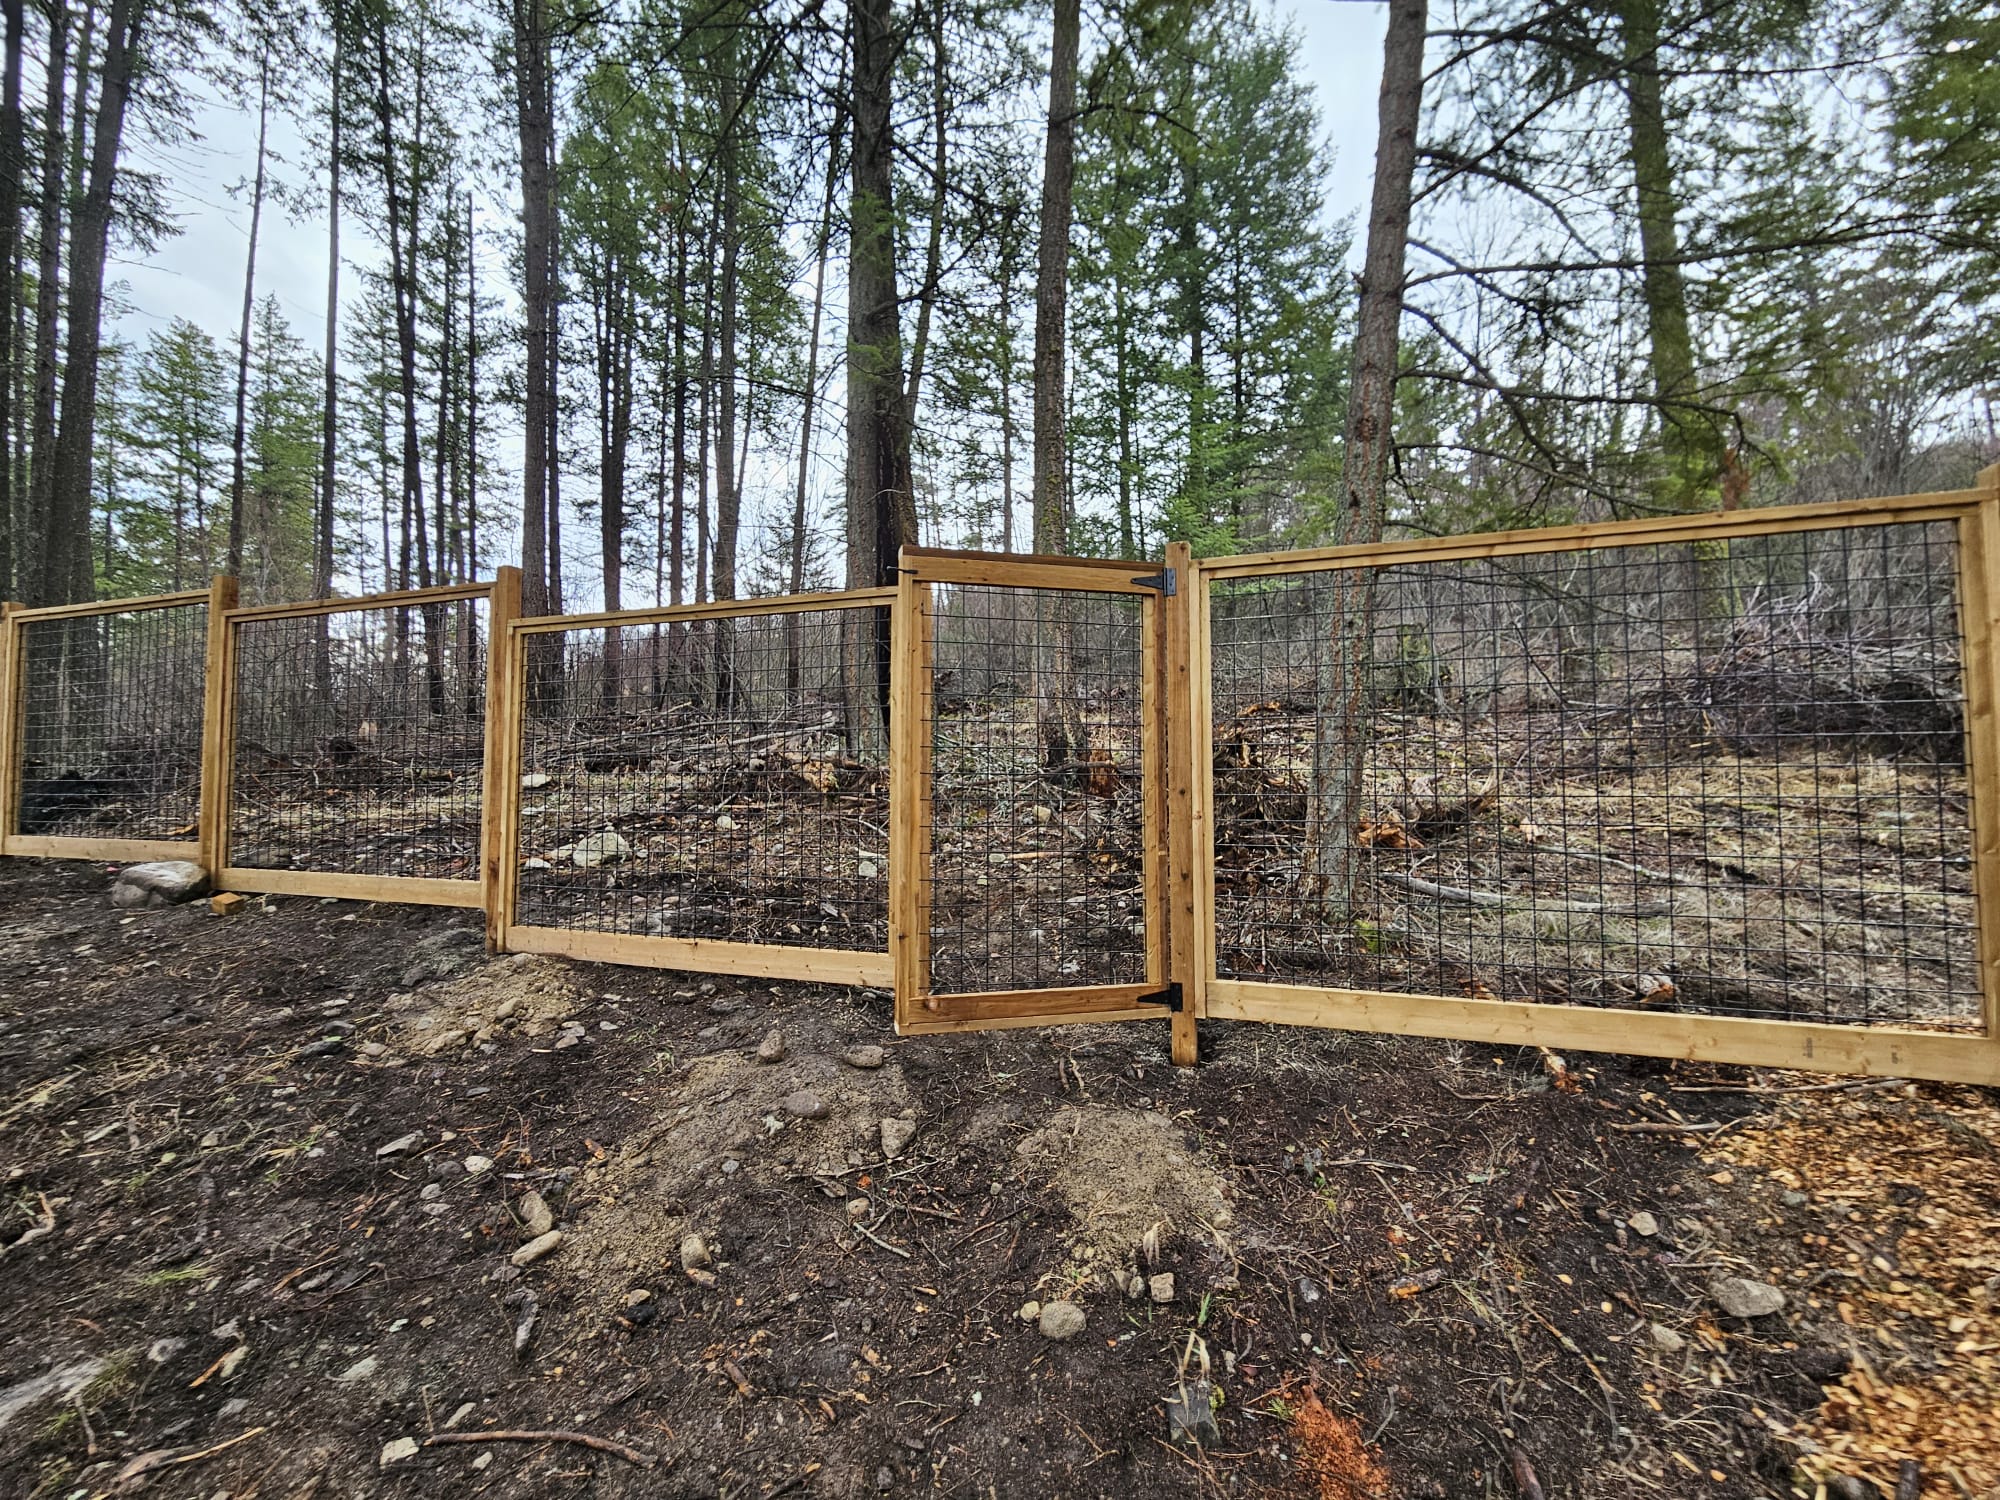
Attaching Panels On Uneven Ground
Attaching wood fence panels on uneven ground needs careful attention. Uneven terrain makes it hard to fit panels straight and secure. This section shows simple ways to install panels firmly and neatly on slopes or bumps. Follow these easy steps to get a smooth fence line.
Step Method For Panel Installation
Start by measuring the ground slope. Mark the highest and lowest points along the fence line. Place fence posts firmly in the ground at these marks. Use a level to keep posts vertical. Attach the first panel at the highest point. Work down the slope, fitting each panel between posts. Adjust each panel’s position to follow the ground’s shape.
Shimming And Custom Fitting
Use wooden shims to fill gaps under panels. Shims help keep panels straight and stable. Cut shims to fit tight spaces under the panel bottom. Place them between the panel and ground. This prevents panels from rocking or bending. Trim panel edges if needed to fit curves or slopes. Custom fitting keeps the fence neat and strong.
Securing Panels Firmly
Fix panels firmly to posts with galvanized screws or nails. Drive fasteners through panel frames into posts. Check panel alignment before tightening. Use extra screws near shims for added strength. Make sure panels do not move after securing. This step ensures the fence lasts long despite uneven ground.
Dealing With Gaps And Alignment
Installing wood fence panels on uneven ground can create gaps and alignment issues. These problems affect the fence’s look and strength. Handling gaps and keeping panels straight are key to a neat finish. This section covers simple ways to deal with these challenges.
Filling Gaps Creatively
Gaps appear between the ground and fence panels on slopes. Use trim boards or scrap wood to fill these spaces. Cut pieces to fit snugly and nail them securely. Another option is to plant low bushes or flowers along the fence. These plants hide gaps and add beauty. Using gravel or mulch under panels also helps cover gaps and stops weed growth.
Maintaining Straight Lines
Uneven ground can cause panels to look crooked. Use a string line to guide your installation. Stretch the string tight between fence posts as a straight reference. Position each panel along this line before fixing it in place. Check the panels with a level to keep them vertical. Adjust the height by digging or adding soil to level the base. This keeps your fence looking clean and straight.
Visual Tricks For Uniformity
Differences in panel height can catch the eye. Paint or stain the fence in one solid color. A uniform color hides small height changes. Add a decorative top rail across panels to create a straight line at the top. This draws attention away from uneven bases. Planting a row of shrubs or a hedge in front of the fence also helps mask unevenness. These tricks improve the fence’s overall appearance.
Finishing Touches And Maintenance
Adding the final touches to your wood fence on uneven ground ensures it looks great and lasts longer. Proper care keeps the wood strong and protects it from weather damage. Simple steps help maintain the fence’s beauty and function over time.
Sealing And Staining Tips
Apply a wood sealer to protect against moisture and sun damage. Use a stain that matches your style and helps block UV rays. Always clean the fence before sealing or staining to remove dirt. Work in small sections for even coverage. Reapply sealer every two years to keep the wood in good shape.
Routine Fence Upkeep
Check your fence regularly for loose panels or nails. Tighten or replace any parts that seem weak. Remove dirt, leaves, and debris near the fence base. Trim plants and grass to prevent moisture buildup. Keep an eye out for signs of rot or insect damage.
Preventing Wood Damage
Keep the fence dry by improving soil drainage around it. Avoid direct contact between wood and soil to stop rot. Use gravel or stones under posts for better water flow. Treat wood with insect repellent to avoid pest problems. Fix any cracks or holes quickly to stop further damage.

Credit: www.reddit.com
Frequently Asked Questions
How Do I Level Wood Fence Panels On Uneven Ground?
Start by measuring the slope and marking the fence line. Use adjustable fence post brackets or step the panels to match ground height. This method helps maintain a straight fence line.
What Tools Are Needed To Install Fence Panels On Slopes?
You will need a level, post hole digger, saw, drill, and measuring tape. These tools help ensure accurate measurements and secure installation on uneven ground.
Can I Use Standard Wood Fence Panels On Sloped Yards?
Yes, but you may need to cut panels or use the stepping method. This approach allows the fence to follow the ground’s natural slope smoothly.
How Deep Should Fence Posts Be On Uneven Terrain?
Posts should be buried at least 2 feet deep for stability, regardless of slope. Deeper posts prevent leaning and help the fence withstand wind and weather.
What Is The Best Way To Secure Fence Panels On Rough Ground?
Use concrete to set posts firmly and metal brackets to attach panels. This provides extra support and keeps the fence stable on uneven surfaces.
Conclusion
Installing wood fence panels on uneven ground takes patience and care. Measure the slope carefully before starting. Use adjustable posts or step the panels to fit the land. This helps keep the fence stable and looking good. Take your time with each panel to avoid mistakes.
A well-installed fence adds value and protects your property. Follow these simple steps for a strong, neat fence every time. Your yard will look better and stay secure. Keep these tips handy for any fencing project on uneven ground.