
Are you ready to give your shed a solid, sturdy floor that lasts for years? Building a wood floor for your shed might seem tricky, but with the right steps, you can do it yourself and save money.
Imagine having a strong base that keeps your tools safe and your space dry. In this guide, you’ll discover simple, clear instructions to help you build a wood floor that fits your shed perfectly. Keep reading, and you’ll soon have the confidence and know-how to start your project today.
Credit: www.shedking.net
Planning The Floor
Planning the floor is the first step to build a strong shed base. It sets the foundation for the entire project. Taking time to plan helps avoid mistakes and saves money. This phase includes choosing materials, measuring the area, and estimating how much wood you will need.
Choosing The Right Materials
Choose wood that resists rot and insects. Pressure-treated lumber is a popular choice. It lasts long outdoors. You also need sturdy joists for support. Pine and cedar are good options. Use plywood or tongue-and-groove boards for the floor surface. Pick materials that fit your budget and climate.
Measuring The Shed Base
Measure the length and width of the shed area. Use a tape measure for accuracy. Double-check each measurement before buying materials. Mark the corners with stakes and string. This helps visualize the shed size. Make sure the ground is level for a stable floor.
Estimating Material Quantity
Calculate the total area by multiplying length by width. Add extra wood for waste and cuts. Plan the number of joists based on spacing rules. Usually, joists go 16 inches apart. Count the sheets of plywood or boards needed. Write down all quantities before shopping.
Credit: www.waltons.co.uk
Preparing The Site
Preparing the site is the first step to build a strong wood floor for your shed. A good foundation keeps the floor stable and dry. It also stops the wood from rotting or shifting over time. Taking time to prepare the ground right helps avoid problems later.
Clearing And Leveling The Ground
Start by removing grass, rocks, and debris from the area. Clear the space a few feet wider than your shed size. Use a shovel or rake to dig out uneven spots. Level the ground by filling low areas with soil. Compact the soil by pressing it down firmly. A flat, firm surface prevents floor movement and damage.
Setting Up A Gravel Base
Spread a layer of gravel about 3 to 4 inches thick over the leveled ground. Gravel helps with drainage and keeps water away from the wood. Use crushed stone for best results. Smooth the gravel surface with a rake. Compact the gravel by stepping or using a tamper. A solid gravel base supports the shed floor evenly.
Installing Weed Barrier
Lay a weed barrier fabric over the gravel base. This stops weeds from growing under your shed. Cut the fabric to fit the entire area. Overlap edges by several inches to block all gaps. Secure the fabric with landscape staples or rocks. Weed barrier helps keep the floor dry and clean.
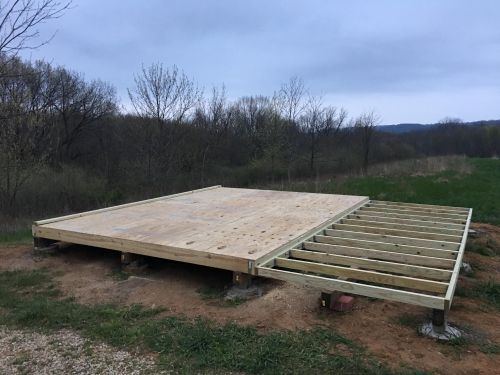
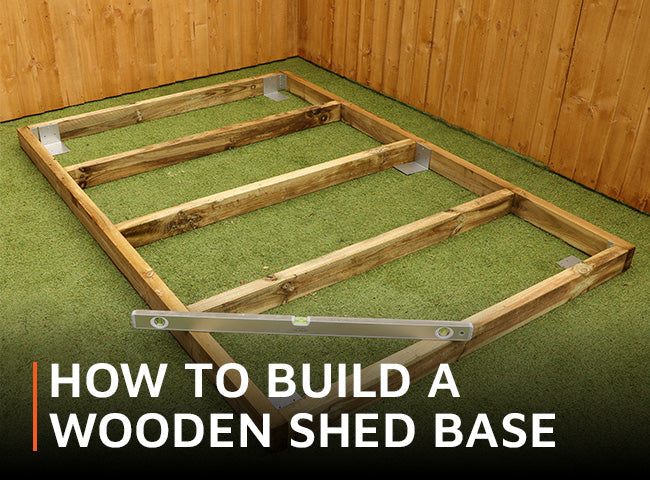
Building The Frame
Building the frame is the first step in creating a strong wood floor for your shed. This frame supports the entire floor and ensures it stays level and stable. Using the right materials and tools will make the job easier and the floor more durable.
Focus on precise measuring and cutting. A well-built frame prevents problems like sagging or uneven floors later on.
Cutting The Joists
Start by measuring the size of your shed floor. Cut the joists to match these measurements. Use a saw to make clean, straight cuts. Each joist should be the exact same length. This keeps the frame square and balanced.
Choose sturdy wood like pressure-treated lumber. It resists rot and lasts longer outdoors. Double-check your measurements before cutting to avoid mistakes.
Assembling The Frame
Lay out the joists on a flat surface. Arrange them parallel to each other, spaced evenly apart. Use a tape measure to keep the gaps uniform. Nail or screw the joists together at the corners. Reinforce the joints with metal brackets for extra strength.
Make sure the frame is square by measuring the diagonals. The two diagonal measurements should be the same. Adjust if needed before securing all connections.
Securing The Frame To The Ground
Prepare the ground by clearing debris and leveling the area. Place the frame on the ground in the desired location. Use concrete blocks or gravel pads under the frame to prevent moisture damage. Attach the frame to the ground using anchor stakes or ground screws.
Check the frame’s level with a spirit level. Adjust the supports to keep the frame flat and stable. This step helps prevent shifting or sinking over time.

Credit: www.youtube.com
Installing The Floorboards
Installing the floorboards is a key step in building a wood floor for your shed. This part shapes the surface you will walk on and store items. The right installation makes your floor strong and long-lasting.
Choosing the right boards, spacing them correctly, and fixing them firmly will help your floor stand the test of time. Each step needs care and attention to detail.
Selecting Floorboard Type
Choose floorboards made from durable wood like pine or cedar. These woods resist rot and insects. Look for boards that are straight and free of cracks. Tongue and groove boards fit tightly together, making a smooth surface.
Thicker boards handle weight better. Select boards about 3/4 inch thick for good strength. Avoid soft or thin boards that may bend or break easily.
Laying And Spacing Boards
Start laying boards along the longest side of your shed. This gives a neat look and adds strength. Leave a small gap of about 1/8 inch between each board. The gap allows wood to expand and contract with weather changes.
Use spacers to keep gaps even. Check each board is level and straight before fixing it. Stagger joints between boards on each row for better stability.
Nailing Or Screwing Floorboards
Use galvanized nails or screws to fix the boards. These resist rust and last longer. Screws hold better but take more time to install. Nails are quicker but may loosen over time.
Drive nails or screws at an angle through the tongue side of the board. This hides fasteners and prevents damage. Space fasteners about every 8 to 10 inches for a secure hold.
Finishing Touches
After building the wood floor for your shed, the final steps make a big difference. These finishing touches protect your floor and improve its look. They also help your shed last longer and stay strong against weather and use.
Sealing And Weatherproofing
Sealing the wood floor stops water from soaking in. Use a good waterproof sealant made for wood. Apply it evenly with a brush or roller. Let it dry fully before using the shed. This keeps the wood safe from rain, snow, and moisture. It also stops wood from warping or rotting over time. A sealed floor is easier to clean and maintain.
Adding Skirting Or Trim
Skirting or trim hides the edges of the floor. It gives your shed a neat, finished look. Use wood or vinyl trim that matches your shed style. Attach the trim carefully with nails or screws. This prevents debris and pests from entering under the floor. Trim also helps keep the floor stable and protected at the edges.
Maintaining The Wood Floor
Check the wood floor often for damage or wear. Clean dirt and leaves away regularly. Use a broom or soft brush to avoid scratches. Reapply sealant every year or two to keep water out. Fix loose boards or nails right away. Proper care keeps your shed floor strong and looking good for years.
Frequently Asked Questions
What Materials Do I Need To Build A Wood Floor For A Shed?
You need treated lumber, plywood sheets, nails, screws, and a vapor barrier. These materials protect the floor and keep it strong. Proper tools like a saw and drill are also needed.
How Do I Prepare The Ground Before Building A Shed Floor?
Clear the area of grass, rocks, and debris. Level the ground by adding gravel or sand for a stable base. This prevents moisture and uneven settling.
What Is The Best Wood Type For A Shed Floor?
Pressure-treated pine is the best choice. It resists rot and insects, making it durable. Avoid untreated wood to prevent damage.
How Do I Attach The Floor Frame To The Shed Foundation?
Use anchor bolts or concrete screws to secure the frame to the foundation. This keeps the floor stable during wind and weather. Make sure the frame is level first.
How Can I Maintain A Wood Floor In A Shed?
Keep the floor dry by fixing leaks and using a vapor barrier. Clean regularly to avoid dirt buildup. Check for signs of rot or damage yearly.
Conclusion
Building a wood floor for your shed is easier than you think. Start with strong, level beams for a solid base. Use quality wood to ensure long-lasting support. Measure carefully and cut pieces to fit well. Secure everything tightly to avoid movement or squeaks.
A good floor keeps your shed dry and stable. Take your time and follow each step clearly. Soon, you will have a sturdy floor ready for use. Simple tools and patience make the job do-able. Enjoy your new shed floor, built by your own hands.