
Are you tired of cold floors that make your mornings uncomfortable? Installing radiant heat under your hardwood floors could be the perfect solution to keep your home warm and cozy all year round.
But how do you get started? You might think it’s complicated or expensive, but with the right guidance, you can do it yourself and enjoy the comfort of heated floors without breaking the bank. You’ll discover simple, step-by-step instructions to install radiant heat under your hardwood floors.
By the end, you’ll have the confidence to transform your space into a warm haven you’ll love every day. Keep reading to find out exactly how to make it happen!
Choosing Radiant Heat Systems
Choosing the right radiant heat system is key to a warm, comfortable hardwood floor. Different systems suit different needs and budgets. Understanding the options helps you make a smart choice.
Electric Vs Hydronic Systems
Electric radiant heat uses electric wires or mats under the floor. It heats quickly and is easier to install. Best for small areas or rooms used often.
Hydronic systems use warm water running through pipes beneath the floor. They work well for large spaces and whole-house heating. Installation is more complex but offers steady warmth.
Benefits For Hardwood Floors
Radiant heat keeps hardwood floors warm without drying out the wood. It avoids cold spots and drafts common with other heating. The heat spreads evenly, protecting wood from cracking or warping.
Both electric and hydronic systems maintain a gentle warmth that helps hardwood last longer. They reduce dust and allergens by not circulating air like forced-air systems.
Cost Considerations
Electric systems cost less upfront and have simpler installation. They use more electricity, which can raise monthly bills.
Hydronic systems have higher installation costs due to pipes and boilers. They run cheaper over time, especially in cold climates.
Think about your budget, home size, and how often you heat the floors before deciding.
Preparing The Subfloor
Preparing the subfloor is a key step for installing radiant heat under hardwood floors. A well-prepared subfloor ensures heat spreads evenly and prevents damage to wood. Take time to clean, level, and protect the surface. This creates a strong base for the heating system and hardwood flooring.
Cleaning And Leveling
Start by removing all debris, dust, and old adhesives from the subfloor. Sweep and vacuum the area thoroughly. Check for bumps, cracks, or dips that can cause uneven flooring. Use a leveling compound to fill in low spots. Sand down any high spots until smooth. A flat surface helps the radiant heat system work effectively and keeps the hardwood stable.
Insulation Options
Add insulation to improve heat efficiency. Rigid foam boards are a common choice. They reduce heat loss and keep warmth directed upward. Cut insulation panels to fit tightly against walls and joists. Avoid gaps that let heat escape. Proper insulation lowers energy costs and helps the floor warm quickly.
Moisture Barriers
Protect hardwood from moisture damage with a moisture barrier. Lay a plastic sheet or special membrane over the subfloor. Overlap seams and tape edges to seal the barrier completely. Moisture barriers prevent warping and mold under the wood. This step is important, especially over concrete slabs or damp areas.
Installing The Radiant Heat System
Installing a radiant heat system under hardwood floors requires careful steps. It ensures warmth spreads evenly through your room. This part covers the key stages of installation. From planning the layout to connecting power or boiler, each step matters. Follow these instructions for a smooth installation process.
Layout Planning
Start by measuring your floor area accurately. Mark the spots where heating elements will go. Avoid placing mats or tubing under permanent fixtures. Check for any obstacles like pipes or wires under the floor. Plan the layout to cover the entire room evenly. Leave a small gap near walls for expansion of hardwood. Proper planning prevents cold spots and saves energy.
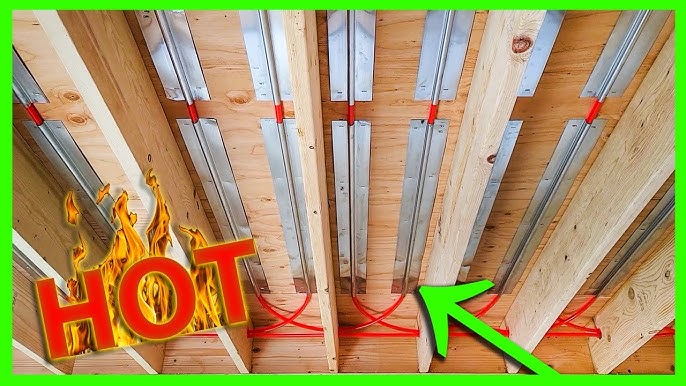
Installing Electric Mats Or Hydronic Tubing
Electric mats are easy to roll out and cut to fit. Lay them flat on the subfloor, following your marked layout. For hydronic systems, attach tubing to the subfloor or a metal plate. Use clips or staples designed for radiant heat tubing. Keep tubing loops evenly spaced for consistent heat. Avoid sharp bends to prevent damage. Cover mats or tubing with a thin layer of self-leveling compound. This protects the system and provides a smooth surface for hardwood.
Connecting To Power Or Boiler
Electric systems connect to your home’s electrical panel. Hire a licensed electrician to handle wiring safely. Install a thermostat to control temperature easily. Hydronic systems connect to a boiler or water heater. Ensure all connections are tight and leak-free. Test the system before installing hardwood floors. Proper connection guarantees efficient and safe heating.
Credit: www.youtube.com
Testing The System
Testing the radiant heat system under hardwood floors is a crucial step. It ensures everything works safely and efficiently before the final installation. Skipping this step can lead to costly repairs or damage to your floor and heating system. The testing process involves checking electrical parts, water pressure in hydronic setups, and running an initial heat trial. Each test confirms the system’s readiness and safety.
Electrical Safety Checks
Start by turning off the main power. Use a multimeter to check for proper voltage and current. Inspect all wiring connections for tightness and correct placement. Look for any signs of damage or wear on cables. Confirm that the thermostat and control units respond correctly. This step prevents electrical shorts or hazards later.
Pressure Testing For Hydronic Systems
Fill the pipes with water and pressurize the system. Use a pressure gauge to monitor the pressure level. It should hold steady without dropping. Watch closely for leaks or weak spots in the piping. Repair any leaks before proceeding. This test stops future water damage under your hardwood floors.
Initial Heat Trial
Turn on the heating system at a low setting. Check if the floor warms evenly across all sections. Listen for unusual noises from the system. Monitor the thermostat to ensure it maintains the set temperature. Run the system for several hours to confirm stability. This trial guarantees your radiant heat will work smoothly and safely.
Laying Hardwood Flooring
Laying hardwood flooring over radiant heat needs care and planning. The right steps help wood last longer and stay beautiful. You must pick the right wood, prepare it well, and follow correct installation methods. These steps protect wood from heat and moisture changes.
Choosing Compatible Hardwood
Not all hardwoods work well with radiant heat. Choose species with low moisture content and good stability. Oak, maple, and cherry are great options. Avoid softwoods like pine, which can warp or crack. Engineered hardwood also works well because it handles heat changes better.
Acclimating Wood
Wood needs to adjust to room conditions before installation. Store planks in the room for several days. This process reduces swelling or shrinking after installation. Keep wood flat and off the ground to avoid moisture issues. Proper acclimation improves wood’s performance over radiant heat.
Installation Techniques
Use floating or glue-down methods for hardwood over radiant heat. Avoid nailing, which can damage heating pipes below. Leave space around edges for wood to expand. Install vapor barriers to protect wood from moisture. Follow manufacturer instructions carefully for best results.

Credit: nilds.gov.ng
Maintaining Radiant Heat Floors
Maintaining radiant heat floors under hardwood is important for long-lasting comfort. Proper care keeps the system efficient and your floors warm. Regular checks help prevent damage and costly repairs.
Temperature Control Tips
Set the thermostat to a steady temperature. Avoid rapid changes to protect the hardwood. Use a programmable thermostat for better control. Keep room temperature between 65°F and 75°F. This range prevents wood from expanding or contracting.
Routine Inspections
Check the system regularly for leaks or damage. Look for any cold spots on the floor. Inspect wiring and connections for wear or corrosion. Schedule annual professional inspections to ensure safety. Early detection avoids bigger problems later.
Troubleshooting Common Issues
If the floor feels unevenly warm, check the thermostat settings. Cold areas might mean a broken pipe or air trapped in the system. Listen for unusual noises in the heating system. Reset the thermostat if the heat stops working. Contact a professional if problems persist.

Credit: wbiwarm.com
Frequently Asked Questions
What Materials Are Needed To Install Radiant Heat Under Hardwood Floors?
You need a radiant heat mat or cable system, a thermostat, insulation boards, and hardwood flooring. Basic tools include a utility knife, measuring tape, and a drill. These materials help ensure efficient and safe installation.
Can Radiant Heat Damage Hardwood Floors?
Radiant heat is safe for hardwood if installed correctly and set to proper temperatures. Avoid high heat settings that can dry out or warp wood. Proper insulation and temperature control protect your floors.
How Long Does Radiant Heat Installation Take Under Hardwood?
Installation usually takes one to three days depending on room size and system complexity. Drying time for adhesives or leveling compounds may add extra time. Planning helps keep the process smooth.
Is Radiant Heat Energy Efficient For Hardwood Floors?
Radiant heat provides even warmth and uses less energy than traditional heating. It heats objects directly, reducing wasted heat in the air. This makes it a cost-effective heating option.
Do I Need Professional Help To Install Radiant Heat?
DIY installation is possible but requires electrical knowledge and careful planning. Hiring a professional ensures safety and system efficiency. Consider your skills before deciding to install yourself.
Conclusion
Installing radiant heat under hardwood floors brings warmth and comfort to your home. The process takes careful planning and the right tools. Follow each step closely for the best results. This system saves energy and keeps floors cozy in cold months.
Take your time to ensure everything works well together. Enjoy the quiet, even heat that radiant floors provide. A warm floor makes any room feel inviting and comfortable.