
Are you planning to update your room but worried about damaging your walls when removing trim? You’re not alone.
Taking off trim without causing dents, scratches, or holes can feel tricky. But what if you could remove it cleanly and easily, saving time and avoiding costly repairs? You’ll discover simple, step-by-step tips to help you get the job done right.
Keep reading, and you’ll learn how to protect your walls while taking off trim like a pro.

Credit: www.youtube.com
Tools You’ll Need
Removing trim from a wall takes the right tools. Using proper tools helps prevent damage to the wall and trim. It makes the job faster and easier. Gather these tools before starting your project.
Essential Hand Tools
Start with a pry bar to lift the trim gently. Use a putty knife to slide behind the trim without hurting the paint. A hammer helps tap the pry bar or remove nails. Needle-nose pliers pull out stubborn nails carefully. A utility knife scores caulk or paint lines for clean removal.
Power Tools That Help
A cordless drill with a screwdriver bit removes screws quickly. An oscillating multi-tool with a blade cuts through caulk or paint seals. A small reciprocating saw can help with stubborn sections. These tools reduce effort and prevent wall damage.
Safety Gear To Wear
Wear safety glasses to protect your eyes from flying debris. Use gloves to avoid splinters and sharp edges. A dust mask keeps you safe from dust and particles. Protect your ears if using loud power tools. Safety gear keeps the work safe and comfortable.
Preparing The Work Area
Preparing the work area is the first step to remove trim from a wall without causing damage. Setting up a clean, safe space helps you work more efficiently. It reduces the risk of harming the wall or the trim. Proper preparation also protects your home from dust and debris. Follow these steps to get your area ready before you start the job.
Clear The Surrounding Space
Remove furniture and other objects near the wall. This creates enough room to move and work freely. Keep valuable or fragile items far away. It prevents accidental bumps or scratches. Clearing the space also helps you see the trim clearly. Good visibility makes the removal process safer and easier.
Protect Walls And Floors
Use drop cloths or old sheets to cover floors. Tape them down so they do not slip. Place painter’s tape along the edges of the wall near the trim. It shields the paint from scratches and dents. Protect corners and nearby walls with cardboard or foam padding. These barriers absorb accidental hits from tools or trim pieces.
Turn Off Utilities If Needed
Check if any electrical outlets, switches, or wires run behind the trim. Turn off the power at the breaker box to avoid shocks. If there are pipes or water lines, shut off the water supply. Taking these safety steps prevents accidents during removal. It keeps you and your home safe while working.
Identifying Trim Attachment
Removing trim from a wall needs care. Knowing how the trim is attached helps avoid damage. Trim can be fixed with nails, glue, or hidden fasteners. Each method needs a different approach to remove safely. Identifying the attachment type is the first step before prying the trim away.
Nails Vs. Adhesive
Many trims are attached with nails. Nails are easy to spot by small holes or dimples on the trim surface. Sometimes paint covers the nails, making them hard to see. Adhesive, or glue, holds trim firmly without nails. Glued trim feels tightly stuck to the wall. No small holes or bumps appear on the trim. Knowing if nails or glue hold the trim guides your removal tools and effort.
Hidden Fasteners
Some trims use hidden fasteners for a clean look. These fasteners are clips or brackets behind the trim. They hold the trim without visible nails or glue spots. Look closely at the trim edges for small gaps or seams. These gaps may hide the clips. Hidden fasteners need gentle prying to avoid breaking the trim or wall.
Signs Of Paint Or Caulk
Paint or caulk can show how trim is attached. Caulk seals gaps between the trim and wall. If caulk runs along the edges, trim removal requires softening or cutting it first. Paint over the trim and wall junction also sticks trim firmly. Scraping or scoring the paint line helps loosen the trim. These signs tell you where to work carefully to prevent wall damage.
Techniques To Loosen Trim
Removing trim without damage requires careful loosening techniques. Trim often sticks to walls due to nails, paint, or caulk. Using the right method helps preserve both the trim and wall. Gentle, steady actions work best to avoid cracks or breaks. Below are some simple ways to loosen trim safely and effectively.
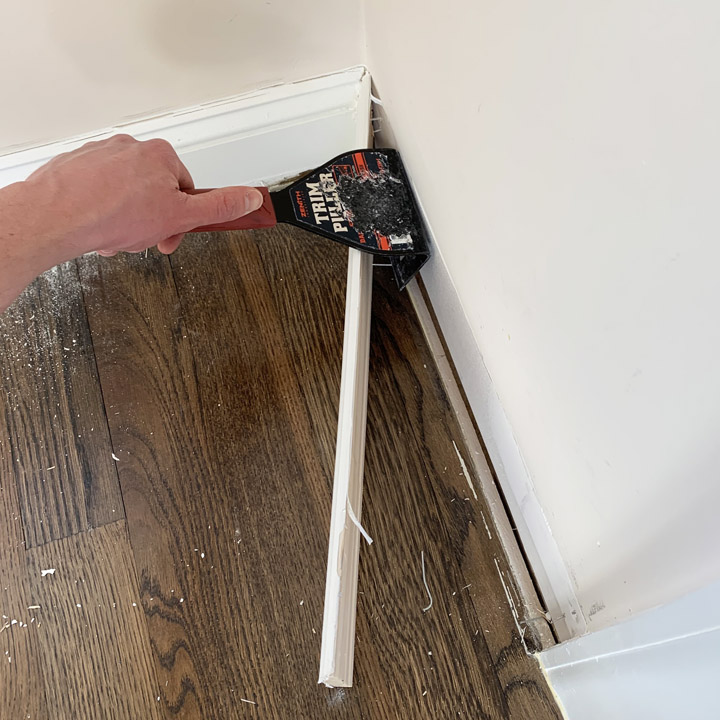
Using A Pry Bar Safely
Choose a small pry bar or putty knife for more control. Slide the tool gently between the trim and wall. Work slowly, moving the tool along the trim’s length. Use a thin piece of wood as a buffer to protect the wall. Apply light pressure to avoid bending or breaking the trim. Stop if you feel strong resistance and try another method.
Applying Heat Or Solvents
Heat softens paint and adhesive, making trim easier to remove. Use a heat gun or hairdryer on a low setting. Aim heat at the trim edges for a few minutes. Be careful not to scorch the wood or wall. Alternatively, apply a small amount of adhesive remover or rubbing alcohol. Let it soak before prying the trim gently.
Cutting Caulk And Paint Seals
Caulk and paint often seal the trim tightly to the wall. Use a utility knife to score along the trim edges. Cut through all paint and caulk layers without pushing the blade deep. This breaks the seal and frees the trim. Move slowly and carefully to prevent wall damage. After scoring, try prying the trim again with less force.
Removing Trim Without Damage
Removing trim without damage takes care and patience. The goal is to keep the wall and trim intact. Using the right tools and methods helps prevent cracks and dents.
Gentle Prying Methods
Start with a thin putty knife or painter’s tool. Slide it gently between the trim and wall. Tap the handle lightly with a hammer to ease the tool in. Work slowly along the trim to loosen it bit by bit. Avoid forcing the tool too hard to stop the wood from breaking.
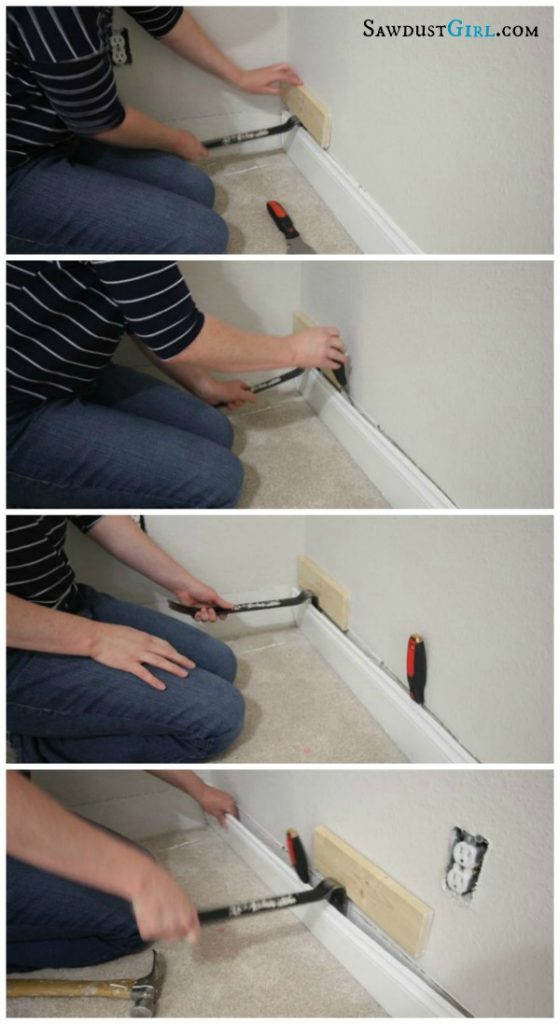
Working With Stubborn Areas
Some parts of the trim stick tighter than others. Use a wider pry bar with a wood block to spread the pressure. Place the wood block against the wall to protect it. Pry slowly and gently at these spots. Repeat the process until the trim loosens without snapping.
Avoiding Wall Surface Damage
Cover the wall near the trim with painter’s tape before prying. This helps stop paint from chipping. Always use a wood block between the pry bar and wall. Keep the tools flat to the wall to reduce dents. Take your time to prevent holes or scratches on drywall or plaster.
Handling Different Trim Types
Removing trim from a wall requires care and the right approach. Different trim types need different handling to avoid damage. Understanding each trim style helps protect your walls and the trim itself.
Baseboards And Crown Molding
Baseboards sit at the bottom of the wall. Use a putty knife to gently separate them from the wall. Tap the knife lightly with a hammer to loosen the nails. Pull the baseboard slowly to avoid breaking it or damaging the wall.
Crown molding fits where the wall meets the ceiling. Pry it carefully using a pry bar wrapped in cloth. Work in small sections to reduce pressure. Be patient to keep the molding intact.
Door And Window Casings
Casings frame doors and windows. Cut any paint seal with a utility knife before prying. Insert a thin pry bar between the casing and wall. Move along the casing to loosen nails. Pull gently to avoid cracking the wood or breaking the drywall.
Decorative And Custom Trim
Decorative trim can be fragile or detailed. Use extra caution with these pieces. Score paint and caulk fully around the trim edges. Use a small pry tool to avoid bending or breaking delicate parts. Take your time to keep the design safe.
Repairing Minor Wall Damage
Removing trim from a wall can sometimes cause small damages, like nail holes or scratches. Fixing these minor issues quickly keeps your wall looking fresh and smooth. The repair process is simple and requires only a few steps. Follow these tips to restore your wall without hassle.
Filling Nail Holes
Start by cleaning the holes with a dry cloth. Use a small amount of spackling paste or wall filler. Press it into the holes with a putty knife. Make sure the filler is slightly above the surface. Let it dry completely before moving on.
Sanding And Smoothing
Once the filler is dry, use fine-grit sandpaper to smooth the area. Sand gently to avoid removing too much filler. The goal is a flat, even surface that matches the rest of the wall. Wipe away dust with a soft cloth before painting.
Touching Up Paint
Choose paint that matches your wall color exactly. Apply paint with a small brush in thin layers. Let each layer dry before adding another. This method blends the repair with the wall perfectly. Your wall will look as good as new.
Credit: philiporflop.com
Tips For Reinstalling Or Reusing Trim
Reinstalling or reusing trim requires care and attention to keep it looking good. Proper steps help avoid damage and save money on new materials. Follow these tips to prepare and install your trim correctly.
Small details make a big difference in the final result. Clean, check, and fasten the trim properly for a smooth finish.
Cleaning And Preparing Trim
Start by removing dirt, dust, and old paint from the trim. Use a soft cloth and mild cleaner. Avoid soaking the wood to prevent warping. Sand rough spots lightly for a smooth surface. Cleaning helps paint or stain stick better later.
Checking For Warping Or Damage
Inspect the trim for bends, cracks, or splits. Warped trim may not fit well and can ruin the look. Minor damage can be fixed with wood filler or sanding. Replace pieces that are too damaged to reuse. Good condition trim saves time and effort in installation.
Best Fastening Practices
Use the right nails or screws for your trim type. Finish nails work well for a clean look. Pre-drill holes to prevent splitting the wood. Nail into wall studs or use anchors for a secure hold. Keep nails flush or slightly below the surface for easy filling and painting.
Credit: sawdustgirl.com
Frequently Asked Questions
How Do I Remove Trim Without Damaging The Wall?
Use a putty knife to gently pry the trim away from the wall. Work slowly and carefully to avoid dents or holes. Apply steady pressure and move along the trim evenly.
What Tools Are Best For Removing Wall Trim Safely?
A putty knife, pry bar, and hammer work best for trim removal. Use thin tools to slide behind the trim without harming the wall. Softwood blocks can protect the wall when prying.
Can I Remove Trim Without Repainting The Wall?
It depends on the wall condition after trim removal. Small nail holes can be filled and painted easily. Large damage might require sanding and repainting for a smooth look.
How To Protect Drywall When Removing Baseboards Or Trim?
Place a thin piece of wood or cardboard between the pry bar and drywall. This prevents dents and cracks during removal. Work slowly and avoid forcing the trim off.
Is It Necessary To Remove Nails Before Pulling Off Trim?
Yes, removing nails first reduces wall damage risk. Use pliers or a nail puller to extract nails carefully. If nails are stuck, pry gently around them to loosen.
Conclusion
Removing trim from a wall does not have to be hard. Use the right tools and go slow. Pry gently to avoid damage to the wall or trim. Keep a putty knife handy to protect surfaces. Take your time and stay patient.
Doing it carefully saves you from extra repairs later. Now, you can remove trim without worry or mess. Simple steps lead to great results. Try these tips and see how easy it can be.