
If you want to save time and get smooth, even surfaces on your wood projects, learning how to use an angle grinder for sanding wood is a game-changer. You might think angle grinders are only for metal or heavy-duty work, but with the right technique, they can make sanding faster and easier.
Imagine finishing your woodworking tasks with less effort and better results—that’s exactly what you’ll discover here. Keep reading, and you’ll find simple steps and tips to turn your angle grinder into a powerful sanding tool you can trust.

Credit: handtoolsmaster.mystrikingly.com
Choosing The Right Angle Grinder
Choosing the right angle grinder is key for sanding wood effectively and safely. The right tool makes your work easier and gives better results. Not every angle grinder fits well for wood sanding. Size, power, and safety features matter a lot. This guide helps you pick the best grinder for your wood projects.
Selecting Proper Size And Power
Pick an angle grinder with a disc size between 4 to 6 inches. Smaller discs offer better control and precision. A grinder with 5 to 7 amps is enough for most wood sanding tasks. High power means faster sanding but can be harder to handle. Balance power and ease of use for smooth results.
Types Of Angle Grinders Suitable For Wood
Use a variable speed angle grinder to control sanding speed. Slower speeds prevent burning the wood. Corded grinders provide constant power for long jobs. Cordless grinders offer portability but may run out of battery. Choose based on your project size and work location.
Essential Safety Features
Look for grinders with a safety guard to protect from sparks and debris. A spindle lock helps change discs safely and quickly. Anti-vibration handles reduce hand fatigue during long sanding sessions. Overload protection prevents motor damage and improves tool life. Safety features protect you and improve work quality.
Picking The Best Sanding Attachments
Choosing the right sanding attachments is key to good results with an angle grinder. Different tasks need different tools. The wrong attachment can damage the wood or wear out fast. This guide explains the main types of sanding attachments. It also shows how to pick the best grit for your project. Learn how flap discs can help get a smooth finish.
Sanding Discs And Pads Explained
Sanding discs are round and fit on the grinder’s backing pad. They come in many grit sizes. Discs are good for flat surfaces and edges. Pads hold the sanding discs tightly in place. Some pads are soft, good for curved surfaces. Others are stiff for flat sanding jobs. Choose discs that match your grinder and task.
Grit Selection For Different Wood Surfaces
Grit size means how rough or smooth the disc is. Lower numbers are rougher. Start with coarse grits for old finishes or rough wood. Use medium grits to smooth out scratches. Finish with fine grits for a clean surface. Soft woods need less rough grit to avoid damage. Hardwoods can handle coarser grits for fast sanding.
Using Flap Discs For Smooth Finishes
Flap discs have overlapping layers of sandpaper. They wear evenly and last longer than regular discs. Flap discs work well on wood, removing material quickly. They also create a smoother finish with less risk of gouges. Use finer flap discs at the end to polish the wood. They are great for shaping and finishing in one step.
Preparing Wood For Sanding
Preparing wood for sanding is an important step before using an angle grinder. It helps to get smooth results and protects the tool and the wood. Proper preparation makes the sanding process safer and more effective.
Start by making sure the wood surface is clean and ready. Remove any dirt and check the wood carefully. This helps avoid scratches and damage during sanding.
Cleaning And Inspecting The Surface
Begin by wiping the wood with a dry cloth to remove dust. Check the surface for any stains or sticky spots. Use a damp cloth if needed but let the wood dry completely. Look closely for cracks or rough patches. These areas may need extra attention during sanding.
Removing Nails And Debris
Look for nails, screws, or staples on the wood surface. Remove all metal objects to protect the angle grinder’s disc. Small pieces of debris can also cause damage. Clear the surface fully to avoid accidents and uneven sanding.
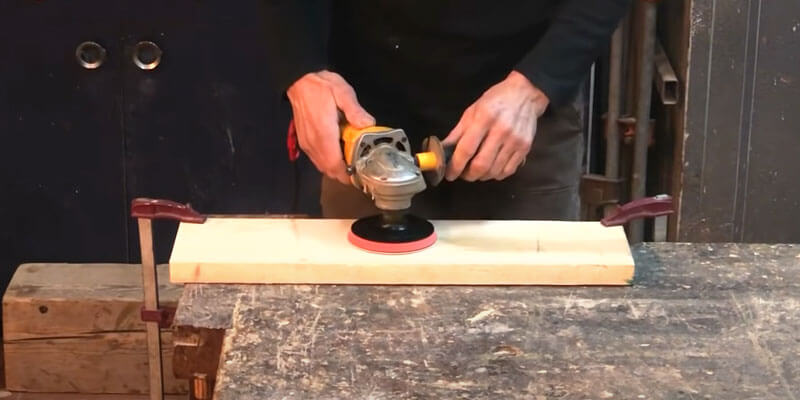
Securing Wood For Stability
Place the wood on a sturdy workbench or table. Use clamps or heavy objects to hold it firmly. This stops the wood from moving while sanding. Stable wood ensures better control and smoother results. Always check stability before turning on the angle grinder.
Angle Grinder Sanding Techniques
Sanding wood with an angle grinder requires steady hands and the right sanding disc. Start by moving the grinder gently across the surface to avoid damage. Keep the tool flat and use light pressure for smooth, even results.
Proper Grip And Handling
Hold the angle grinder firmly with both hands. One hand should grip the main handle. The other hand holds the auxiliary handle for control. This grip helps you guide the tool smoothly over the wood surface. Keep your hands steady to avoid slipping. A steady grip reduces accidents and improves sanding quality.
Maintaining Consistent Pressure
Apply light, even pressure while sanding. Pressing too hard can damage the wood or wear out the sanding disc quickly. Too little pressure wastes time and effort. Let the angle grinder do the work. Move the tool slowly and steadily for an even finish. Consistent pressure helps achieve smooth, uniform results.
Sanding With The Grain
Always sand in the direction of the wood grain. Sanding across the grain can leave scratches and rough patches. Follow the natural lines of the wood for a cleaner look. This method preserves the wood’s texture and appearance. It also makes the sanding process easier and faster.
Avoiding Common Mistakes
Do not stay in one spot too long. This can create uneven surfaces or burn marks. Avoid using a worn or damaged sanding disc. Check the disc before each use. Keep the grinder moving at a steady pace. Never force the tool against the wood. These habits protect both the wood and your tool.
Safety Tips For Sanding Wood
Sanding wood with an angle grinder can be fast and effective. Safety is very important. Without proper safety steps, accidents can happen. Protect yourself and others by following simple safety tips. These tips help you work safely and finish your project well.
Keep your focus on safety gear, dust control, and workspace setup. These areas reduce risks and make sanding easier. Take time to prepare before starting your work.
Personal Protective Equipment
Wear safety glasses to protect your eyes from flying dust and wood chips. Use a dust mask or respirator to avoid breathing wood dust. Gloves protect your hands from sharp edges and heat. Ear protection reduces noise from the angle grinder. Wear long sleeves and sturdy shoes for extra safety.
Dust Control Methods
Wood dust is harmful when inhaled. Use a vacuum or dust extractor with your angle grinder. Work in a well-ventilated area to keep air clean. Wet sanding reduces dust by keeping particles heavy. Clean the workspace often to avoid dust buildup on surfaces.
Safe Workspace Setup
Keep your workspace clear of clutter. Make sure the wood is secured firmly before sanding. Use clamps or a workbench to hold the wood steady. Ensure good lighting to see your work clearly. Check that electrical cords are away from moving parts. Always have a fire extinguisher nearby for emergencies.
Credit: binictools.com
Finishing Touches After Sanding
Finishing touches after sanding are important to make your wood project look great. These steps help prepare the wood for the next stage. They ensure a smooth, clean surface for painting or staining. Taking time here improves the final result and durability of your work.
Cleaning Dust And Residue
Remove all dust and leftover sanding residue from the wood. Use a soft brush or vacuum to clear loose particles. Wipe the surface with a damp cloth to pick up fine dust. Make sure the wood is dry before moving on. Clean wood helps paint or stain stick better.
Inspecting For Smoothness
Feel the wood surface with your hand. Check for any rough spots or uneven areas. Use good light to see imperfections clearly. Sand those areas again if needed, using fine grit sandpaper. Smooth wood creates a professional finish and avoids problems later.
Preparing For Staining Or Painting
Choose the right primer or wood conditioner for your wood type. Apply it evenly and follow the product instructions. This step helps the stain or paint absorb evenly. It also prevents blotches and uneven color. Let the wood dry completely before starting your paint or stain.
Troubleshooting Common Issues
Troubleshooting common issues helps keep your sanding work smooth and effective. Small problems can cause big headaches during sanding. Identifying and fixing these issues fast saves time and effort. This section covers easy ways to solve frequent problems using an angle grinder on wood.
Dealing With Gouges And Uneven Surfaces
Gouges happen when the grinder presses too hard or stays too long in one spot. Move the grinder in steady, even strokes to avoid gouges. Use a finer grit disc to smooth out rough areas. Sand around the gouge gently to blend it with the wood. Keep the angle grinder moving to create an even surface.
Fixing Burn Marks
Burn marks appear from too much pressure or slow movement. Let the grinder do the work without pushing hard. Use a lighter touch and keep the disc moving quickly. Sand the burn marks lightly with fine grit sandpaper. If marks stay, try sanding with a lower speed setting on the grinder.
Replacing Worn-out Discs
Worn discs reduce sanding quality and can damage wood. Check discs regularly for wear and tear. Replace discs that are smooth or have missing grit. Turn off and unplug the grinder before changing discs. Use the correct disc type and size for wood sanding. Proper disc maintenance improves sanding results and tool safety.

Credit: www.youtube.com
Frequently Asked Questions
What Safety Gear Is Needed When Sanding Wood With An Angle Grinder?
Always wear safety goggles, a dust mask, and ear protection. Gloves and long sleeves help prevent cuts and scrapes. Safety is key to avoid accidents and dust inhalation.
Which Sanding Disc Should I Use On An Angle Grinder For Wood?
Use a sanding disc designed for wood, like a flap disc or sanding pad. Coarse grit removes rough wood; fine grit smooths the surface. Choose the grit based on the wood’s condition.
How Do I Control Dust While Sanding Wood With An Angle Grinder?
Work in a well-ventilated area or outside to reduce dust buildup. Use a dust extraction attachment if available. Wearing a mask also protects your lungs from fine dust.
Can An Angle Grinder Damage Wood During Sanding?
Yes, if used too fast or with too much pressure, it can gouge the wood. Keep the grinder moving and use light, even pressure. This prevents uneven sanding and damage.
How Do I Prepare Wood Before Sanding With An Angle Grinder?
Clean the wood surface from dirt and nails first. Remove any paint or finish if possible. This makes sanding smoother and protects the disc from damage.
Conclusion
Using an angle grinder for sanding wood can save time and effort. Choose the right sanding disc and keep a steady hand. Move the grinder gently to avoid damaging the wood. Always wear safety gear to protect yourself. Practice on scrap wood before starting your project.
With care, your wood will look smooth and even. This tool can be a helpful addition to your workshop. Keep these tips in mind, and you will get great results.