
If you’re planning to build a shower on a plywood floor, one of the most important steps is creating a strong, waterproof shower pan. Without a proper shower pan, water can seep through and cause serious damage to your floor and home.
But don’t worry—building a shower pan on plywood isn’t as hard as it sounds. In this guide, you’ll learn the exact steps to make a durable, leak-proof shower base that will keep your bathroom dry and safe for years to come.
Keep reading, and you’ll have the confidence to tackle this project like a pro.
Credit: vinawoodltd.com
Choosing Materials
Choosing the right materials is a key step in building a shower pan on a plywood floor. The materials ensure the shower pan is strong, waterproof, and lasts long. Each component plays a role in protecting your bathroom from water damage. This section covers the basics of selecting plywood, liners, and waterproofing options.
Selecting The Right Plywood
Use exterior-grade plywood for durability and moisture resistance. It should be at least 3/4 inch thick to support weight. Avoid using particle board or softwood plywood, as they absorb water easily. Make sure the plywood surface is smooth and flat to create a solid base. Proper plywood helps prevent warping and damage under the shower pan.
Types Of Shower Pan Liners
Shower pan liners stop water from leaking below the pan. Common types include PVC, CPE, and rubber liners. PVC liners are flexible and easy to install. CPE liners are thinner but still effective for waterproofing. Rubber liners offer strong durability and long life. Choose a liner that fits well and meets local building codes.
Waterproofing Options
Waterproofing adds an extra layer of protection to your shower pan. Liquid waterproof membranes are popular and easy to apply with a brush or roller. Sheet membranes come in rolls and provide a consistent barrier. Both types help seal joints and corners. Proper waterproofing prevents mold and water damage under the shower floor.

Credit: www.youtube.com
Preparing The Floor
Preparing the floor is the first step in building a strong shower pan on a plywood floor. The floor must be solid, clean, and shaped correctly for water to drain properly. Taking time at this stage helps avoid leaks and damage later.
Inspecting And Repairing The Subfloor
Start by checking the plywood for any damage or weak spots. Look for cracks, rot, or soft areas that need fixing. Replace damaged sections or add extra support where needed. A sturdy subfloor prevents future problems and supports the shower pan well.
Ensuring Proper Slope
The shower floor must slope toward the drain to avoid standing water. The slope should be about 1/4 inch per foot. Use a level and straightedge to measure and adjust the slope. Add thin layers of mortar if you need to create a smooth, angled surface.
Cleaning The Surface
Clear the plywood surface of dust, dirt, and debris. Sweep and vacuum thoroughly to remove all particles. Wipe down with a damp cloth to ensure good adhesion of the waterproof layer. A clean surface helps the shower pan materials bond tightly and last longer.
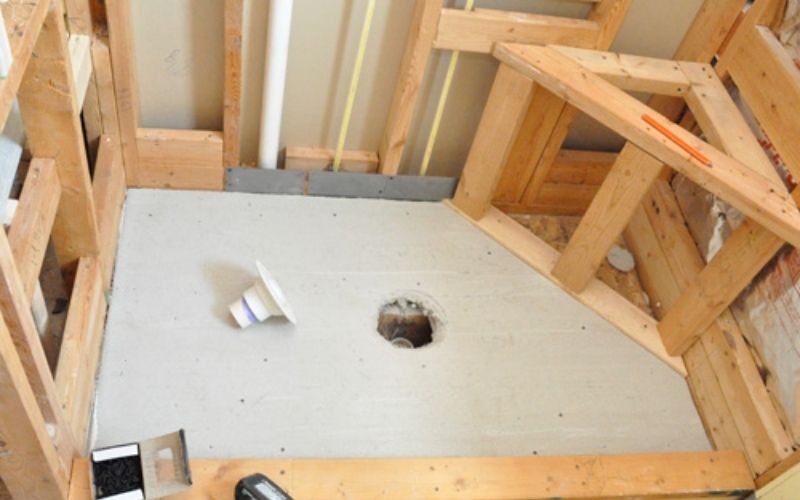
Installing The Shower Drain
Installing the shower drain is a key step in building a shower pan on a plywood floor. It ensures water flows properly and prevents leaks. The drain must fit well and be secured tightly to keep the shower safe and dry.
Positioning The Drain
First, find the exact spot for the drain on the plywood floor. It should align with the drain pipe below. Mark the center point clearly. Cut a hole slightly bigger than the drain size. Check that the drain will sit flat and level in the hole.
Securing The Drain Assembly
Place the drain flange into the hole. Apply a bead of silicone sealant around the edge for a watertight seal. Screw the flange firmly into the plywood using rust-resistant screws. Attach the drain body underneath and tighten all connections. Test for any movement to ensure it is secure.
Building The Shower Base
Building the shower base is a key step in creating a strong, waterproof shower pan. It supports the entire shower floor and helps direct water to the drain. The base needs to be sturdy and properly angled to avoid water pooling. This section explains how to cut and fit the plywood, create the slope frame, and fasten all parts securely.
Cutting And Fitting Plywood
Start by measuring the shower floor area carefully. Use a circular saw to cut plywood sheets to size. Make sure the plywood fits snugly inside the shower space. Check the edges for smoothness and trim if needed. The plywood should lay flat without gaps or bumps.
Creating The Slope Frame
Build a slope frame using 2×4 lumber to guide water to the drain. Cut the lumber to fit around the drain area. Attach the pieces at an angle, with higher edges at the walls and lower near the drain. The slope should drop about 1/4 inch per foot toward the drain. This ensures proper water flow and prevents standing water.
Fastening The Components
Secure the plywood and slope frame with screws. Use corrosion-resistant screws to avoid rust. Space screws every 8 to 12 inches for strong holding power. Check that all parts are tight and stable. Avoid over-tightening, which can damage the wood. A solid base keeps the shower pan safe and long-lasting.
Applying The Shower Pan Liner
Applying the shower pan liner is a key step in building a shower pan on a plywood floor. The liner acts as a waterproof barrier. It prevents water from leaking into the floor below. Proper installation of the liner ensures a long-lasting, leak-free shower base.
Start by carefully measuring and cutting the liner. Then, secure it tightly around the drain. Lastly, seal all edges and test for leaks. Each step requires attention to detail to avoid problems later.
Cutting The Liner To Size
Measure the shower base area with care. Add extra inches to cover the sides and corners. Use a sharp utility knife to cut the liner. Cut slowly to avoid jagged edges. The liner should overlap the shower curb by several inches.
Ensure the liner covers the entire floor area. A well-cut liner fits snugly without wrinkles. Avoid folding or bunching the material.
Securing The Liner Around The Drain
Cut a hole in the liner for the drain opening. The hole should be slightly smaller than the drain flange. Push the liner down over the drain pipe. Use a clamping ring to hold the liner in place. Tighten the ring to create a water-tight seal.
Check the liner fits smoothly around the drain. No gaps or folds should remain. This step prevents leaks near the drain area.
Sealing And Testing For Leaks
Fold the liner edges up the shower walls. Secure the liner with waterproof tape or sealant. Seal all seams and corners well. Allow the sealant to dry completely before testing.
Test the liner by flooding the shower base with water. Let the water sit for several hours. Look below the plywood floor for any signs of leaks. Fix any leaks before adding the mortar bed.
Adding Mortar Bed
Adding a mortar bed is a key step in building a shower pan on a plywood floor. This layer creates a strong base that supports the waterproof membrane and the tile above. The mortar bed must be mixed properly, applied evenly, and shaped with the correct slope. This ensures water flows toward the drain and does not pool on the floor.
Mixing The Mortar
Use a high-quality mortar mix designed for shower pans. Follow the package instructions for water amount and mixing time. The mix should be thick but workable, similar to damp sand. Avoid making it too wet or too dry. Use a mixing paddle and drill for best results. Mix small batches for better control and to prevent drying out.
Applying The Mortar Bed
Start by wetting the plywood floor lightly to help the mortar stick. Spread the mortar evenly using a trowel or flat board. Press the mortar firmly against the floor. Fill all gaps and low spots. Work in small sections to keep the mortar fresh. Smooth the surface but do not overwork it.
Shaping The Slope
The slope directs water to the drain. Aim for a slope of 1/4 inch per foot. Use a straight edge or screed to level the mortar. Check the slope from all sides toward the drain. Adjust the mortar by adding or removing material. Shape the bed carefully to avoid flat spots where water can collect.
Finishing Touches
The finishing touches complete your shower pan project. They make the surface ready for tiling. Proper steps here ensure durability and water resistance. Follow these simple tasks carefully to protect your work and enjoy a long-lasting shower.
Installing Backer Board
Backer board provides a strong, water-resistant base for tiles. Cut the boards to fit the walls around the shower pan. Attach them securely to the studs using corrosion-resistant screws. Leave small gaps between boards to allow for expansion. Seal joints with fiberglass mesh tape and thin-set mortar for extra protection.
Waterproofing The Walls
Apply a waterproof membrane over the backer board. Use a brush or roller to spread the liquid evenly. Cover all corners and seams carefully. Let the first coat dry completely before applying a second coat. This barrier stops water from reaching the plywood and framing behind the walls.
Preparing For Tile Installation
Check that all surfaces are smooth and clean. Remove dust and debris that could stop tile adhesive from sticking. Plan your tile layout to avoid small cuts at edges. Gather all tools and materials before starting. Proper preparation helps tiles stay secure and look neat for years.
:max_bytes(150000):strip_icc()/SPR-how-to-build-a-shower-pan-5087841-117f3d83f7a24c33816fb67aef8b9983.jpg)
Credit: www.thespruce.com
Frequently Asked Questions
What Materials Are Needed To Build A Shower Pan On Plywood?
You need plywood, a waterproof membrane, mortar mix, a drain assembly, and sealant. These materials ensure a strong, water-tight shower base.
How Do You Waterproof A Plywood Shower Floor?
Apply a waterproof membrane over the plywood, sealing all edges and seams. This stops water from reaching the wood underneath.
Can I Install A Shower Pan Directly On Plywood?
Yes, but the plywood must be sturdy and properly sealed. A waterproof membrane is critical to prevent water damage.
How Thick Should The Mortar Bed Be For A Shower Pan?
The mortar bed should be about 1 to 1. 5 inches thick. This thickness supports proper slope for water drainage.
How Do I Ensure Proper Drainage In A Shower Pan?
Slope the mortar bed at about 1/4 inch per foot towards the drain. This angle helps water flow correctly and prevents pooling.
Conclusion
Building a shower pan on a plywood floor is doable with the right steps. Start with a clean, dry surface and ensure proper waterproofing. Use quality materials for durability and safety. Take your time to measure and fit everything correctly.
Small details matter to avoid leaks and damage. This project can save money and add value to your home. Trust the process and stay patient. Soon, you will enjoy a strong, reliable shower base that lasts for years. Simple, clear steps lead to great results.