
If you have a wood stove or plan to get one, building a proper hearth is a must. Your hearth not only protects your floor but also adds style and safety to your space.
But how do you build a hearth that’s both strong and attractive? You might feel unsure where to start or worried about making mistakes. Don’t worry—this guide will walk you through every step, so you can create a hearth that looks great and keeps your home safe.
Ready to transform your wood stove area? Keep reading, and you’ll learn exactly how to build the perfect hearth for your needs.

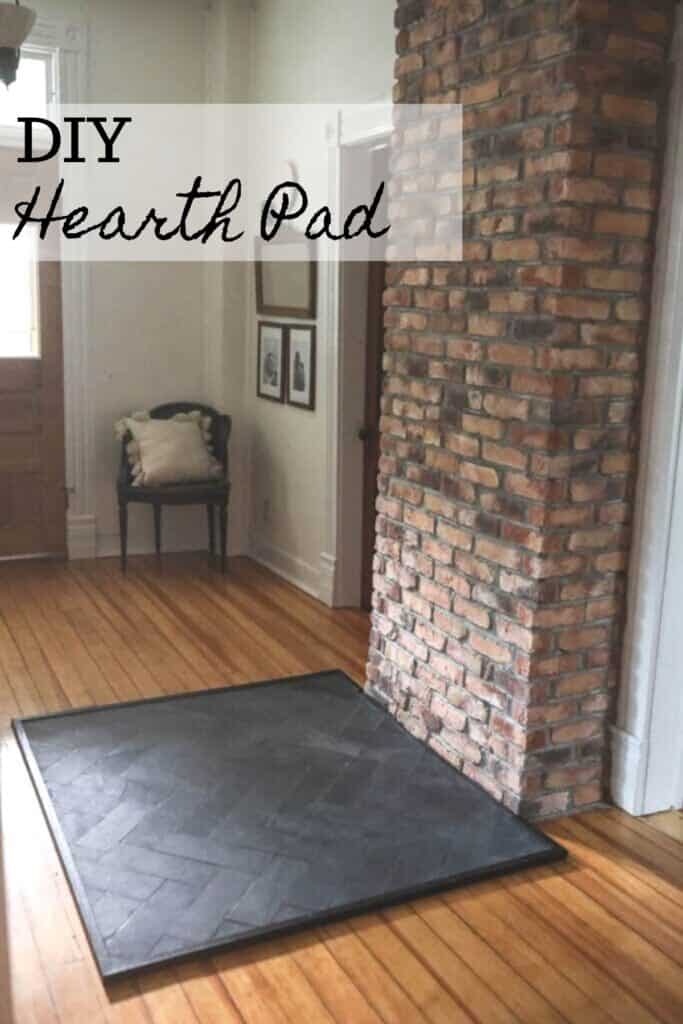
Credit: www.motherearthnews.com
Choosing The Right Location
Choosing the right location for your wood stove hearth is essential. It affects safety, efficiency, and comfort. A good spot makes the stove work better and keeps your home safe from fire risks. Careful planning saves time and money later.
Assessing Space Requirements
Measure the area where you want to place the stove. Leave enough room for the stove and the hearth. Check the stove’s size and add space around it for safety. The hearth should extend beyond the stove on all sides. This space protects your floor and walls.
Checking Local Building Codes
Local rules may limit where you can install a wood stove. Visit your city or county building office. Ask about permits and safety standards. Building codes often specify minimum distances from walls and ceilings. Follow these rules to avoid fines and keep your home safe.
Considering Heat Clearance
Heat clearance means the space needed between the stove and any combustible materials. Wood, drywall, and furniture should be far enough away. This prevents fires and heat damage. Use a stove thermometer to check temperature levels near the stove. Keep clearances as the stove manufacturer recommends.
Credit: www.farmhouseonboone.com
Selecting Hearth Materials
Selecting the right materials for your wood stove hearth is a crucial step. The hearth protects your floor from heat and sparks. It must be safe, long-lasting, and match your home’s style. Choosing the best material means balancing safety, durability, and appearance. This guide helps you understand key factors for choosing hearth materials.
Fire-resistant Options
Safety is the top priority for any hearth. Choose materials that resist heat and flames well. Common fire-resistant options include brick, stone, and concrete. These materials do not burn or catch fire easily. They create a strong shield between your wood stove and floor. Avoid materials like wood or carpet that can catch fire.
Durability And Maintenance
Durable materials last longer and save money over time. Stone and brick can handle heavy use and heat without damage. Concrete is also tough and easy to maintain. Some materials need regular sealing or cleaning to keep them safe. Consider how much care each option requires. Choose materials that fit your lifestyle and cleaning habits.
Aesthetic Choices
Your hearth can add beauty to your room. Stone offers a natural, rustic look. Brick gives a classic and warm feel. Concrete can be smooth or textured, fitting modern or traditional styles. You can pick colors and patterns to match your decor. The right material helps your hearth blend in or stand out as a feature.
Gathering Tools And Supplies
Building a hearth for a wood stove needs careful planning. The right tools and supplies make the job easier and safer. Preparing everything before starting saves time and effort. It also helps ensure a strong, lasting hearth.
Essential Tools List
Gather these tools for your hearth project:
- Measuring tape for accurate dimensions
- Level to keep surfaces even
- Hammer and chisel for shaping bricks or stones
- Notched trowel to spread mortar evenly
- Masonry saw or angle grinder for cutting materials
- Bucket and mixing hoe to prepare mortar
- Gloves to protect your hands
- Brush to clean dust and debris
Material Quantities
Calculate materials based on hearth size. Common materials include fire bricks, mortar, and concrete backer board. Use a simple formula: length × width × thickness. Add 10% extra for cuts and mistakes. Check product packaging for coverage details. Buy materials in bulk to avoid shortages during work.
Safety Gear
Wear safety gear to prevent injuries. Use gloves to shield hands from rough surfaces and mortar. Wear safety goggles to protect eyes from dust and flying debris. A dust mask stops inhaling harmful particles. Wear sturdy shoes to protect feet from heavy objects. Keep first aid supplies nearby for emergencies.
Credit: www.youtube.com
Preparing The Area
Preparing the area is the first step in building a hearth for a wood stove. This phase sets the stage for a safe and solid installation. It helps avoid problems later on and ensures the hearth supports the stove properly. Follow these steps carefully to get the area ready.
Clearing And Cleaning
Start by removing all furniture and items near the stove location. Clear the floor completely to have enough space to work. Sweep the area well to remove dust and dirt. A clean surface helps the hearth materials stick better. Check for any damage on the floor that needs fixing before you build.
Measuring And Marking
Use a tape measure to find the exact size of the hearth needed. Measure the stove’s base and add extra space around it for safety. Mark the outline on the floor with chalk or pencil. Double-check the measurements to avoid mistakes. These marks guide where to place hearth materials.
Protecting Surroundings
Cover nearby walls and furniture with protective sheets or plastic. This prevents damage from dust or materials during construction. Use painter’s tape to hold the coverings in place. Ensure the area is well-ventilated to avoid dust buildup. Protecting surroundings keeps the room clean and safe.
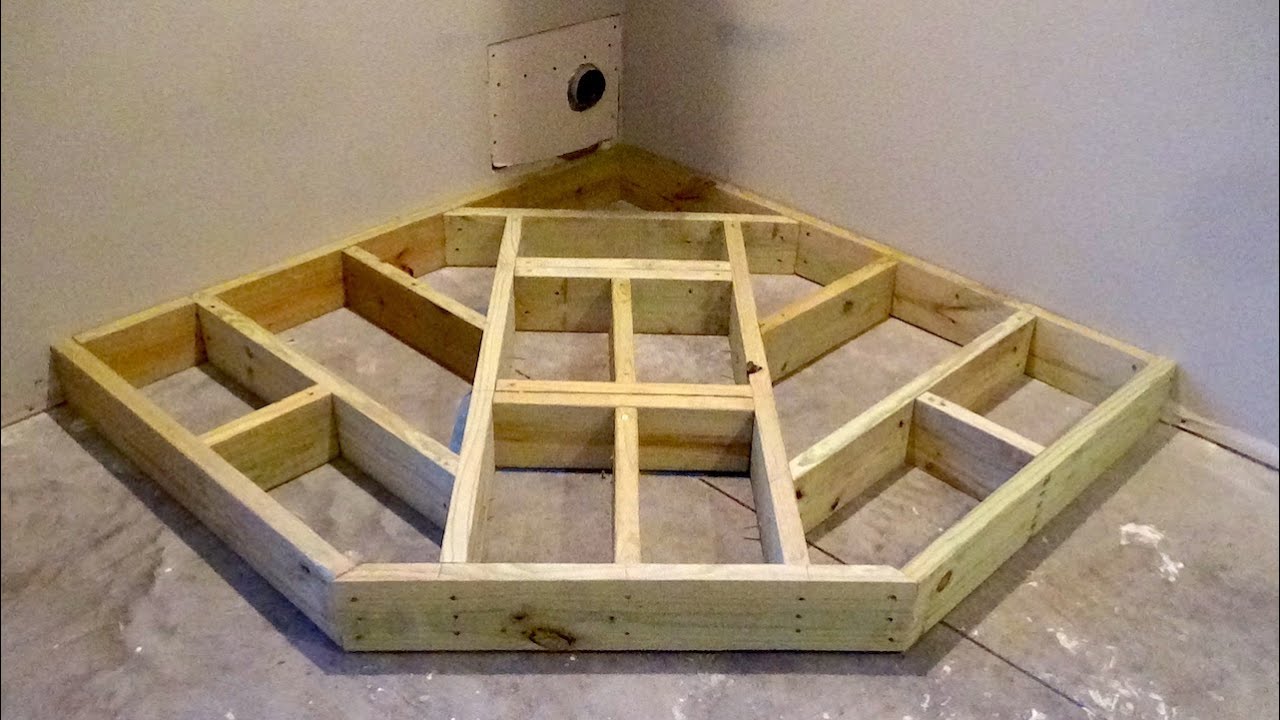
Constructing The Hearth Base
Constructing the hearth base is the first step to a safe wood stove setup. A strong base supports the stove and protects your floor from heat and sparks. Careful planning and sturdy materials make the hearth last for years. Follow simple steps to build a solid, level base that meets safety rules.
Building A Solid Foundation
Start by clearing the area where the hearth will sit. Remove carpet or wood flooring to expose the subfloor. The foundation must hold the weight of the stove and hearth materials. Use concrete board or cement backer board for strength and fire resistance. Attach the board firmly to the floor with screws or adhesive. This base stops heat from damaging the floor below.
Laying Cement Or Mortar
Mix cement or mortar according to package instructions. Spread a layer evenly over the foundation board using a trowel. This layer bonds bricks or tiles to the base. Work quickly before the mortar dries. Press the first row of bricks or fireproof tiles into the mortar. Check for gaps or uneven spots and fill as needed. Let the mortar set fully before moving on.
Ensuring Level Surface
Use a carpenter’s level to check the surface after laying each row. A flat surface keeps the stove stable and prevents tipping. Adjust bricks or tiles by tapping lightly with a rubber mallet. Add or remove mortar under bricks to fix high or low spots. Double-check the entire hearth base is level in all directions. A well-leveled base ensures safety and a neat finish.
Installing Hearth Materials
Installing the hearth materials is a key step in building a safe wood stove hearth. The right materials protect your floor and add style to your room. Proper installation ensures durability and safety.
Each step requires care and precision. Follow these simple instructions to achieve a neat, solid hearth base. The process includes cutting and fitting tiles or stones, applying adhesive, and then grouting and sealing.
Cutting And Fitting Tiles Or Stones
Measure the hearth area carefully before cutting. Use a tile cutter or wet saw for clean edges. Fit each tile or stone tightly to avoid gaps. Leave a small space for grout lines. Dry fit all pieces to check alignment. Adjust cuts as needed for a perfect fit.
Applying Adhesive
Spread a thin layer of adhesive on the hearth base. Use a notched trowel for even coverage. Press tiles or stones firmly into place. Work in small sections to prevent the adhesive from drying out. Clean any excess adhesive from tile surfaces immediately. Allow the adhesive to set as per instructions.
Grouting And Sealing
Mix grout according to package directions. Use a rubber float to apply grout between tiles. Press grout firmly into gaps to fill completely. Wipe off extra grout with a damp sponge. Let grout dry for at least 24 hours. Apply a sealer to protect grout and tiles from stains and moisture. Reapply sealer every year for best results.
Finishing Touches
Finishing touches give your wood stove hearth a polished and complete look. These final steps ensure your hearth is safe, clean, and visually appealing. Proper care and small details enhance both function and style.
Cleaning The Hearth Surface
Start by removing dust and debris from the hearth. Use a soft brush or vacuum to clear loose dirt. Wipe the surface with a damp cloth and mild soap. Avoid harsh chemicals that can damage the materials. Let the hearth dry completely before use.
Inspecting For Safety
Check the hearth for cracks or loose tiles. Make sure all edges are smooth to prevent injury. Confirm the hearth extends far enough from the stove. This reduces fire risk and protects your floor. Fix any issues before lighting the stove.
Adding Decorative Elements
Choose simple decorations that suit your home style. Place a fireproof rug nearby for added warmth and safety. Use metal or stone accessories that resist heat. Avoid cluttering the hearth to keep it functional. Small plants or artwork can add charm too.
Maintaining Your Hearth
Maintaining your hearth is essential for safety and durability. A well-kept hearth protects your floors and walls from heat and sparks. It also keeps your wood stove working efficiently. Small efforts can prevent costly repairs and hazards.
Regular Cleaning Tips
Remove ashes from the hearth often. Use a metal container to avoid fire risks. Sweep dust and debris around the hearth weekly. Clean the hearth surface with mild soap and water. Avoid harsh chemicals that can damage materials. Keep the area dry to stop mold and mildew growth.
Checking For Damage
Inspect the hearth for cracks or chips regularly. Look for loose tiles or bricks. Check the grout and mortar for signs of wear. Notice any discoloration or burn marks. Make sure the hearth edges are smooth and secure. Early detection helps avoid bigger problems later.
When To Repair Or Replace
Repair small cracks and loose parts promptly. Use heat-resistant materials for fixes. Replace tiles or bricks that are broken or missing. Consider a full replacement if the hearth is uneven or unsafe. Consult a professional if unsure about the damage. Safety should be your top priority.
Frequently Asked Questions
What Materials Are Best For Building A Wood Stove Hearth?
Good hearth materials are fireproof and durable. Common choices include brick, stone, tile, and concrete. These materials protect the floor from heat and sparks.
How Big Should A Hearth Be For A Wood Stove?
A hearth should extend at least 18 inches in front of the stove. It also needs 8 to 12 inches on the sides. This size keeps the area safe from sparks and heat.
Can I Build A Hearth Myself Or Hire A Professional?
You can build a hearth yourself if you have basic skills. Measuring and using fireproof materials are key steps. For complex setups, hiring a professional is safer.
Do Hearths Require Special Permits Or Inspections?
Local building codes often require permits for wood stove installation. Hearths may need inspection to meet safety rules. Check with your local office before starting work.
How Do I Maintain A Wood Stove Hearth For Safety?
Keep the hearth clean and free of debris. Inspect it regularly for cracks or damage. Fix any issues quickly to prevent fire hazards.
Conclusion
Building a hearth for your wood stove keeps your home safe and warm. Choose strong, heat-resistant materials for the best protection. Measure your space carefully before you start building. Take your time to fit each piece well. A solid hearth makes your wood stove look great and work better.
Enjoy the cozy heat and peace of mind it brings. Your effort will pay off with a safer, more comfortable home.