
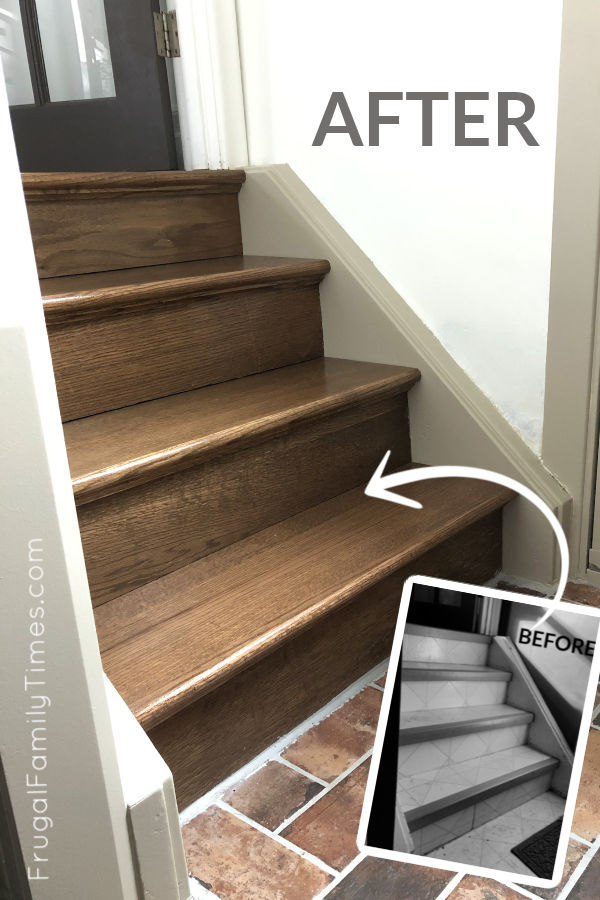
Are your stairs looking worn out or outdated? Installing stair treads over your existing stairs is a quick and affordable way to give them a fresh new look.
You don’t have to tear out your old stairs or spend a fortune on remodeling. With the right tools and simple steps, you can transform your staircase into a stylish focal point in your home. Keep reading, and you’ll discover how easy it is to upgrade your stairs yourself—no special skills needed.
Your home deserves this upgrade, and you’ll love the results!
Tools And Materials Needed
Before installing stair treads over existing stairs, gather all the necessary tools and materials. This step ensures the project runs smoothly without delays. Having everything ready saves time and reduces frustration.
Choosing the right tools and materials also guarantees a safe and durable installation. Each item plays a specific role in the process. Use quality materials for the best results.
Tools Needed
- Measuring tape – to get accurate dimensions
- Pencil – for marking cuts and positions
- Circular saw or handsaw – to cut the treads
- Hammer or nail gun – to secure the treads
- Drill with bits – for pre-drilling holes
- Level – to ensure the treads are even
- Screwdriver – to tighten screws
- Safety glasses – to protect your eyes
- Dust mask – to avoid inhaling sawdust
- Vacuum or broom – to clean the work area
Materials Needed
- Stair treads – select the right size and style
- Adhesive – wood glue or construction adhesive
- Screws or nails – to fix the treads securely
- Wood filler – to cover nail or screw holes
- Sandpaper – to smooth rough edges
- Finish or paint – to protect and beautify the stairs
- Primer – if painting the treads
- Cleaning cloth – to wipe dust and debris

Credit: www.youtube.com
Preparing The Existing Stairs
Preparing your existing stairs is the first step to a successful stair tread installation. A clean and smooth surface helps the new treads stick better. It also ensures a safe and even finish. Take time to check every part of your stairs before you start.
Cleaning And Inspecting
Remove all dust, dirt, and debris from the stairs. Use a broom or vacuum to clear the surface. Wipe down with a damp cloth to catch fine dust. Look closely for cracks, loose nails, or worn-out spots. Mark any areas that need fixing before moving forward.
Repairing Damages
Fill any cracks or holes with wood filler or putty. Let it dry completely to avoid bumps under the treads. Hammer down or replace any loose nails or screws. Replace rotten or broken wood if needed. A sturdy base keeps your new treads safe and secure.
Sanding The Surface
Sanding smooths the surface and removes old finishes. Use medium-grit sandpaper to even out rough spots. Sand edges and corners carefully to avoid splinters. Clean off sanding dust with a vacuum or damp cloth. A smooth surface helps the adhesive work better and lasts longer.
Measuring And Cutting Stair Treads
Measuring and cutting stair treads is a key step in installing them over existing stairs. Getting the right size and shape ensures a perfect fit. This process helps avoid gaps and makes the stairs safe and attractive. Accurate measurements save time and reduce material waste.
Taking Accurate Measurements
Start by measuring the width of each stair. Use a tape measure and record the exact number. Measure from one side to the other, including any trim or edges. Check the depth of the stair tread too. Measure from the front edge to the back. Write down all measurements clearly to avoid mistakes.
Choosing The Right Materials
Select materials that match your stairs and style. Wood is popular for its durability and look. Laminate or vinyl can be easier to clean. Ensure the material thickness fits well over the existing steps. Thicker treads may need adjustments to the stair frame. Pick materials that resist wear and slip.
Cutting To Size
Use a saw to cut the stair treads to the measured size. A circular saw or miter saw works best for straight cuts. Cut slowly and carefully to keep edges smooth. Double-check measurements before cutting each piece. Sand the cut edges for a clean finish. Test fit the treads on stairs before final installation.
Applying Adhesive And Positioning Treads
Applying adhesive and positioning stair treads is a key step in installing treads over existing stairs. This process ensures the treads stick well and stay in place for years. Careful preparation and attention during this step will help achieve a smooth, safe staircase.
Selecting The Adhesive
Choose an adhesive made for stair treads and wood surfaces. Look for one that offers strong bonding and works with your tread material. Some adhesives are designed for indoor use only, so check the product label. Avoid using generic glues that may not hold under foot traffic.
Applying Adhesive Correctly
Spread the adhesive evenly on the back of the tread. Use a notched trowel to create consistent ridges. These ridges help the adhesive grip the stair surface better. Apply enough glue to cover the entire back, but avoid excess that could squeeze out later.
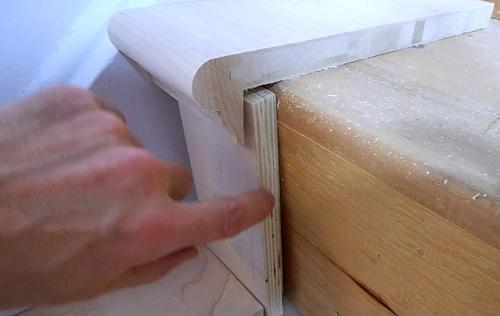
Aligning The Treads
Place the tread carefully on the stair, starting at one edge. Align it with the edges of the existing stairs for a neat look. Press down firmly to set the tread in place. Use clamps or weights to keep the tread steady while the adhesive dries.
Securing The Stair Treads
Securing stair treads properly is key to a safe, lasting installation. The treads must be fixed firmly to avoid movement or noise. This step also helps keep the stairs looking neat and finished.
Choose the right fasteners and techniques to match your stairs and materials. The goal is strong attachment without damage to the existing stairs.
Nailing Or Screwing Options
You can use nails or screws to secure stair treads. Nails are quicker to install but may not hold as tightly over time. Screws provide stronger grip and reduce chances of the tread loosening.
Use galvanized or coated fasteners to prevent rust. Choose the right length to go through the tread and into the stair base without poking out.
Using Finishing Nails
Finishing nails are thin and less visible on the surface. They create a clean look with minimal holes to fill later. Use a nail set to drive them just below the wood surface.
Spacing nails evenly along the edges helps spread the hold. Avoid nailing too close to the edges to prevent splitting the wood.
Countersinking And Filling
After nailing or screwing, countersink the fasteners slightly below the surface. This step keeps the tread surface smooth and safe to walk on.
Fill the holes with wood filler or putty matching the tread color. Sand the area smooth once dry for a seamless finish. This makes the stairs look professional and well cared for.
Credit: www.frugalfamilytimes.com
Finishing Touches
Finishing touches complete the stair tread installation. They protect your work and ensure safety. These steps make your stairs look neat and last longer. Pay close attention to this final phase for best results.
Sealing And Protecting
Apply a sealant to shield the stair treads from damage. Choose a product that matches your tread material. Sealants prevent water, dirt, and wear from harming the stairs. Use a brush or cloth to spread it evenly. Let the sealant dry fully before using the stairs.
Adding Non-slip Features
Non-slip options reduce the risk of falls. Use adhesive strips or pads designed for stairs. These features improve traction, especially on smooth surfaces. Place them near the edge of each tread for best effect. Test the grip before regular use.
Cleaning Up
Clear away dust, debris, and leftover materials. Use a vacuum or broom to clean the steps thoroughly. Wipe the surface with a damp cloth for a polished look. Proper cleanup keeps your stairs safe and attractive. Store tools and unused items properly after finishing.
Common Mistakes To Avoid
Installing stair treads over existing stairs can be a smart way to refresh your steps. Avoiding common mistakes saves time and money. Small errors can cause big problems later.
Knowing what to watch for helps you get the best results. Focus on these common pitfalls to keep your project on track and safe.
Incorrect Measurement Of Stair Dimensions
Measuring stairs wrong leads to poor fit and gaps. Always measure width and depth carefully. Measure each step individually. Stairs can vary slightly in size.
Ignoring The Condition Of Existing Stairs
Old stairs with damage cause issues for new treads. Check for loose boards, cracks, or rot first. Fix any problems before installing treads.
Using The Wrong Adhesive Or Fasteners
Choose adhesives and nails that suit your stair material. Wrong products may not hold treads securely. Follow manufacturer instructions closely for best results.
Skipping Surface Preparation
Clean and sand stairs before attaching treads. Dust, dirt, or paint can stop glue from sticking well. Prepare the surface for a strong bond.
Neglecting Safety Precautions
Wear safety gear like gloves and goggles. Use tools carefully to avoid injury. Work slowly and check your progress often.
Maintenance Tips For Longevity
Maintaining stair treads helps keep them safe and looking good longer. Regular care prevents damage and wear. Simple steps can extend the life of your stairs. Follow these tips to protect your investment and enjoy your stairs for years.
Cleaning Stair Treads Regularly
Dust and dirt can wear down stair treads quickly. Sweep or vacuum the stairs often. Use a damp cloth to wipe them clean. Avoid harsh chemicals that can damage the surface. Gentle cleaning keeps treads fresh and safe.
Protecting From Moisture
Water can cause wood and other materials to warp or rot. Wipe up spills immediately. Use rugs or mats in wet areas. Ensure good ventilation to reduce humidity. Keeping stairs dry prevents costly damage.
Inspecting For Damage
Check stair treads for cracks, loose nails, or wear. Early repairs stop small problems from growing. Tighten screws or replace damaged parts quickly. Regular inspections keep stairs strong and safe.
Applying Protective Finishes
Use sealants or varnishes to protect wood treads. Reapply finishes as recommended by the manufacturer. Protective layers block dirt and moisture. This step keeps stairs looking new and sturdy.
Credit: woodgears.ca
Frequently Asked Questions
What Tools Do I Need To Install Stair Treads Over Stairs?
You need a measuring tape, pencil, saw, adhesive, and nails or screws. A drill and level help for precise fitting and alignment.
How Do I Prepare Existing Stairs Before Installing Treads?
Clean the stairs thoroughly and remove any loose paint or debris. Sand the surface lightly to help the adhesive stick better.
Can I Install Stair Treads Over Carpeted Stairs?
Yes, but remove the carpet and padding first. The surface must be solid and flat for the treads to fit properly.
How Do I Measure For Stair Tread Installation?
Measure the width and depth of each step carefully. Cut the treads slightly smaller to fit without gaps.
How Long Does It Take To Install Stair Treads?
It usually takes a few hours for an average staircase. Drying time for adhesive can add extra hours before use.
Conclusion
Installing stair treads over your existing stairs can improve safety and style. Follow the steps carefully for a smooth fit. Use the right tools and materials to make the job easier. Take your time to measure and align each tread well.
This simple update can refresh your stairs without full replacement. Enjoy your new look and safer steps for years to come.