
Are you struggling to remove old veneer from your furniture or cabinets? Using a heat gun can make this job much easier and less messy than you might think.
In this guide, you’ll learn simple, step-by-step techniques to safely and effectively strip veneer without damaging the wood underneath. Whether you’re a DIY enthusiast or tackling a home project, these tips will save you time and frustration. Keep reading to discover how to handle your heat gun like a pro and get your surfaces ready for a fresh new look.
Tools Needed
Removing veneer with a heat gun requires the right tools. Using proper equipment makes the job safer and easier. Prepare all items before starting. This helps avoid delays and mistakes.
Choosing The Right Heat Gun
Select a heat gun with adjustable temperature settings. Lower heat prevents damage to the wood underneath. A model with a comfortable grip helps control better. Choose one with a narrow nozzle for precise heat application. This directs heat exactly where you need it.
Additional Safety Equipment
Wear heat-resistant gloves to protect your hands from burns. Safety glasses stop debris and heat from hurting your eyes. Use a dust mask if the veneer produces dust or fumes. Keep a fire extinguisher nearby in case of emergencies. Dress in long sleeves to shield your skin from heat.
Other Required Tools
Have a putty knife or scraper to lift softened veneer. Use a utility knife to cut through tough spots carefully. A heat-resistant cloth helps manage hot surfaces. Keep a drop cloth or plastic sheet to protect floors. A small brush can clean residue after removal.

Credit: www.thirtyeighthstreet.com
Preparing The Workspace
Preparing the workspace is the first step to remove veneer safely with a heat gun. A clean, organized area helps avoid accidents and protects your home. Taking a few simple precautions makes the process smoother and safer.
Clearing The Area
Remove all furniture and objects near the workspace. This avoids damage and gives you enough room to move freely. A clear area also helps you focus on the task without distractions. Keep tools and materials close but out of your way.
Protecting Surrounding Surfaces
Cover floors and nearby walls with drop cloths or old sheets. Use painter’s tape to hold coverings in place. This prevents heat damage or stains from melted veneer or adhesive. Protect electrical outlets and switches with tape or plastic covers.
Ensuring Proper Ventilation
Open windows and doors to create airflow. Heat guns release fumes that can be harmful if trapped indoors. Use a fan to help move air out of the room. Good ventilation keeps the air fresh and reduces health risks.
Setting Up The Heat Gun
Setting up the heat gun properly is important before removing veneer. This step helps you work safely and effectively. A well-set heat gun gives you control over the process. It also protects the surface under the veneer from damage.
Adjusting Temperature Settings
Start by checking the heat gun’s temperature settings. Most heat guns have adjustable levels. Use a moderate temperature to avoid burning the wood. Too much heat can damage the surface. Set the temperature between 200°F and 300°F for best results. Adjust as needed based on how the veneer reacts.
Selecting The Correct Nozzle
Choose the right nozzle for the job. A wide nozzle spreads heat evenly over a larger area. It helps loosen the glue under the veneer. A narrow nozzle focuses heat on a small spot. Use it for tight corners or edges. Pick the nozzle that fits your work area best.
Testing The Heat Gun
Test the heat gun before starting on the veneer. Point it away from yourself and heat for a few seconds. Feel the air temperature carefully. Check if the heat is steady and the gun works well. This test avoids surprises during the project. It ensures a smooth veneer removal process.
Credit: www.attagirlsays.com
Heating The Veneer
Heating the veneer is the key step in removing it with a heat gun. The heat softens the glue that holds the veneer to the surface. This process makes the veneer easier to peel off without damage. Careful heating is important. Too much heat can burn the wood underneath. Too little heat will not soften the glue enough.
Maintaining Safe Distance
Keep the heat gun at least 6 to 8 inches from the veneer. Holding it too close can burn the surface. Too far away wastes heat and slows the process. Move the heat gun in small circles or side to side. This helps heat the area evenly without staying too long in one spot.
Applying Heat Evenly
Heat the veneer slowly and evenly. Focus on small sections at a time. Avoid heating large areas all at once. Even heat softens the glue better and prevents warping. Use a consistent speed when moving the heat gun. This keeps the temperature steady across the surface.
Signs The Adhesive Is Softening
Watch the veneer closely for softening signs. The veneer may start to lift slightly at the edges. You may see slight bubbling or wrinkles on the surface. The glue will feel less sticky when touched carefully. These signs mean the veneer is ready to be peeled off safely.
Removing The Veneer
Removing veneer with a heat gun is a careful process. The heat softens the glue, making the veneer easier to lift. Patience and the right tools help avoid damage to the wood underneath.
Start by heating a small section of the veneer. Work slowly to prevent burning the surface. Once warm, the veneer should peel off more easily.
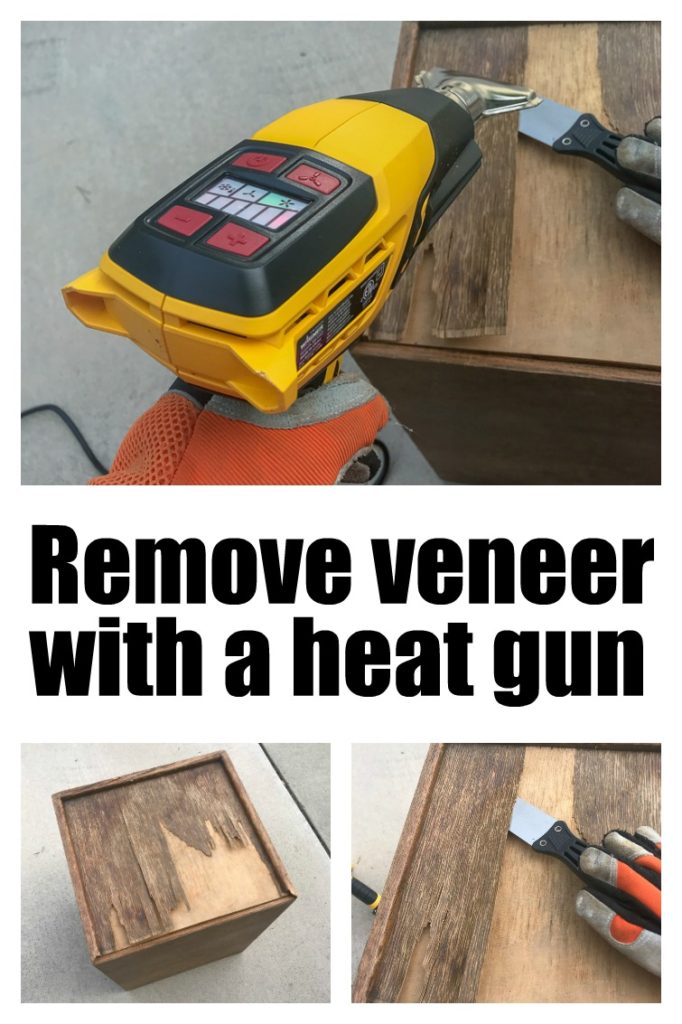
Using Scrapers Safely
Choose a scraper with a flat, sharp edge. Hold it at a low angle to the surface. Gently slide it under the veneer edge. Avoid pressing too hard to prevent gouging the wood.
Keep your hands steady. Move the scraper slowly along the heated area. Stop if you feel resistance and apply more heat.
Peeling Techniques
Lift the veneer slowly after heating. Pull it back at a low angle. This reduces the risk of tearing the wood or leaving glue behind.
Work in small sections. Reheat the area if the veneer resists. Use steady, even pressure for best results.
Handling Stubborn Areas
Some spots may not peel easily. Reapply heat and allow it to soak in longer. Use a scraper carefully to loosen edges.
For tough glue spots, a gentle solvent can help. Test it on a small hidden area first. Take your time and avoid rushing these parts.

Credit: www.reddit.com
Cleaning Residue
After removing veneer with a heat gun, residue often remains on the surface. This leftover adhesive and small wood pieces can spoil the look of your project. Cleaning residue is a key step to prepare the surface for new finishes. It helps ensure a smooth, clean base for your next work.
Removing Adhesive Leftovers
Start by scraping off thick glue bits gently. Use a plastic scraper to avoid wood damage. For sticky residue, apply a small amount of adhesive remover or rubbing alcohol. Let it sit for a few minutes to soften the glue. Then wipe with a clean cloth. Repeat until the surface feels smooth and clean.
Sanding The Surface Smooth
Use fine-grit sandpaper to smooth out rough spots. Sand lightly in a circular motion. Focus on areas with glue residue or wood splinters. Sanding evens the surface and removes small imperfections. Clean off dust with a dry cloth after sanding.
Preparing For New Finishes
Ensure the surface is dry and dust-free. Check for any remaining residue or rough patches. A clean, smooth surface helps new finishes stick better. Choose your paint, stain, or varnish. Follow application instructions for the best results.
Safety Tips
Using a heat gun to remove veneer requires care and attention. Safety should be your top priority. Heat guns reach very high temperatures. They can cause burns, start fires, or damage surfaces. Follow these safety tips to protect yourself and your home.
Avoiding Burns And Injuries
Always wear heat-resistant gloves to protect your hands. Keep your fingers away from the hot nozzle. Use the heat gun in a well-lit area to see clearly. Do not touch the heated surface immediately after heating. Let it cool before handling. Keep children and pets away during work.
Preventing Fire Hazards
Do not use the heat gun near flammable materials. Clear the work area from paper, cloth, or liquids. Avoid pointing the gun at the same spot for too long. This can cause overheating and fire. Always have a fire extinguisher nearby. Unplug the heat gun after use to stop accidental fires.
Proper Heat Gun Storage
Allow the heat gun to cool completely before storing it. Store it in a dry, safe place out of reach of children. Use the original case or a sturdy box for storage. Avoid wrapping the cord tightly around the gun. This can damage the cord and cause electrical hazards.
Common Mistakes To Avoid
Removing veneer with a heat gun can be simple if done right. Many people make mistakes that cause damage or danger. Avoiding these common errors helps protect your work and keeps you safe. Focus on careful steps to get the best results.
Overheating The Veneer
Heat guns get very hot. Holding the gun too close or too long can burn the veneer. Burnt veneer becomes hard to remove and can damage the wood underneath. Move the heat gun slowly and keep it at a safe distance. Heat evenly and watch the surface closely.
Using Excessive Force
Pulling or scraping the veneer too hard can break it or harm the surface below. Use gentle pressure with a putty knife or scraper. Let the heat soften the glue first. Forcing the veneer off can cause cracks and splinters.
Ignoring Safety Precautions
Heat guns can cause burns or fires if not used carefully. Always wear heat-resistant gloves and safety glasses. Work in a well-ventilated area to avoid inhaling fumes. Keep flammable materials far from your work zone. Stay alert to avoid accidents.
Frequently Asked Questions
How Do You Safely Remove Veneer With A Heat Gun?
Heat the veneer evenly until the glue softens. Use a putty knife to gently lift the veneer. Work slowly to avoid damaging the wood underneath.
What Temperature Should A Heat Gun Be For Veneer Removal?
Set the heat gun between 200°F and 300°F. This range softens glue without burning the wood. Adjust heat based on veneer thickness.
Can A Heat Gun Damage The Wood Under Veneer?
Yes, too much heat can scorch or warp wood. Keep the gun moving and avoid overheating one spot. Use moderate heat for best results.
How Long Does It Take To Remove Veneer Using A Heat Gun?
It usually takes a few minutes per section. Time depends on veneer thickness and glue type. Be patient for a clean removal.
What Tools Do I Need Besides A Heat Gun To Remove Veneer?
A putty knife or scraper is essential. Gloves protect your hands from heat. Sandpaper helps smooth the wood after veneer removal.
Conclusion
Removing veneer with a heat gun takes patience and care. Heat softens the glue, making the veneer easier to lift. Always keep the gun moving to avoid damage. Use a scraper gently to peel off the softened veneer. Work in small sections for better control.
Protect yourself with gloves and a mask. Clean the surface well after removal. This method saves time and effort compared to other ways. Stay focused and take breaks if needed. With practice, you will get better at this task.