
Are you ready to add a special touch to your holiday decorations this year? Making a Christmas star out of wood is a simple and rewarding project that anyone can do.
Imagine creating a beautiful, handmade star that shines with warmth and charm in your home. This guide will walk you through every step, even if you’ve never worked with wood before. By the end, you’ll have a unique decoration that not only looks amazing but also brings a sense of pride and joy.
Keep reading, and let’s make your Christmas sparkle brighter than ever!
Credit: letsdiyitall.com
Materials And Tools Needed
Creating a Christmas star out of wood is a fun and rewarding project. To get started, gather all the materials and tools needed. Having the right supplies makes the process smoother and safer. Below is a list of what you will need for this festive craft.
Types Of Wood Suitable For Stars
Choose wood that is easy to cut and shape. Pine is a popular choice because it is soft and affordable. Cedar and fir also work well and add a nice scent. Avoid hardwoods like oak or maple; they are harder to work with. Thin plywood can be used for lighter stars. Pick smooth wood to reduce sanding time.
Essential Tools For The Project
You need some basic tools for cutting and shaping the wood. A handsaw or jigsaw works best for cutting star shapes. Sandpaper or a sanding block smooths rough edges. A pencil helps mark your design on the wood. Use wood glue or small nails to join pieces. A ruler or measuring tape keeps your star even.
Safety Equipment To Use
Safety is very important while working with wood and tools. Wear safety glasses to protect your eyes from dust and wood chips. Use gloves to avoid splinters and cuts. A dust mask helps keep wood dust out of your lungs. Work in a well-ventilated area for fresh air. Keep your workspace clean to prevent accidents.
Choosing The Star Design
Choosing the right star design is the first step in making a wooden Christmas star. The design sets the tone for the whole project. Simple shapes work well for beginners. More complex patterns suit those with some woodworking skills. The size of your star also matters. It affects where you can place your finished star and how much wood you need.
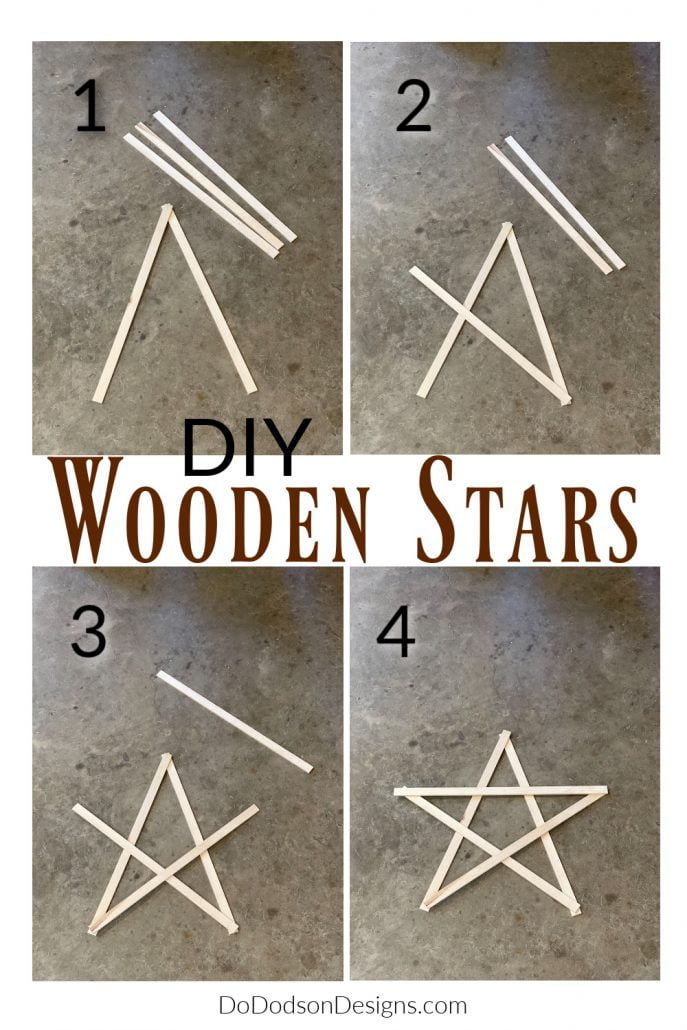
Simple Star Shapes For Beginners
Start with easy star shapes. Five-point stars are classic and easy to cut. They have straight lines and sharp angles. These shapes use less wood and require fewer tools. Simple stars make a great first project. They help you practice cutting and sanding.
Advanced Star Patterns
Choose advanced patterns for a challenge. These stars have more points or layered designs. You might include curves or intricate cuts. These patterns need precise measuring and steady hands. Advanced stars look stunning but take more time. They are perfect for those ready to improve their skills.
Sizing Your Wooden Star
Decide the size before cutting. Small stars fit well on tables or shelves. Large stars make bold wall decorations. Measure your space to find the right size. Keep wood thickness in mind for stability. A well-sized star looks balanced and fits your home style.
Preparing The Wood
Preparing the wood is the first step in making a beautiful Christmas star. It ensures your star looks neat and lasts long. Taking time to prepare the wood makes cutting and shaping easier. This section guides you through cutting, sanding, and marking the wood.
Cutting The Wood To Size
Start by choosing the right type of wood. Pine or cedar work well for this project. Use a saw to cut the wood into strips. Each strip should match the star’s arm length. Measure twice before cutting to avoid mistakes. Cut slowly and carefully for clean edges.
Sanding For Smooth Edges
After cutting, the wood edges may feel rough. Use sandpaper to smooth all sides and ends. Sanding prevents splinters and helps paint stick better. Move the sandpaper in small circles for even smoothing. Wipe off dust with a cloth before moving on.
Marking The Star Pattern
Draw the star pattern on the wood before assembling. Use a pencil and a ruler for straight lines. Mark all points where cuts or joins will happen. Clear marks make it easier to follow the pattern. This step helps keep your star symmetrical and balanced.

Credit: www.youtube.com
Cutting And Shaping The Star
Cutting and shaping the wooden star is a key part of this craft. It turns your flat piece of wood into a beautiful star shape. Careful cutting makes the star neat and ready for decorating. This step requires patience and the right tools.
Using A Jigsaw Or Handsaw
A jigsaw makes cutting curves and angles easy. It moves smoothly along the star outline. A handsaw works well for straight cuts and simple shapes. Hold the wood firmly to avoid slips. Follow the drawn lines closely for a clean cut.
Creating Sharp Points And Angles
Sharp points give the star its classic look. Cut slowly at the tips to keep them sharp. Use a small blade or fine teeth saw for better control. Check each angle to ensure it matches the star’s design.
Fine-tuning The Shape
Use sandpaper to smooth rough edges and curves. Start with coarse grit, then move to finer grit for a soft finish. Trim any uneven parts with a file or small knife. The star should feel smooth and look even all around.
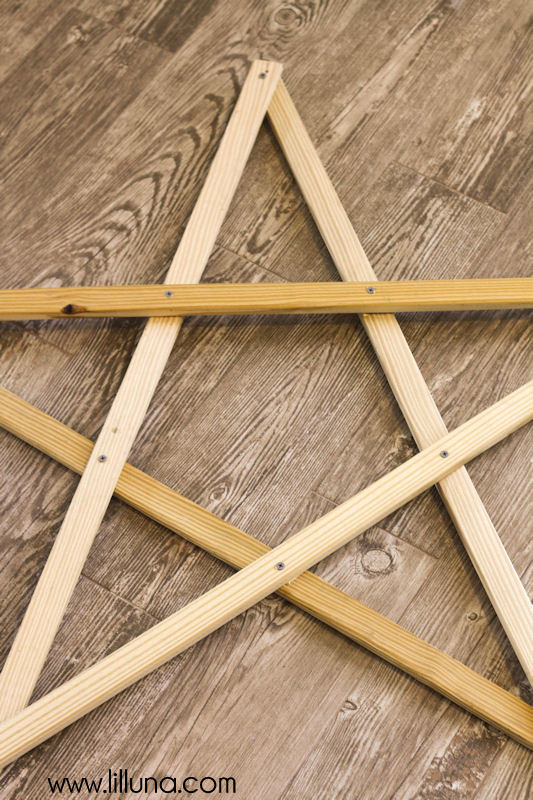
Assembling And Securing Pieces
Assembling and securing the wooden pieces is a key step in making your Christmas star. This process ensures the star holds its shape and looks neat. You will join the pieces carefully and fix them together firmly. Proper assembly gives your star strength and durability.
Joining Multiple Wood Pieces
Start by arranging the wood pieces in the star shape. Check the angles where pieces meet. Make sure they fit tightly without gaps. Use a pencil to mark where each piece touches the other. This helps during gluing and nailing. Align the pieces on a flat surface for stability.
Using Wood Glue And Nails
Apply wood glue along the edges where pieces join. Spread it evenly for a strong bond. Press the pieces together after gluing. Use small nails to add extra hold. Gently hammer nails at an angle to avoid splitting wood. Nails keep the pieces secure while glue dries.
Clamping And Drying Time
Use clamps to hold the star tightly. Clamps prevent movement and ensure a firm bond. Leave the clamps on for at least one hour. Drying time depends on the glue brand. Avoid handling the star until the glue fully dries. This step keeps your star strong and stable.
Finishing Touches
Finishing touches bring your wooden Christmas star to life. They add charm and protect your creation. These steps make your star stand out and last longer. Let’s explore how to finish your star with style and care.
Painting And Staining Options
Choose colors that match your holiday decor. Bright reds and greens create a classic look. Soft whites and golds add a modern touch. Staining shows the wood grain and feels warm. Use a brush or cloth for even coverage. Let each coat dry fully before adding more.
Adding Decorative Elements
Glue small beads or glitter for sparkle. Attach tiny pinecones or ribbons for a natural feel. Use stickers or stencils for patterns and shapes. Keep decorations light to avoid weighing down the star. Place elements carefully for a balanced design.
Protective Coating For Durability
Apply clear varnish or polyurethane to seal your work. This layer protects against moisture and dust. Use a spray or brush-on finish for smooth coverage. Allow the coating to dry in a dust-free place. Multiple coats increase strength and shine.
Displaying Your Wooden Christmas Star
Your wooden Christmas star deserves a special place to shine. Displaying it well can highlight your craftsmanship and bring warm holiday cheer to your home. Choose spots where the star catches the eye and adds a festive touch. Thoughtful placement makes your decoration stand out and invites admiration.
Hanging Ideas For Indoors
Hang your wooden star on a wall using sturdy hooks or nails. Place it above the fireplace for a classic look. Use a ribbon or twine to suspend it from the ceiling near a window. Position the star where it can catch natural light during the day. Keep it away from direct heat to avoid damage.
Outdoor Display Tips
Seal your star with weatherproof paint before placing it outside. Attach it securely to your front door or porch wall. Use strong nails or hooks to keep it stable in wind. Position it near outdoor lights for better visibility at night. Avoid placing it on the ground to prevent moisture damage.
Incorporating Lights
Wrap small LED string lights around the star’s edges for a glowing effect. Choose warm white lights for a cozy feel. Battery-operated lights offer easy setup without cords. Test the lights before attaching to ensure even coverage. Keep wires neat and hidden for a clean look.
Credit: www.dododsondesigns.com
Troubleshooting Common Issues
Making a Christmas star out of wood can be fun, but some problems may appear. These problems can slow you down or affect the look of your star. Knowing how to fix common issues helps you keep going and get great results.
Fixing Splintered Wood
Splintered wood can ruin the smooth look of your star. Use fine sandpaper to gently smooth the splinters. Sand along the grain to avoid more damage. For bigger splinters, apply wood glue to hold them in place before sanding. Let the glue dry fully to make a solid fix.
Correcting Uneven Cuts
Uneven cuts make the star look unbalanced. Use a sharp saw or a sanding block to even the edges. Measure twice before cutting to reduce mistakes. Small gaps can be filled with wood filler. Sand the filler smooth after it dries to blend it with the wood.
Improving Adhesion
Strong joints keep your star sturdy. Clean the wood surfaces before applying glue. Remove dust and oil for better grip. Clamp the pieces firmly while the glue dries. Use a quality wood glue made for your project. Avoid moving the pieces until the glue sets fully.
Frequently Asked Questions
What Materials Do I Need To Make A Wooden Christmas Star?
You need wood pieces, nails or glue, sandpaper, paint, and a saw. Basic tools like a hammer and ruler help with cutting and assembling.
How Long Does It Take To Make A Wooden Christmas Star?
It usually takes about 1 to 2 hours depending on your skill level. Drying time for paint or glue may add extra time.
Can Beginners Easily Make A Wooden Christmas Star?
Yes, beginners can make it by following simple steps and safety tips. Start with small wood pieces and take your time.
What Type Of Wood Is Best For A Christmas Star?
Softwoods like pine or cedar are easy to cut and shape. They are lightweight and hold paint well.
How Can I Decorate My Wooden Christmas Star?
You can paint it with bright colors, add glitter, or use ribbons. Personal touches make your star unique and festive.
Conclusion
Making a Christmas star out of wood is a fun and rewarding project. It adds a warm, handmade touch to your holiday decor. You only need a few simple tools and materials to start. The steps are easy to follow, even for beginners.
Creating your own star brings joy and pride. Enjoy the process and the festive spirit it brings to your home. Give it a try and see how bright your Christmas can shine!