
Have you ever thought about turning your shed into something truly unique by building it into a hillside? Imagine a space that blends perfectly with your landscape, offering natural insulation and a cozy, hidden retreat.
It might sound complicated, but with the right steps, you can create a sturdy, attractive shed that fits right into the slope of your land. You’ll discover simple, practical tips to help you build your hillside shed safely and efficiently.
Ready to transform your outdoor space? Keep reading, and let’s get started.
Choosing The Right Location
Choosing the right location is the first step to building a shed into a hillside. The spot must be safe, dry, and easy to reach. The slope should be steady, so the shed stays strong over time. Good sunlight helps keep the shed warm and bright. Access matters for carrying tools and materials. This section guides you through what to check before starting your project.
Assessing Slope Stability
Check if the hillside is firm and not loose. Walk the area and look for cracks or landslides. A steep slope may need extra support like retaining walls. Avoid places with recent erosion or where soil moves easily. Stable ground stops your shed from shifting or sinking.
Checking Soil Drainage
Good drainage prevents water from pooling near your shed. Dig a small hole and fill it with water. See how fast the water drains away. Avoid clay soil that holds water. Choose soil that lets water flow through quickly. Proper drainage protects your shed’s foundation from damage.
Considering Sunlight And Accessibility
Pick a spot that gets enough sunlight. Sunlight keeps the shed dry and helps prevent mold. Also, make sure you can reach the shed easily. Think about paths for carrying tools and materials. Easy access saves time and effort during building and use.
Credit: www.secrets-of-shed-building.com
Planning Your Shed Design
Planning your shed design is the first step to a successful hillside project. It sets the foundation for every decision ahead. Thoughtful design helps the shed blend with the land and last longer. A clear plan saves time and money during construction.
Start by thinking about the shed’s purpose. Storage, workspace, or something else? This guides size and style choices. Consider how the shed will fit into the slope and landscape around it. Planning carefully makes building easier and the final result stronger.
Selecting Shed Size And Style
Choose a size that fits your needs and the hillside space. Avoid making it too big or small. A smaller shed can fit better on steep slopes. Pick a style that matches your home or garden. Simple designs work best for hillside builds. They reduce construction challenges and look natural.
Incorporating Hillside Features
Use the slope to your advantage. Build part of the shed into the hill for support. This adds insulation and saves space. Plan for proper drainage to prevent water damage. Think about windows and doors placement to catch sunlight. The hill can protect the shed from wind and harsh weather.
Materials Suitable For Hillside Builds
Pick strong materials that handle hillside pressure well. Pressure-treated wood resists moisture and decay. Concrete blocks or stone offer solid foundation support. Use weather-resistant siding to protect from rain and dirt. Lightweight roofing helps reduce stress on the structure. Durable materials ensure the shed stays safe for years.
Preparing The Site
Preparing the site is the first step to building a shed into a hillside. It involves making the ground stable and ready for construction. Proper preparation helps avoid problems like water damage or soil erosion later.
Clearing And Leveling The Ground
Start by removing plants, rocks, and debris from the area. Clear enough space for the shed and workspace. Use tools like shovels or a small excavator for this job.
Next, level the ground to create a flat surface. A level base prevents structural issues and makes building easier. Check the slope and adjust soil as needed.
Installing Retaining Walls
Retaining walls hold back soil on the hillside. They stop soil from sliding and protect the shed foundation. Choose materials like wood, stone, or concrete blocks.
Build the wall sturdy and secure it deep into the soil. Proper drainage behind the wall prevents pressure buildup and damage. Make sure the wall height suits the slope.
Setting Up Drainage Systems
Drainage is critical to avoid water pooling around the shed. Install pipes or gravel trenches to guide water away. This keeps the foundation dry and safe.
Consider the natural water flow on the hill. Place drains at low points to catch runoff. Regular checks keep the system working well over time.
Building The Foundation
Building a shed into a hillside starts with a strong foundation. The foundation holds the entire structure steady. It must support the shed’s weight and fit the slope of the land. A good foundation prevents shifting and water damage. Careful planning and the right materials keep your shed safe for years.
Choosing Foundation Types
Pick a foundation type that suits the hillside terrain. Concrete slabs work well on flat areas. Pier foundations lift the shed off the ground. Stem wall foundations combine concrete and block for strength. Consider soil type and slope angle before deciding. The right choice keeps the shed stable and dry.
Pouring Concrete Footings
Concrete footings provide a solid base for the foundation. Dig trenches below the frost line to avoid movement. Use wooden forms to shape the concrete. Mix concrete thoroughly and pour it evenly. Allow the concrete to cure for several days before building on it. Strong footings stop the shed from sinking or tilting.
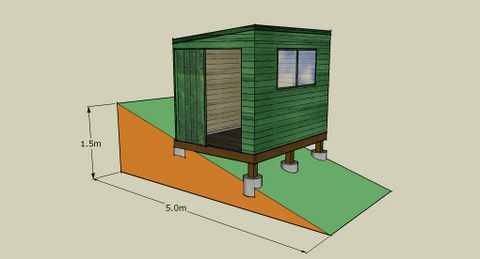
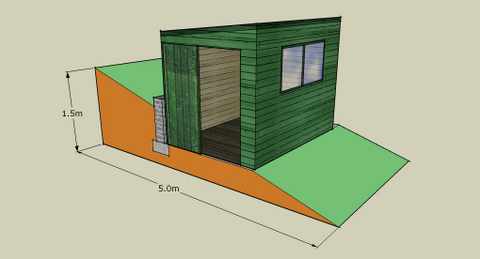
Using Pier Or Stem Wall Foundations
Pier foundations use concrete columns set deep in the ground. They raise the shed above wet soil and uneven ground. Stem walls are short walls built on footings. They provide a level base on a slope. Both options handle hillside challenges well. Choose the type that fits your shed size and hill shape.
Constructing The Shed Frame
Constructing the shed frame on a hillside requires special care. The slope affects how you build walls and secure the structure. A solid frame keeps the shed stable and safe. Proper waterproofing and insulation protect it from weather damage and keep it dry inside.
Each step must fit the unique shape of the land. Let’s break down the key parts of building a strong frame on a slope.
Framing Walls On A Slope
Start by measuring the slope carefully. Cut the bottom plates of the walls to match the angle of the hill. Use pressure-treated wood to resist moisture from the soil. Build the wall frames flat on level ground first. Then, lift and secure them in place on the slope. Add extra support with angled braces to hold the walls steady.
Securing The Structure
Anchor the shed firmly into the hillside. Use concrete footings or piers below the frost line. Attach the frame to these anchors with heavy-duty metal brackets. Check the level often during construction to avoid leaning walls. Secure all joints with screws, not nails, for stronger connections. This prevents shifting or damage during storms.
Waterproofing And Insulation
Apply a waterproof barrier between the shed frame and the hillside. Use a durable plastic sheet or building wrap to stop moisture. Seal all seams with waterproof tape. Add rigid foam insulation on the inside walls to keep temperature steady. Cover insulation with plywood to protect it. Proper waterproofing and insulation help the shed last longer and stay comfortable.
Credit: www.secrets-of-shed-building.com
Finishing Touches
Finishing touches make your hillside shed complete and functional. These steps protect your shed and improve its look. Focus on doors, windows, roofing, and landscaping. Each element enhances comfort and durability. Let’s explore the final tasks to bring your shed to life.
Installing Doors And Windows
Choose doors and windows that fit your shed’s size and style. Install weatherproof frames to keep water out. Secure doors with strong hinges and locks. Windows let in light and air. Use double-pane glass for better insulation. Seal around all openings to prevent drafts and bugs.
Adding Roofing Materials
Select roofing materials that suit your climate and hillside slope. Metal or asphalt shingles work well on sloped roofs. Install a waterproof underlayment to stop leaks. Extend the roof overhang to protect walls from rain. Check for proper drainage to avoid water pooling. Secure all materials tightly to resist wind and weather.
Landscaping Around The Shed
Shape the ground around the shed to guide water away. Use gravel or mulch to prevent mud and erosion. Plant grass or low shrubs to blend the shed with the hillside. Avoid large trees close to the structure. Create a clear path for easy access. Landscaping adds beauty and protects your shed’s foundation.
Maintenance Tips For Hillside Sheds
Maintaining a shed built into a hillside is key to its long life. Proper care keeps the structure safe and looking good. Regular checks help spot problems early. This section covers simple tips to keep your hillside shed in top shape.
Preventing Water Damage
Water is the biggest threat to hillside sheds. Make sure gutters and drainage systems are clear. Water should flow away from the shed’s base. Use waterproof sealants on walls and roof. Check for leaks after heavy rain. Fix any damage fast to avoid bigger problems.
Inspecting Structural Integrity
Check the shed’s frame and walls often. Look for cracks, loose boards, or signs of rot. Pay special attention to areas touching the soil. Tighten nails and screws if they are loose. A strong structure keeps the shed safe from hillside pressure.
Seasonal Upkeep Advice
Change your maintenance routine with the seasons. Clear leaves and debris in fall to prevent moisture build-up. In winter, remove snow to reduce weight on the roof. Spring is a good time to inspect for winter damage. Summer calls for checking ventilation to avoid mold.

Credit: www.youtube.com
Frequently Asked Questions
How Do You Prepare The Ground For A Hillside Shed?
Clear the area of plants and rocks first. Then level the soil as much as possible. Use gravel or concrete blocks for a stable base.
What Materials Work Best For Building Into A Hillside?
Wood and concrete are good choices. Wood blends well with nature. Concrete offers strong support against soil pressure.
How Do You Prevent Water Damage To A Hillside Shed?
Install proper drainage around the shed. Use waterproof materials on walls and roof. A sloped roof helps water run off easily.
What Are The Common Challenges Of Hillside Shed Construction?
Uneven ground and soil pressure cause issues. Drainage and erosion control need special attention. Access can be tricky on steep slopes.
Can A Hillside Shed Be Used For Storage Safely?
Yes, if built with strong support and waterproofing. Proper ventilation prevents mold inside. Regular checks keep it safe and dry.
Conclusion
Building a shed into a hillside takes careful planning and effort. Start with a strong foundation and good drainage. Use materials that match the land and protect against moisture. Take your time to measure and level everything properly. This project can add useful space and blend well with nature.
Follow the steps, and you will enjoy a sturdy, hidden shed for years. Small details make a big difference in the final result. Keep safety in mind and work patiently. Your hillside shed can become a great outdoor spot.