
Are you looking for a unique way to add charm and character to your home decor? Making picture frames from old barn wood is a simple and creative project that lets you bring a piece of history into your space.
Not only will you create something beautiful, but you’ll also give new life to wood that might otherwise go to waste. Imagine the warm, rustic feel these frames can add to your photos or artwork. Keep reading, and you’ll discover easy steps and handy tips to turn old barn wood into stunning picture frames you’ll be proud to display.
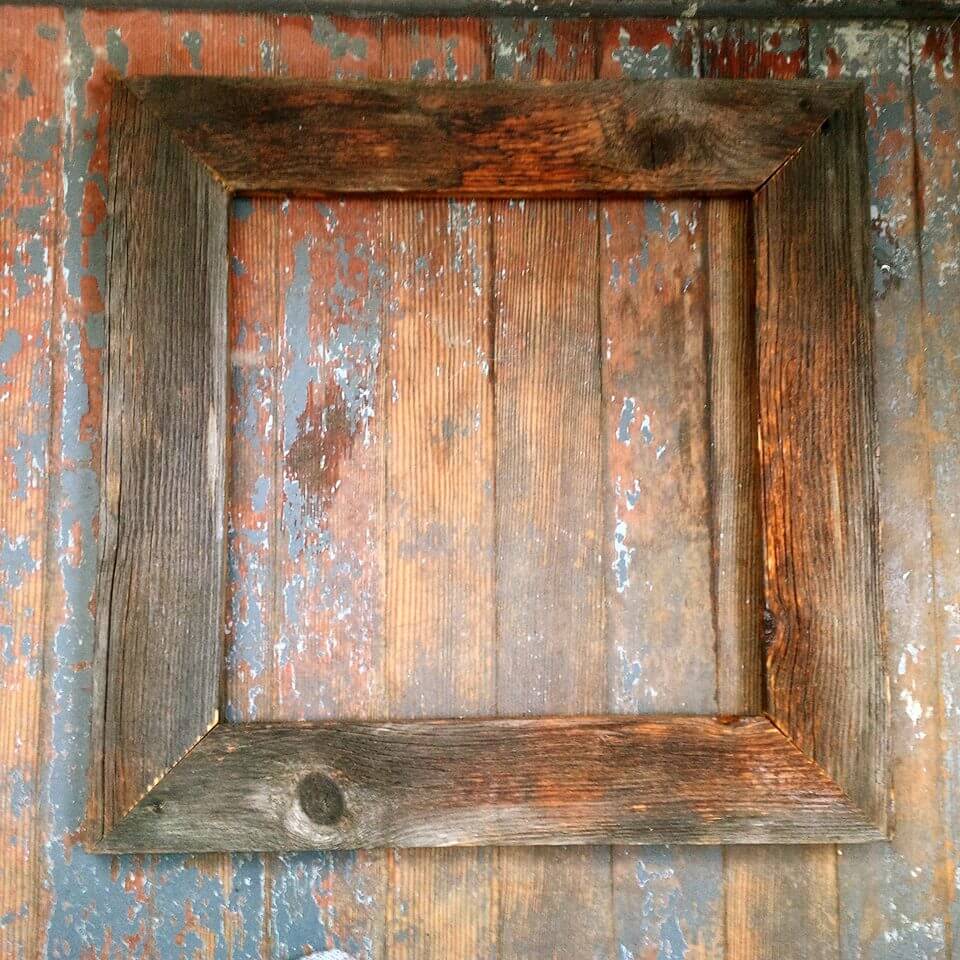
Credit: insteading.com
Choosing Barn Wood
Choosing the right barn wood is the first step to making beautiful picture frames. Old barn wood has a unique look that adds warmth and character. Picking good wood ensures your frames last long and look great.
Not all barn wood is the same. Some pieces may be damaged or too weak. You need wood that is strong and clean to make sturdy frames.
Selecting The Right Wood
Choose wood with rich color and interesting grain. Look for pieces that feel solid and heavy. Avoid wood with too many cracks or holes. Pine, oak, and cedar are good choices for frames. Each type has its own texture and look.
Inspecting For Quality
Check the wood carefully for signs of rot or insect damage. Tap the wood and listen for a solid sound. Soft spots mean the wood is weak. Make sure the wood is dry and not warped. Straight pieces are easier to cut and join.
Cleaning And Preparing
Remove dirt and loose bark with a stiff brush. Sand the wood lightly to smooth rough edges. Clean wood holds paint or stain better. Cut the wood to the size needed for your frame. Proper cleaning makes the wood safe to use indoors.
Tools And Materials Needed
Making picture frames from old barn wood is a fun and creative project. It needs some tools and materials. Having the right items makes the work easier and safer. Below are the key tools and supplies you will need.
Essential Tools
- Measuring tape to get exact dimensions
- Miter saw for cutting angles on the wood
- Sandpaper or power sander to smooth rough edges
- Clamps to hold pieces firmly while gluing or nailing
- Hammer or nail gun to attach the frame parts
- Wood glue for strong joints
- Square tool to keep corners straight
Additional Supplies
- Old barn wood planks with character and texture
- Picture frame backing board
- Glass or clear acrylic sheet for frame front
- Small nails or brads for assembling
- Wood filler to cover holes or cracks
- Paint or wood stain for finishing touch
- Brushes or rags to apply finish
Safety Gear
- Safety glasses to protect your eyes
- Dust mask to avoid inhaling sawdust
- Gloves to protect hands from splinters
- Ear protection if using loud power tools
Cutting And Measuring
Cutting and measuring are key steps in making picture frames from old barn wood. Accurate measurements ensure the frame fits perfectly. Careful cutting creates clean edges for a neat look. Both steps need focus and patience. This section breaks down how to measure and cut wood for your frame.
Measuring Frame Dimensions
Start by measuring the picture or artwork you want to frame. Add extra space for the frame width. Use a tape measure for precise numbers. Write down the length and width clearly. Double-check measurements to avoid mistakes. Remember, accuracy here saves time later.
Cutting Wood Pieces
Choose a sharp saw for clean cuts. Cut the wood pieces to the lengths you measured. Work slowly to keep cuts straight. Use clamps to hold wood steady if needed. Cut each piece one by one. Check each piece after cutting to confirm size.
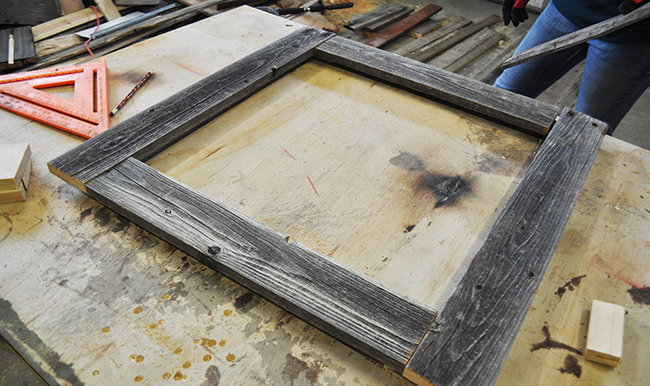
Creating Mitered Corners
Mitered corners make frames look professional. Cut each wood end at a 45-degree angle. This allows the corners to fit together tightly. Use a miter box or saw guide for accuracy. Test fit the corners before gluing. Adjust cuts slightly if edges do not meet perfectly.

Credit: www.youtube.com
Assembling The Frame
Assembling the frame is a key step in making picture frames from old barn wood. This process brings the pieces together to form a strong, neat frame. Careful joining and securing ensure the frame holds well and looks good.
Joining Corners
Start by arranging the wood pieces to form the frame shape. Use a miter box or saw to cut corners at a 45-degree angle. These angled edges fit tightly together. Hold the corners firmly to check the fit. Proper corner joining gives the frame a clean, classic look.
Securing With Nails Or Screws
Use small nails or screws to fasten the corners. Drive nails or screws in at an angle for better hold. Countersink screws so they sit flush with the wood surface. This step stops the frame from falling apart. Choose rust-resistant nails or screws for lasting strength.
Adding Wood Glue
Apply wood glue to the mitered edges before joining corners. The glue strengthens the bond between the pieces. Spread glue evenly with a small brush or stick. Press corners together and wipe off excess glue quickly. Let the glue dry fully for a solid frame.
Sanding And Finishing
Sanding and finishing are key steps in making picture frames from old barn wood. These steps bring out the wood’s beauty and protect it. Proper sanding removes rough spots and dirt. Finishing adds color and keeps the frame safe from damage. The right techniques help keep the wood’s natural charm.
Sanding Techniques
Start with coarse sandpaper to smooth rough areas. Use 80-grit sandpaper for heavy sanding. Move in the direction of the wood grain. Change to finer sandpaper, like 120-grit, for a smooth finish. Sand edges carefully to avoid sharp corners. Use a sanding block for even pressure. Clean dust with a dry cloth after sanding.
Applying Stain Or Sealant
Choose a stain or sealant that matches your style. Test on a small wood piece first. Use a brush or cloth to apply stain evenly. Wipe off excess stain to avoid blotches. Let the stain dry completely before applying sealant. Apply sealant to protect the wood from moisture and dirt. Use a clear sealant to keep the natural look. Apply two coats for better protection.
Creating A Rustic Look
Leave some rough patches for a rustic feel. Use a wire brush to add texture. Lightly sand only some areas to show wear. Use dark stain to highlight wood grain and knots. Avoid making the wood too smooth or shiny. Add small dents or scratches for character. A matte finish works best for rustic frames.
Credit: www.diypete.com
Adding Glass And Backing
Adding glass and backing to your barn wood picture frame protects your photo and gives it a finished look. This step helps keep the picture clean and flat. Glass adds shine, while the backing holds everything in place. Take your time to measure and cut carefully for a neat fit.
Cutting Glass To Size
Measure the inside of your frame accurately. Use a glass cutter to score the glass along your marks. Place the glass on a flat surface and snap it gently along the score line. Smooth any sharp edges with sandpaper or a glass file. Always wear gloves to protect your hands.
Attaching Backing Board
Cut a backing board from cardboard or foam core to match the frame size. Place the backing behind the photo inside the frame. Make sure it fits snugly but does not bend the photo. The backing keeps the picture straight and stops dust from entering.
Securing The Picture
Use small nails, clips, or flexible tabs to hold the backing in place. Press gently to avoid damaging the wood or glass. Check that the picture stays flat and does not move inside the frame. Secure all sides evenly for a strong hold.
Creative Design Ideas
Old barn wood offers a rich texture and history for picture frames. Using this wood creatively can add charm and uniqueness to your frames. Try different design ideas to match your style and décor. Simple changes can make a big difference in the final look.
Explore how metal, mixed wood, and personal touches can transform basic frames into art pieces. These ideas keep the rustic feel while adding modern or personal elements.
Incorporating Metal Accents
Metal accents add contrast and strength to barn wood frames. Use nails, screws, or metal strips to decorate edges. Copper or black iron works well with the wood’s rough texture. Small metal corners can protect the frame and look stylish. This mix of materials gives an industrial or vintage feel.
Using Mixed Wood Types
Combine barn wood with other wood types for a layered look. Light and dark woods together create depth and interest. Use smooth wood to highlight the rough barn wood. This mix creates a balanced frame that fits many decor styles. It also uses small wood pieces efficiently.
Personalizing With Paint Or Carving
Paint or carve names, dates, or simple designs on the wood. Use soft colors to keep the rustic look or bold colors for a modern twist. Carving adds texture and a handmade touch. Personal details make the frame special and meaningful. This customization fits gifts or home décor perfectly.
Hanging And Display Tips
After crafting your picture frame from old barn wood, displaying it properly is key. Hanging and display tips help your frame look its best. These simple ideas make your frame a beautiful part of any room.
Choosing Hanging Hardware
Select sturdy hardware that fits your frame size. D-rings and wire provide strong support. Use sawtooth hangers for smaller frames. Make sure screws go into the wood firmly. Check the weight of your frame before buying hardware.
Placement Ideas
Hang your frame where it catches natural light. Above a sofa or mantel is a good spot. Group several frames together for a gallery wall. Keep frames at eye level for easy viewing. Avoid places with high moisture to protect the wood.
Maintaining Your Frame
Dust your frame regularly with a soft cloth. Avoid water or harsh cleaners to keep wood safe. Use wood polish occasionally to keep the wood shiny. Check hardware every few months to ensure it stays secure. Handle your frame gently to prevent scratches or dents.
Frequently Asked Questions
What Tools Do I Need To Make Frames From Barn Wood?
Basic tools include a saw, hammer, nails, sandpaper, and wood glue. A measuring tape and clamps help ensure precise cuts and strong joints.
How Do I Prepare Old Barn Wood For Framing?
Clean the wood with a brush to remove dirt and debris. Sand it lightly to smooth rough spots and reveal the wood’s natural texture.
Can Barn Wood Frames Be Made Without Power Tools?
Yes, hand tools like a handsaw and hammer work fine. It takes more time but gives a rustic, handmade look.
How Do I Join Barn Wood Pieces For A Picture Frame?
Use wood glue on edges and secure with nails or screws. Clamps hold the frame tight while glue dries for a strong bond.
What Finish Should I Use On Barn Wood Frames?
A clear sealant or wax protects the wood and keeps its natural look. Avoid heavy paint to keep the wood’s rustic charm.
Conclusion
Crafting picture frames from old barn wood adds charm to your home. It saves money and gives a unique look. The wood’s texture tells a story of the past. Simple tools and steps make this project easy. Try it yourself to enjoy a fun, creative activity.
Reuse wood and help the environment too. Your handmade frame will hold memories with style. Give your pictures a warm, rustic touch today.