
Have you ever wondered how to turn simple logs into smooth, sturdy boards using just your hands? Whether you’re working on a DIY project, building furniture, or just want to learn a valuable skill, making boards from logs by hand can be incredibly rewarding.
It’s not only about creating wood—you’re crafting something unique with your own effort and tools. You’ll discover easy-to-follow steps and practical tips that anyone can use, even if you’ve never tried it before. Ready to get your hands dirty and transform raw logs into beautiful boards?
Let’s dive in and make it happen together.
Credit: farmhandscompanion.com
Choosing The Right Logs
Choosing the right logs is the first step to make strong, durable boards by hand. The quality of your wood affects the final product’s strength and appearance. Not all logs are good for making boards. Some woods work better, and some logs have flaws that cause problems later.
This section explains how to pick logs that fit your project. Knowing which types of wood are best and spotting defects helps you save time and effort. The right logs lead to better boards that last longer and look great.
Types Of Wood Suitable For Boards
Hardwoods like oak, maple, and cherry are popular for boards. They are strong and resist wear. Softwoods like pine and cedar work too but are easier to cut and lighter.
Choose wood that matches your project needs. Hardwoods suit furniture and flooring. Softwoods fit for crafts and light use. Avoid wood that is too soft or brittle.
Selecting Logs With Minimal Defects
Look for logs without cracks, knots, or rot. Cracks weaken boards and cause splitting. Knots can make cutting harder and affect strength. Rot damages wood and shortens board life.
Check the bark and surface for signs of disease or insect damage. Fresh, healthy logs have tight bark and no holes. Pick straight logs with even grain for easier cutting.
Gathering Essential Tools
Before starting to make boards from logs, gather all the essential tools. Having the right tools makes the work easier and safer. This step saves time and helps create better boards.
Hand Tools Needed
Start with a sturdy axe to cut the logs into manageable pieces. A hand saw helps to cut the logs more precisely. Use a froe to split the logs along the grain. A wooden mallet is useful to strike the froe safely. A drawknife shapes and smooths the boards by removing bark and rough edges. A spokeshave can help refine the surface further. Lastly, a measuring tape and pencil help mark where to cut and split.
Safety Gear To Prepare
Wear strong gloves to protect your hands from splinters and cuts. Use safety goggles to shield your eyes from flying wood chips. A sturdy pair of boots protects your feet from falling logs or tools. Hearing protection is important if you use noisy tools nearby. Dress in close-fitting clothes to avoid getting caught in tools. Always keep a first aid kit nearby for quick treatment of minor injuries.
Preparing The Logs
Preparing the logs is the first key step in making boards by hand. Good preparation makes cutting easier and safer. It helps create smooth, even boards. Take your time to get this part right. The work you put in now will show in the final product.
Removing Bark And Debris
Start by removing all bark from the logs. Bark can hide dirt and small stones. These can damage your tools or cause uneven cuts. Use a sharp knife or drawknife for this job. Scrape the log surface until it is clean and smooth. Remove any moss, dirt, or loose wood pieces too. A clean log surface helps you see the wood grain clearly.
Marking The Cutting Lines
Next, mark your cutting lines carefully on the log. Use a pencil or chalk for clear visibility. Measure the width of the board you want. Mark straight lines along the log length. Use a square or straight edge for accuracy. Clear lines guide your saw or axe during cutting. Precise marking reduces mistakes and waste wood.

Credit: smokymtnwoodproducts.com
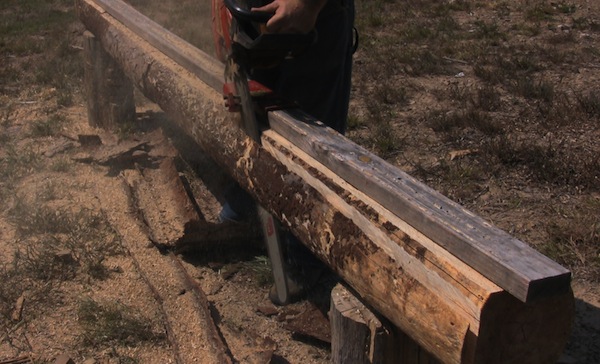
Cutting Logs Into Slabs
Cutting logs into slabs is the first step in making boards by hand. It requires patience and care. You will turn a round log into flat, usable wood pieces. This process sets the foundation for your boards. Proper cutting helps avoid waste and makes the next steps easier.
Use the right tools and techniques. This section covers key tips for cutting logs by hand. Focus on using a hand saw well and keeping your cuts straight. These skills improve your work and save time.
Using A Hand Saw Effectively
Select a sharp, sturdy hand saw for cutting logs. A bow saw or a crosscut saw works well. Keep the saw clean and sharp to cut smoothly. Use steady, even strokes. Let the saw do the work; don’t push too hard.
Start cutting slowly to make a groove. This groove guides the saw for the rest of the cut. Keep your hands steady and your body balanced. This helps control the saw and avoid mistakes.
Maintaining Straight Cuts
Mark the log clearly before cutting. Use a pencil or chalk to draw a straight line. Follow this line closely while sawing. Look at the line often, not just the saw blade.
Cut a shallow groove first to guide the saw. Check your angle often to stay straight. Use a straight edge or level to help. Stop and adjust if the cut starts to drift.
Work slowly and carefully. Straight cuts save time in the sanding and shaping stages. Patience is key to getting good slabs.
Flattening And Smoothing Boards
Flattening and smoothing boards is an important step after cutting logs. It helps make the wood flat, even, and ready for use. This process removes rough spots and shapes the board to the right thickness. It also makes the surface smooth and safe to handle.
Working by hand gives control over the final look and feel of the wood. It takes patience but creates a natural, beautiful finish. Tools like hand planes and sandpaper are key for this job.
Hand Planing Techniques
Start by using a hand plane to flatten the board. Hold the plane firmly and push it along the wood grain. Take long, even strokes for a smooth result. Check the surface often to avoid removing too much wood.
Focus on high spots first, lowering them gradually. Keep the blade sharp for clean cuts. A dull blade can tear the wood fibers and cause rough patches. Work from one edge to the other, making sure the board stays flat.
Sanding For A Smooth Finish
After planing, sanding helps remove small marks and roughness. Begin with coarse sandpaper to smooth larger imperfections. Move the sandpaper in circles or along the grain.
Gradually switch to finer sandpaper for a softer finish. Sand all surfaces evenly to avoid ridges. Wipe the board clean after sanding to remove dust. This step prepares the wood for any finishes or stains.
Drying And Seasoning The Boards
Drying and seasoning the boards is a key step after cutting logs. This process removes moisture and prepares wood for use. Proper drying helps prevent problems like warping, cracking, and mold. It also improves the wood’s strength and durability.
Seasoning wood takes time. Patience ensures the boards dry evenly and stay in good shape. There are different ways to dry wood by hand. Choosing the right method depends on your tools, space, and climate.
Air Drying Methods
Air drying is a simple, natural way to remove moisture. Stack boards in a dry, shaded place. Avoid direct sunlight to prevent uneven drying. Use spacers between boards for airflow. This helps moisture escape from all sides.
Place the stack on raised supports. Keep wood off the ground to stop water absorption. Cover the top with a tarp or roof. Let the sides stay open for ventilation. This setup allows air to flow freely around the boards.
Air drying can take weeks or months. Thicker boards need longer drying times. Check boards regularly for dryness. Wood is ready when it feels light and shows no damp spots.
Preventing Warping And Cracking
Warping and cracking happen when wood dries unevenly. Keep boards flat and supported during drying. Weight on top can help keep boards straight.
Turn the boards often. This balances moisture loss on all sides. Avoid drying wood too fast. Rapid drying causes cracks and splits.
Store boards away from heat sources and direct wind. These can dry wood too quickly. Control the environment to keep wood stable. Dry wood slowly and evenly for the best results.
Final Touches
After shaping your boards from logs, the final touches bring out their full potential. These steps help ensure your boards look great and last longer. Proper finishing improves both appearance and durability. Let’s explore the last important tasks in this process.
Trimming To Size
Start by measuring each board carefully. Use a straight edge and pencil to mark the cut lines. Trim the edges to make the boards even and smooth. A hand saw or circular saw works well for this step. Cutting boards to the right size helps in easy handling and use. Sand the edges after trimming to remove any rough spots. Smooth edges prevent splinters and improve the board’s look.
Applying Protective Finishes
Choose a finish that protects the wood from moisture and damage. Natural oils like linseed or tung oil soak into the wood. They bring out the grain and add a soft shine. Brush or rub the oil on evenly with a cloth. Let the boards dry completely between coats. For stronger protection, use varnish or polyurethane. These create a hard, protective surface. Apply thin coats and sand lightly between each layer. Proper finishing keeps your boards safe and beautiful for years.

Credit: www.youtube.com
Frequently Asked Questions
What Tools Do I Need To Make Boards From Logs By Hand?
You need a handsaw, axe, drawknife, and a straight edge for accurate cutting. Safety gear like gloves and goggles is essential too.
How Do I Prepare A Log Before Cutting It Into Boards?
Remove the bark and check the log for cracks or knots. Mark the log to guide your cuts.
What Is The Best Way To Cut Logs Into Boards By Hand?
Use a handsaw to cut along marked lines slowly and steadily. Keep the saw straight to get even boards.
How Can I Smooth And Finish Boards Made By Hand?
Use a drawknife or hand plane to shave rough surfaces gently. Sand the boards with fine sandpaper for a smooth finish.
How Long Does It Take To Make Boards From Logs Manually?
Time varies by log size and skill but expect several hours per log. Patience ensures quality and safety during the process.
Conclusion
Making boards from logs by hand takes patience and care. Each step shapes the wood for your project. Using the right tools makes the job easier and safer. Take your time to measure and cut well. Enjoy the process of creating something useful and natural.
With practice, your skills will grow stronger and faster. This craft connects you with nature and tradition. Keep trying, and soon you will make beautiful boards on your own.