
Are you tired of your stencil designs bleeding and ruining your wood projects? You’re not alone.
Whether you’re a beginner or have some experience, keeping stencils sharp and clean on wood can be tricky. But imagine finishing your project with crisp, clear lines every single time. You’ll discover simple, effective tips that will stop your stencils from bleeding and help your artwork look professional.
Keep reading—you’re just moments away from mastering this essential skill!
Choosing The Right Stencil Material
Selecting a stencil made from sturdy plastic or mylar helps prevent paint from bleeding on wood. Thin paper stencils often soak up paint, causing blurry edges. Choose materials that lay flat and resist paint for clean, sharp designs.
Types Of Stencil Materials
Choosing the right stencil material is key to a clean design on wood. Stencils come in many types, each with pros and cons. Paper stencils are cheap and easy to cut, but they can absorb paint and bleed. Mylar stencils are thin plastic sheets. They resist paint and last longer. Vinyl stencils are sticky and hold tight to surfaces, reducing paint bleed. Cardboard stencils are thicker but can soak up paint, causing edges to blur.
Best Options For Wood Surfaces
For wood, durable and non-absorbent materials work best. Mylar is ideal because it stays flat and blocks paint well. Vinyl also works well, especially for rough or uneven wood. It sticks to the surface, stopping paint from seeping under. Avoid paper or cardboard on wood. They soak up paint and lead to bleeding. Choose a stencil material that holds paint and fits the wood’s texture.
Preparing The Wood Surface
Preparing the wood surface is a key step to prevent stencils from bleeding. A smooth, clean base helps paint stay inside the stencil lines. Proper preparation makes your design crisp and clear. Follow these steps carefully for the best results.
Cleaning And Sanding Tips
Start by wiping the wood with a damp cloth to remove dust. Dirt and grease cause paint to bleed under the stencil. Let the wood dry completely before moving on.
Next, sand the wood lightly with fine-grit sandpaper. This removes rough patches and opens the wood grain. Sanding helps the paint stick better and prevents bleeding. Always sand in the direction of the grain. After sanding, clean off the dust with a brush or cloth.
Applying A Base Coat
Apply a base coat to seal the wood surface. Use a paint color that matches or contrasts your stencil. A base coat creates a smooth layer that blocks paint from soaking in.
Allow the base coat to dry fully before placing the stencil. This dry layer stops the stencil paint from spreading. Applying two thin coats often works best. Let each coat dry well to avoid bleeding.
Securing The Stencil Properly
Securing the stencil properly is key to stopping paint from bleeding on wood. When the stencil moves, paint seeps under the edges. This makes the design look messy and unclear.
Keeping the stencil flat and steady helps paint stay inside the lines. It also makes painting easier and faster. Use the right tools and methods to hold the stencil firmly in place.
Using Adhesive Sprays
Adhesive sprays are light glues that stick the stencil to the wood. Spray a thin, even coat on the back of the stencil. Let it dry for a few seconds until it feels tacky.
Press the stencil gently onto the wood. The spray holds it tight without leaving marks. It stops paint from slipping under the edges. This method works well for detailed patterns.
Tape Techniques For Stability
Masking tape or painter’s tape helps keep the stencil still. Place small strips around the stencil edges to hold it down. Press tape firmly to avoid gaps where paint can leak.
Use tape on flat or curved surfaces to prevent stencil movement. For large stencils, tape the corners and middle sections. This keeps the stencil smooth and secure during painting.
Credit: www.makingmanzanita.com
Selecting The Right Paint And Tools
Selecting the right paint and tools helps prevent stencil bleeding on wood. The paint type and application method affect how clean the edges stay. Proper choices make your design clear and sharp.
Choosing Paint Types That Resist Bleeding
Use paint with thick consistency to reduce bleeding. Acrylic paint works well on wood because it dries fast. Avoid thin or watery paints that soak under the stencil.
Look for paints labeled as “matte” or “flat” finishes. These tend to stay put better and create less spread. Test the paint on a scrap wood piece before starting your project.
Brushes, Sponges, And Rollers
Stencil brushes have stiff bristles that help control paint flow. Use a small amount of paint on the brush and dab gently. Too much paint causes bleeding and messy edges.
Sponge applicators also work well. Pat the paint lightly onto the stencil instead of brushing. This stops paint from seeping under the edges.
Mini foam rollers spread paint evenly on larger stencil areas. Roll slowly with light pressure to avoid pushing paint under the stencil. Clean tools between colors to keep your work neat.
Applying Paint Without Bleeding
Applying paint without bleeding is essential for clean and sharp stencil designs on wood. Bleeding happens when paint seeps under the stencil edges. This ruins the crisp lines and makes the project look messy. Careful paint application helps prevent this problem.
Using Light Coats
Use thin layers of paint to avoid bleeding. Thick paint easily seeps under the stencil. Light coats dry faster and stay where you want them. Apply several light coats instead of one thick one. Let each coat dry before adding another. This builds color without causing smudges or drips.
Dabbing Vs Brushing Methods
Dabbing paint onto the stencil works better than brushing. Use a sponge or stencil brush for dabbing. Gently tap the paint onto the wood. Avoid brushing side to side because it pushes paint under the edges. Dabbing controls the amount of paint well. It reduces the chance of bleeding and keeps lines sharp.
Credit: www.makingmanzanita.com
Sealing And Finishing The Design
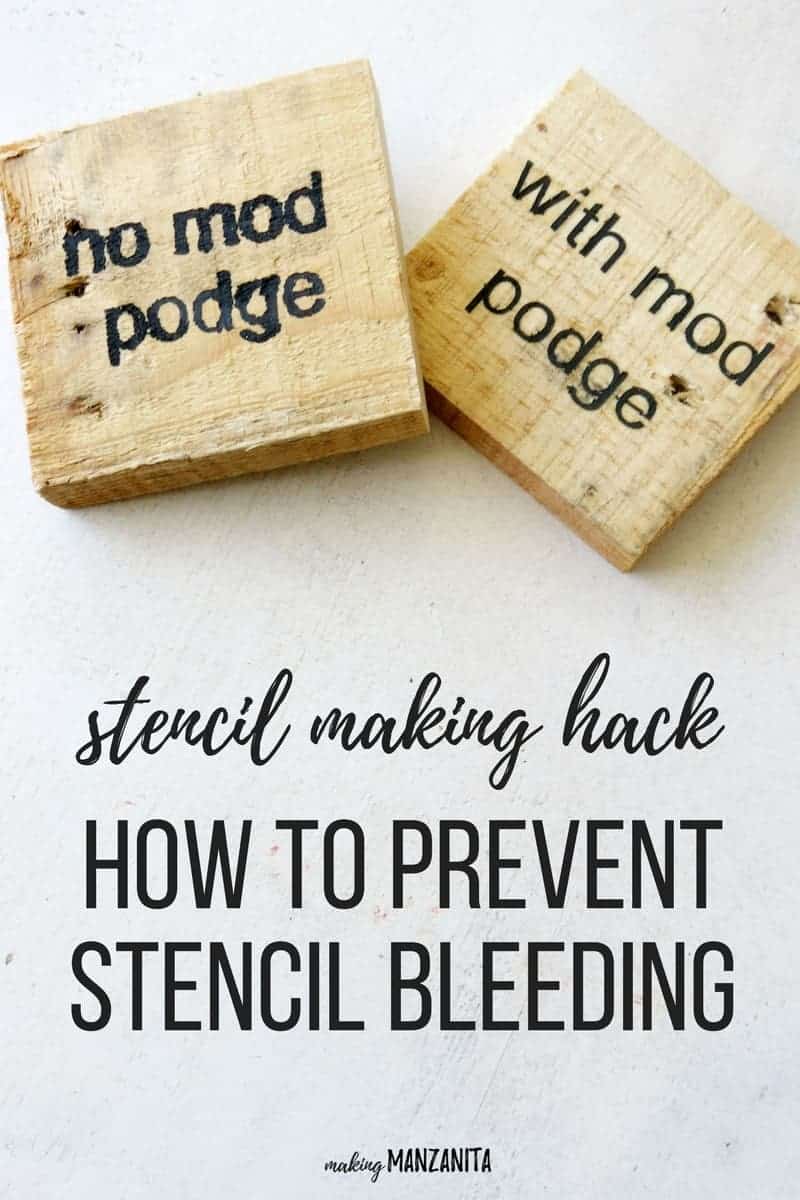
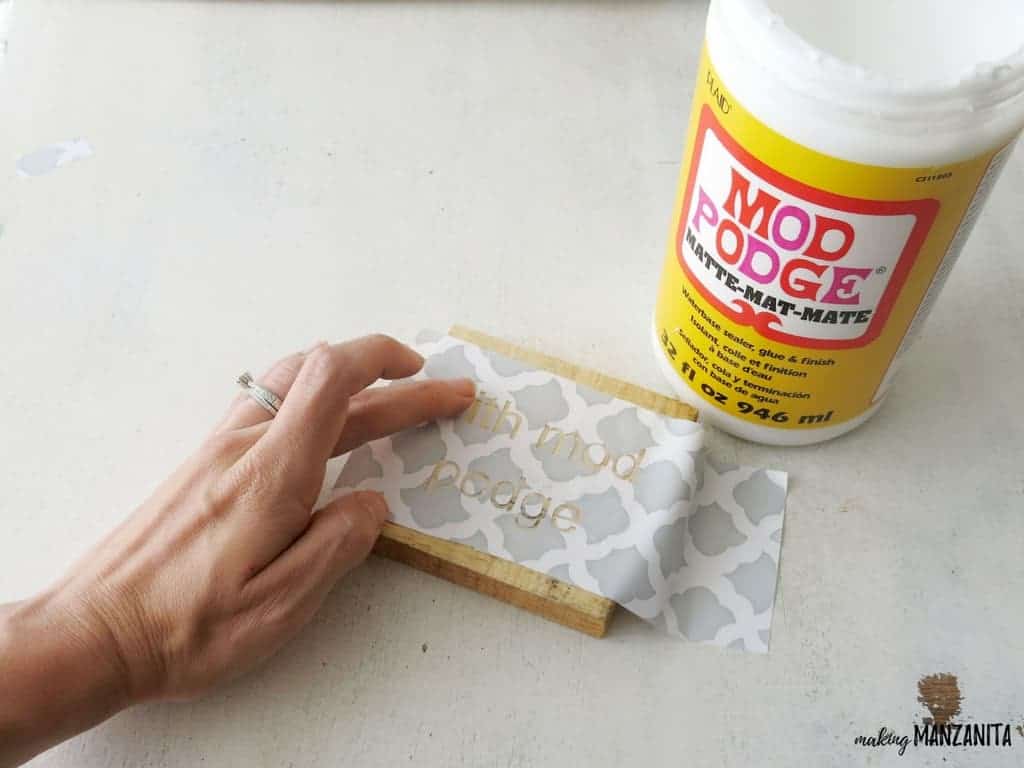
Sealing and finishing your stencil design on wood helps protect your work. This step keeps colors bright and stops paint from bleeding. It also makes the surface smooth and ready for use. Proper sealing adds a professional look to your project.
Protective Clear Coats
Choose a clear coat that fits your wood type and design. Polyurethane is strong and great for heavy use. Acrylic sprays dry fast and keep colors true. Apply thin, even layers with a brush or spray. Let each coat dry fully before adding the next. Avoid thick layers to prevent cloudiness.
Maintaining The Stencil Art Over Time
Clean the surface gently with a soft cloth. Avoid harsh chemicals or scrubbing that can damage the seal. Place your wood art away from direct sunlight or moisture. These conditions can fade paint and weaken the finish. Reapply a clear coat every year for lasting protection.
Troubleshooting Common Bleeding Issues
Bleeding is a common problem when stenciling on wood. It happens when paint seeps under the stencil edges. This makes the design look messy and unclear. Understanding how to fix and prevent bleeding helps keep your project neat. Below are tips to handle these issues effectively.
Fixing Bleeds After Painting
Use a small brush to carefully paint over the bleed marks. Choose the base wood color or a matching shade. Lightly dab the paint to cover the unwanted spots. Avoid heavy strokes to keep the surface smooth. Let the area dry completely before touching it again. Sanding gently with fine sandpaper can also smooth rough edges. Be careful not to damage the design.
Preventing Future Bleeding Problems
Secure the stencil tightly to the wood surface. Use painter’s tape or adhesive spray for a strong hold. Apply paint in thin layers using a stencil brush or sponge. Dab the paint lightly instead of brushing it on. Allow each layer to dry before adding another coat. Seal the wood with a clear coat before stenciling. This creates a barrier that reduces paint bleed. Practice on scrap wood to improve your technique.

Credit: www.youtube.com
Frequently Asked Questions
How Can I Prevent Stencil Paint From Bleeding On Wood?
Use painter’s tape to secure the stencil tightly. Apply a light coat of paint and let it dry between layers. Press the stencil firmly to avoid gaps.
What Type Of Paint Works Best For Stenciling On Wood?
Acrylic paint is ideal for wood stenciling. It dries fast and sticks well without bleeding. Avoid watery paints that soak into the wood.
Should I Prepare The Wood Surface Before Stenciling?
Yes, sanding the wood smooth helps paint stick better. Clean off dust and dirt before painting. A sealed or primed surface also reduces bleeding.
How Do I Seal The Stencil Edges To Stop Bleeding?
Use a stencil adhesive spray or a glue stick on the back. This keeps the stencil flat and prevents paint from seeping underneath. Remove the stencil carefully after painting.
Can Multiple Stencil Layers Cause Paint Bleeding On Wood?
Yes, thick paint layers increase bleeding risk. Wait for each layer to dry before adding more. Thin, even coats work best for crisp edges.
Conclusion
Keeping stencils from bleeding on wood takes care and patience. Use painter’s tape to hold the stencil in place. Apply paint lightly with a sponge or brush. Let each layer dry before adding more paint. Seal the wood surface first to stop paint from soaking.
Clean the stencil right after use to avoid buildup. These simple steps help you get sharp, clean designs every time. Practice makes perfect, so don’t be afraid to try again. Your wood projects will look neat and professional with these tips.