
Building a stair landing for your deck can transform how you use your outdoor space. It’s more than just a step; it’s a spot to pause, gather, and enjoy the view.
But if you’re not sure where to start, this guide is for you. You’ll learn simple, clear steps to create a sturdy, attractive landing that fits your deck perfectly. By the end, you’ll have the confidence to build a landing that adds both safety and style to your home.
Ready to get started? Let’s dive in.
Planning Your Stair Landing
Planning your stair landing is a key step in building a safe and stable deck. It sets the foundation for the stairs and affects how well they fit into your outdoor space. Taking time to plan helps avoid costly mistakes and ensures your deck looks great and functions well.
Careful planning also keeps your project within local rules. It improves safety and comfort while using the stairs. Start by thinking about the best place for the landing, the size you need, and any building rules that apply.
Choosing The Right Location
Pick a spot that makes the stairs easy to use. The landing should connect smoothly to your deck and yard. Avoid areas with slopes or obstacles like trees or bushes. Make sure there is enough flat space for people to step safely. The location should also allow good drainage to prevent water buildup.
Measuring The Space
Measure the height from the deck to the ground. This helps decide the landing size and stair height. The landing must be wide enough for safe movement. Use a tape measure and mark the area clearly. Double-check your measurements to avoid errors. Plan for some extra space around the stairs for safety.
Checking Local Building Codes
Local building codes set rules for stair landings to keep them safe. These rules cover size, height, and handrail requirements. Visit your city or county website for code details. Follow all rules to avoid fines or having to rebuild. Some areas require permits for deck stairs. Check this early to stay compliant.
Gathering Materials And Tools
Building a stair landing for your deck needs careful preparation. Gathering the right materials and tools is the first step. This saves time and helps avoid mistakes during construction. Knowing what you need makes the process smoother and safer.
Essential Lumber And Hardware
Choose strong, weather-resistant lumber for your landing. Pressure-treated wood works well outdoors. Use 2×6 or 2×8 boards for the frame. Decking boards should match your deck’s material. Galvanized or stainless steel screws resist rust. Include metal brackets for extra support. Concrete anchors help fix the landing to the ground.
Tools Needed For Construction
Gather basic and specialized tools before starting. A circular saw cuts lumber to size. A drill drives screws and makes pilot holes. A tape measure ensures precise measurements. A level keeps the landing flat and even. Use a hammer for nails and adjustments. Safety gear like gloves and goggles protects you.
Preparing The Site
Preparing the site is a key step in building a stair landing for your deck. This stage sets the foundation for a strong, safe structure. Proper preparation avoids problems later. It ensures the landing fits well with the deck and the ground.
Clearing And Leveling The Ground
Start by removing grass, weeds, and debris from the landing area. Clear the space completely to avoid any obstacles. Use a shovel or rake to even out the soil. Level ground prevents uneven settling of the landing. Check the area with a level tool. Add or remove soil to create a flat surface. Compact the soil firmly to make it stable and strong.
Marking The Landing Area
Measure the size of your stair landing carefully. Use stakes and string to mark the corners of the area. Make sure the shape matches your plan exactly. Double-check your measurements to avoid mistakes. Marking the area clearly guides your digging and building. It keeps the work organized and precise.
Credit: www.finehomebuilding.com
Building The Landing Frame
Building the landing frame is a key step in creating a safe and sturdy stair landing for your deck. This frame supports the landing surface and connects the stairs to the deck itself. Proper framing ensures the landing holds weight evenly and stays stable over time.
Careful measuring, cutting, and assembling of the joists set the foundation. The frame must fit precisely and attach firmly to the deck for long-lasting strength.
Cutting And Assembling Joists
Start by measuring the landing size on your deck. Cut the joists to match these dimensions. Use pressure-treated wood for durability.
Lay out the joists on a flat surface. Assemble them into a rectangular frame. Space joists evenly for strong support. Use galvanized screws or nails to fasten them securely.
Double-check the frame for square corners. Adjust if needed before moving on. A square frame is crucial for a level landing.
Securing The Frame To The Deck
Position the assembled frame on the deck at the landing spot. Use a level to ensure it sits flat and even.
Attach the frame to the deck using lag bolts or heavy-duty screws. Drill pilot holes first to prevent wood splitting.
Check all connections for tightness. Add metal brackets or joist hangers at corners for extra strength. Secure framing guarantees safety and stability for stairs.
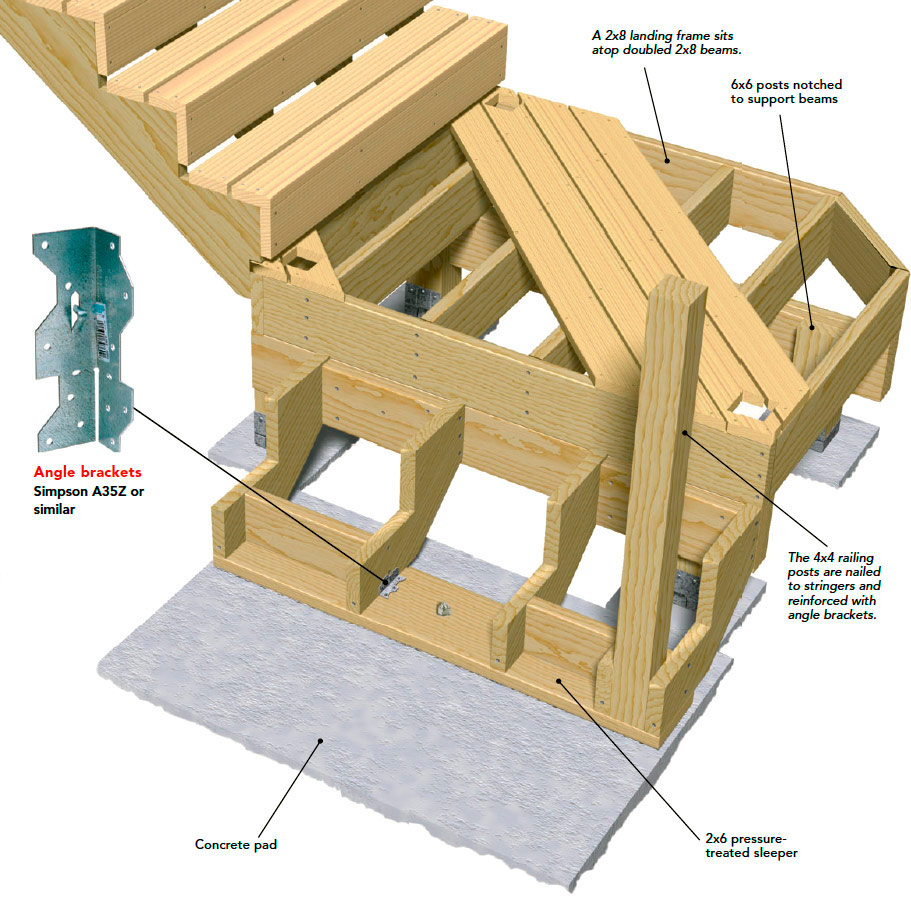
Installing Support Posts
Installing support posts is a key step in building a sturdy stair landing for your deck. These posts hold the weight of the landing and stairs. Proper installation keeps your deck safe and strong. Take your time and follow the correct steps.
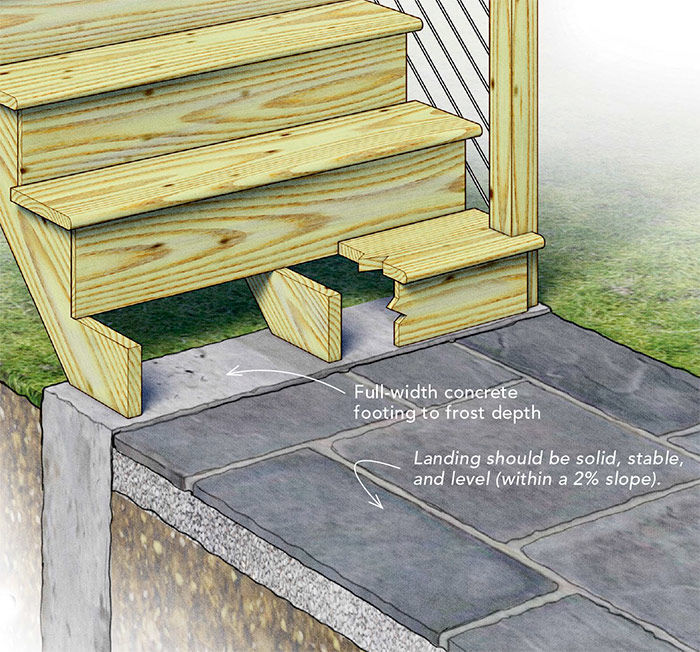
Setting Post Footings
Start by digging holes for the post footings. The holes should be deep enough to reach below the frost line. This prevents movement during winter. Use concrete to fill each hole for a solid base. Let the concrete cure fully before adding posts. Check that each footing is level and aligned with your deck frame.
Attaching Posts To The Frame
Once footings are set, place the posts on top. Secure each post with metal post anchors or brackets. These connectors keep posts from shifting. Attach the brackets firmly to the deck frame using screws or bolts. Make sure posts stand straight and plumb. Double-check connections for strength before continuing.
Credit: www.finehomebuilding.com
Adding Decking Boards
Adding decking boards to your stair landing creates a solid, attractive surface. This step shapes the final look and ensures safety. Choose boards made for outdoor use. They resist weather and last longer.
Start with careful measuring and cutting. Then, attach each board firmly to the frame below. Follow these steps to get a neat, strong deck landing.
Cutting Boards To Size
Measure the landing area accurately. Mark each board with a pencil for precise cuts. Use a circular saw for straight, clean edges. Cut boards slightly longer if you plan to trim later. Smooth rough edges with sandpaper to avoid splinters. Keep safety gear on during cutting.
Fastening Boards To The Frame
Place the first board along the frame edge. Leave a small gap between boards for water drainage. Use exterior-grade screws or decking nails to fasten. Drive screws straight to avoid splitting the wood. Check each board is level before securing. Continue adding boards until the landing is fully covered. Tighten all fasteners for a sturdy deck landing.
Constructing The Stair Stringers
Constructing the stair stringers is a key step in building a stair landing for your deck. Stringers support the steps and give the stairs their shape. Properly made stringers ensure safety and durability. This section explains how to measure, cut, and attach the stringers to the landing.
Take your time with each step. Precision makes the stairs fit well and look good.
Measuring And Cutting Stringers
Start by measuring the total height from the deck to the ground. Divide this height by the number of steps you want. This gives the rise, the height of each step.
Next, measure the depth of each step, called the run. Use a framing square to mark the rise and run on the stringer board. Usually, 2×12 lumber works well for stringers.
Cut along the marks carefully with a circular saw. Finish the cuts with a handsaw for clean edges. Make sure all stringers are the same size for even steps.
Attaching Stringers To The Landing
Place the stringers on the deck landing where the stairs will go. Use metal brackets or hangers to secure the top of each stringer to the landing frame. Fasten with strong screws or nails.
Check that the stringers are level and spaced evenly. Attach the bottom ends to a concrete pad or footing for stability. Make sure everything feels solid before moving on.
Installing Stair Treads And Risers
Installing stair treads and risers is an important part of building a deck landing. These components create safe and sturdy steps for your deck. Proper installation ensures your stairs look good and last long.
Each step has two main parts: the tread and the riser. The tread is the flat part where you step. The riser is the vertical piece between treads. Both need to fit well and be strong.
Cutting Treads And Risers
Measure the width and depth of your stair frame carefully. Use these measurements to mark your treads and risers on the wood. A circular saw works best for cutting straight lines.
Cut the treads slightly larger than the frame to allow for overhang. This improves safety and appearance. Cut the risers to fit perfectly between each tread.
Check each cut piece for smooth edges. Sand rough spots to prevent splinters. Accurate cuts make installation easier and the stairs safer.
Securing Treads And Risers In Place
Start by attaching the risers to the stair stringers. Use strong exterior screws or nails. Make sure the riser is flush with the frame and level.
Next, place the treads on top of the stringers and risers. Secure them with screws from above. Countersink screws slightly to avoid tripping hazards.
Check each step for firmness. Tighten any loose screws. Proper fastening keeps the stairs stable and safe for use.
Adding Railings And Safety Features
Adding railings and safety features to your deck stair landing is very important. Railings protect people from falling off the edges. They also give support while walking up or down the stairs. Safety features help prevent accidents and make your deck safer for everyone.
Properly installed railings add style and strength to your deck. You can choose materials that match your deck design and last a long time. Handrails and balusters create a secure barrier that meets building codes.
Choosing Railing Materials
Pick railing materials that fit your budget and style. Wood offers a classic look and is easy to work with. It needs regular sealing to avoid damage from weather. Metal, like aluminum or steel, is strong and lasts longer. It often needs less maintenance than wood.
Vinyl railings resist moisture and do not fade easily. They are good for low maintenance decks. Glass panels create a modern look and do not block views. Make sure to use tempered glass for safety. Consider the climate and how much wear the railings will face.
Installing Handrails And Balusters
Handrails should be at a comfortable height, usually between 34 and 38 inches. Secure them firmly to the posts or wall. Balusters keep people from slipping through the gaps. Space balusters no more than 4 inches apart to meet safety rules.
Use screws or bolts to attach handrails and balusters. Avoid nails because they can loosen over time. Double-check that everything is level and sturdy. Test the railings by applying pressure before finishing your deck.

Credit: diy.stackexchange.com
Finishing Touches
Finishing touches make your stair landing look complete and last longer. They protect the wood and keep the deck safe. Proper care at this stage helps your deck withstand weather and daily use.
Sanding And Sealing The Deck
Sanding smooths the wood surface and removes rough spots. Use medium-grit sandpaper first, then fine-grit for a smooth finish. Always sand along the wood grain to avoid scratches.
Sealing protects the wood from moisture and sun damage. Choose a water-resistant sealant suitable for outdoor use. Apply sealant evenly with a brush or roller. Let it dry completely before walking on the deck.
Inspecting For Safety And Stability
Check all screws and nails to ensure they are tight and secure. Loose fasteners can cause accidents and weaken the structure. Test the handrails and posts to confirm they do not wobble.
Look for any cracks or splits in the wood. Replace damaged boards immediately to prevent injury. Make sure the landing is level and sturdy to support weight safely.
Frequently Asked Questions
What Materials Are Best For Building A Deck Stair Landing?
Pressure-treated wood is common for deck landings due to durability. Composite materials resist weather and need less upkeep. Choose materials that match your deck and local climate.
How Big Should A Stair Landing Be For Safety?
A safe stair landing is at least as wide as the stair. The depth should be at least 36 inches to provide space to stand. This size helps prevent trips and falls.
Do I Need A Permit To Build A Deck Stair Landing?
Many areas require a permit for deck landings to meet safety rules. Check your local building codes before starting the project. This avoids fines and ensures your landing is safe.
How Do I Ensure Proper Drainage On A Stair Landing?
Slope the landing slightly away from the house to prevent water pooling. Use gaps between deck boards for water to drain through. Good drainage stops wood rot and keeps the landing safe.
Can I Add Railings To My Deck Stair Landing?
Yes, railings improve safety and are often required by code. Use sturdy materials and secure them well to the landing frame. Railings help prevent falls, especially on higher decks.
Conclusion
Building a stair landing for your deck adds safety and style. Plan the size and position carefully before starting. Use strong materials to ensure it lasts long. Follow each step for a smooth and sturdy build. Take your time to measure and secure everything well.
A well-built landing makes your deck easier to use. It also adds value to your outdoor space. Enjoy your new deck with confidence and comfort.