
Are you worried your shed might tip over or shift during strong winds or storms? Anchoring your shed to the ground is the key to keeping it safe and secure, no matter the weather.
In this guide, you’ll learn simple, effective steps to firmly attach your shed so it stays put for years to come. Whether you’re new to DIY projects or just want to make sure your shed is rock solid, this article will give you clear, easy instructions you can trust.
Keep reading to protect your investment and enjoy peace of mind every season.
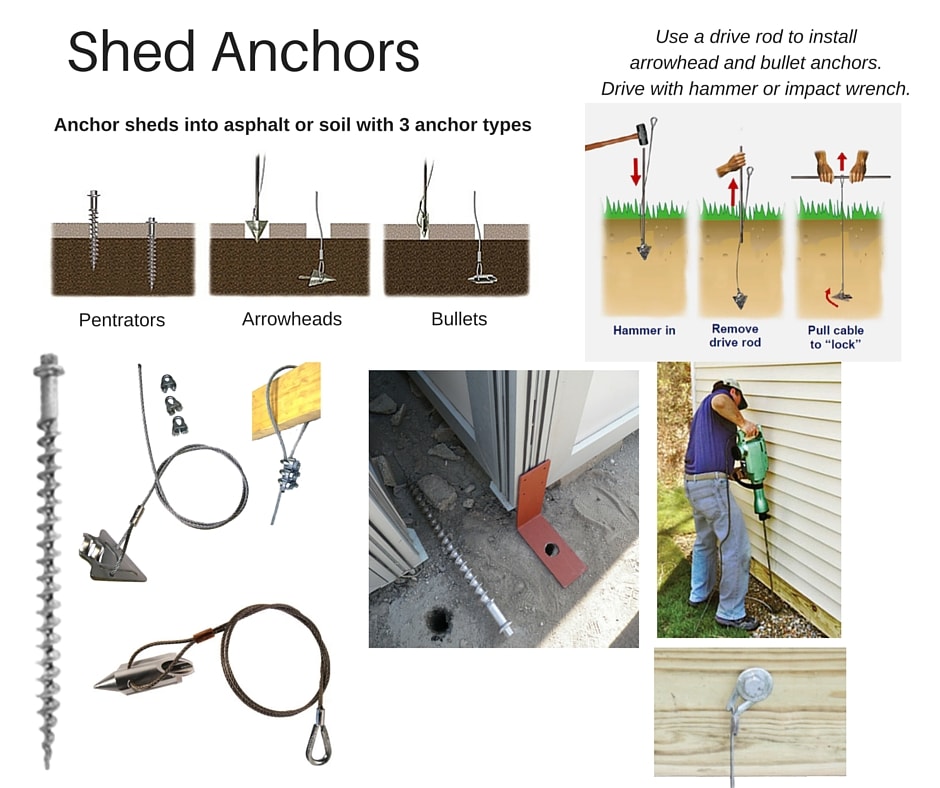
Choosing The Right Anchor Type
Choosing the right anchor type is key for securing your shed safely. Different anchors work best on different ground types and shed sizes. Picking the right one keeps your shed stable through wind and weather. This guide helps you understand common anchor options.
Ground Anchors
Ground anchors dig into the soil to hold the shed. They work well in soft or loose soil. These anchors are easy to install with simple tools. They provide good stability for small to medium sheds. Ground anchors resist pulling forces from wind.
Concrete Anchors
Concrete anchors attach your shed to a concrete base. They offer strong, permanent support. Ideal for heavier sheds or windy areas. Installation requires drilling into concrete and using special bolts. Concrete anchors keep your shed firmly in place.
Auger Anchors
Auger anchors screw deep into the ground like a giant screw. They are great for sandy or loose soil. These anchors hold tight and resist lifting forces. Installation needs a twisting motion or a drill attachment. Auger anchors are strong and reliable.
Tie-down Straps
Tie-down straps secure the shed frame to anchors or stakes. They are flexible and easy to use. Straps work well with ground or auger anchors. They help prevent the shed from shifting in wind. Quality straps add extra safety to any anchor system.
Credit: shedsbydesign.com
Preparing The Site
Preparing the site is a crucial step before anchoring a shed to the ground. A well-prepared site ensures the shed stays stable and secure. This process starts with clearing the ground and ends with marking the exact points for the anchors. Taking time here prevents problems later. Let’s explore how to prepare the site properly.
Clearing And Leveling The Ground
Remove all grass, rocks, and debris from the area. This creates a clean surface for your shed. Uneven ground can cause the shed to tilt or shift. Use a shovel or rake to clear the site thoroughly.
Next, level the ground using a spirit level or a straight board. Check for high spots and low areas. Fill low spots with soil and compact it firmly. A flat surface helps the shed sit evenly and strengthens the anchor hold.
Measuring And Marking Anchor Points
Measure the shed’s base dimensions carefully. Mark the corners and sides where anchors will go. Use a tape measure and marking spray or stakes to mark points.
Ensure the marks are square and aligned with the shed’s frame. Accurate marking prevents misplacement of anchors. Double-check measurements before drilling or digging holes for anchors.
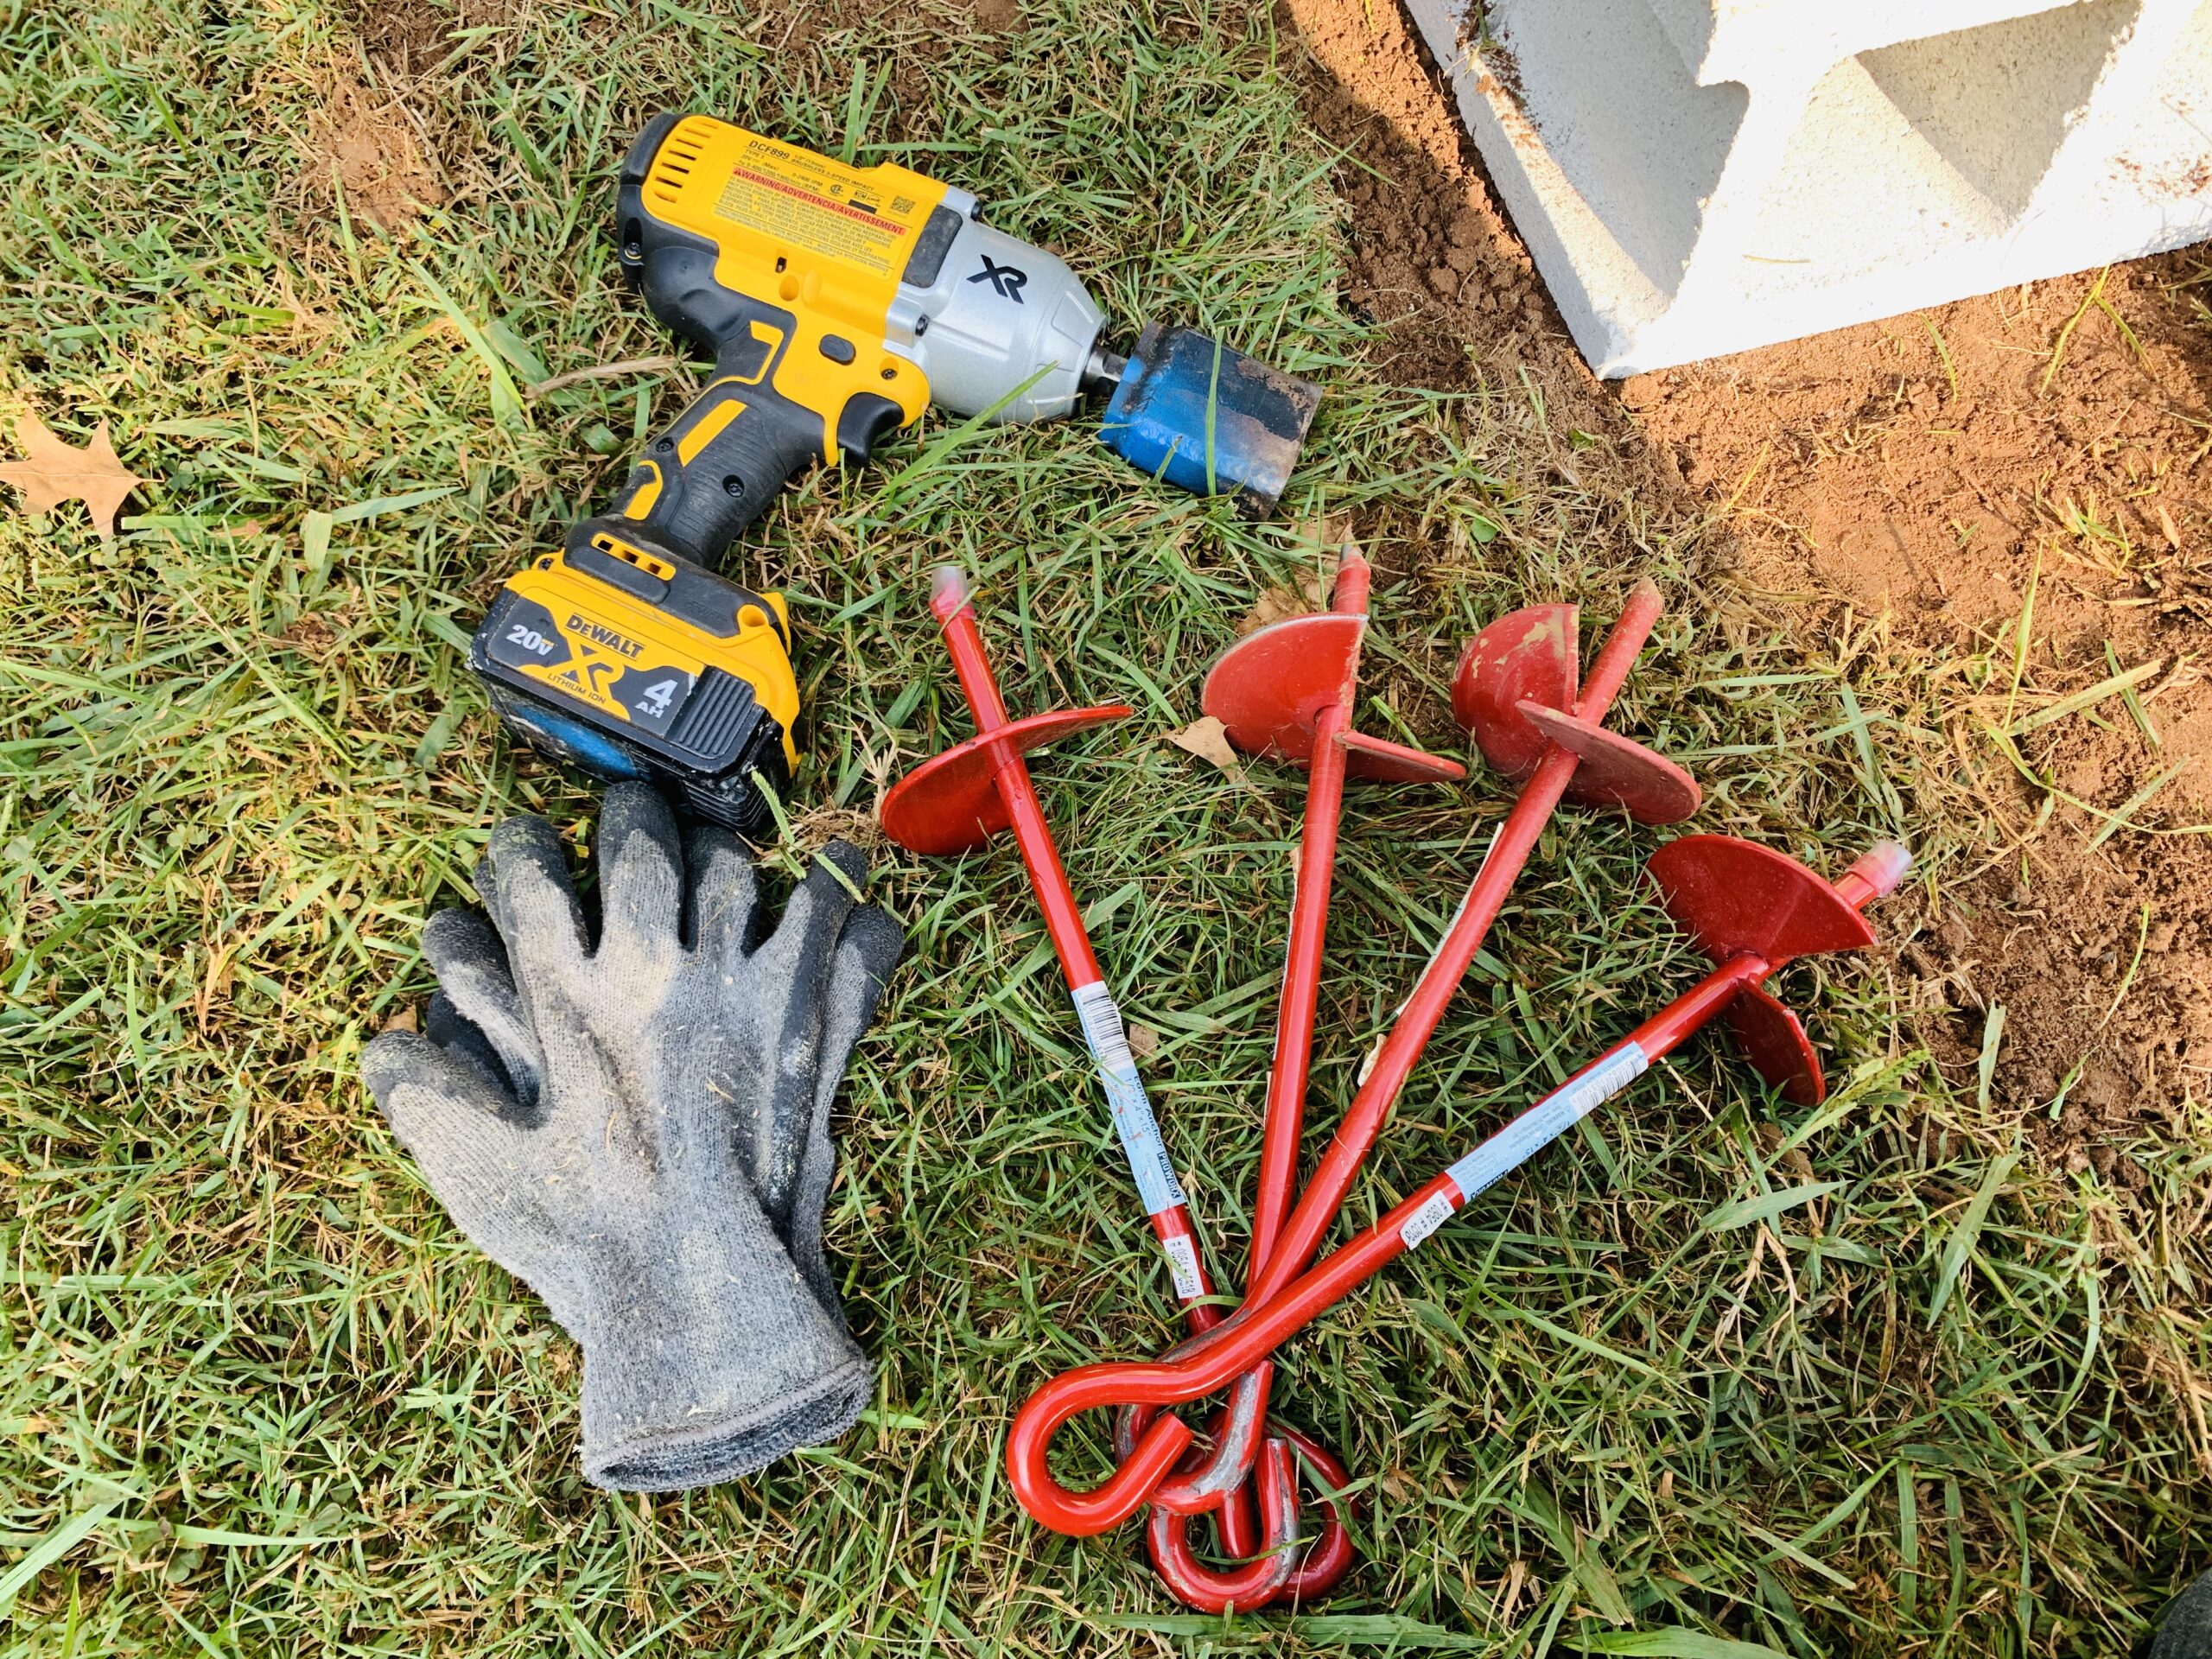
Installing Ground Anchors
Installing ground anchors is a key step to keep your shed stable and secure. These anchors help hold the shed firmly to the ground. They prevent damage from strong winds and shifting soil.
This section explains the tools and materials needed. It also guides you through the installation process in clear, easy steps.
Tools And Materials Needed
- Ground anchors (spiral or drive-in type)
- Heavy-duty drill with a screwdriver bit
- Hammer or mallet
- Measuring tape
- Wrench or socket set
- Shovel (optional, for soft soil)
- Protective gloves
Step-by-step Installation Process
- Measure and mark anchor points on the shed base.
- Check the ground condition at each point.
- Use a shovel to clear debris and loosen soil if needed.
- Insert the ground anchor into the soil at the marked spot.
- Twist or hammer the anchor until it is fully embedded.
- Attach the anchor strap or cable to the shed base.
- Tighten bolts or screws to secure the connection.
- Repeat for all anchor points around the shed.
- Double-check each anchor for tightness and stability.
Using Concrete For Extra Stability
Using concrete to anchor a shed gives it strong and lasting support. Concrete holds the anchors firmly in place. This prevents the shed from moving during strong winds or heavy rain. It is a good choice for extra stability on soft or uneven ground.
Concrete also helps protect the shed base from moisture damage. It creates a solid barrier between the shed and the soil. This keeps the shed dry and safe from rot or rust. Overall, concrete provides a reliable and durable way to secure your shed.
Mixing And Pouring Concrete
Start by choosing the right concrete mix. A ready-mix bag works well for small projects. Follow the instructions on the bag for water amounts. Use a wheelbarrow or bucket to mix the concrete.
Mix until the concrete looks smooth and thick but not dry. Pour the concrete into the holes or the base area. Fill it evenly and avoid air pockets. Use a trowel to smooth the surface if needed.
Setting Anchors In Concrete
Place metal anchors or bolts into the wet concrete. Push them deep enough to hold the shed securely. Make sure the anchors stay straight and do not move.
Check the anchor positions before the concrete sets. Let the concrete dry for at least 24 hours. The anchors will be firm and ready to attach the shed after curing.
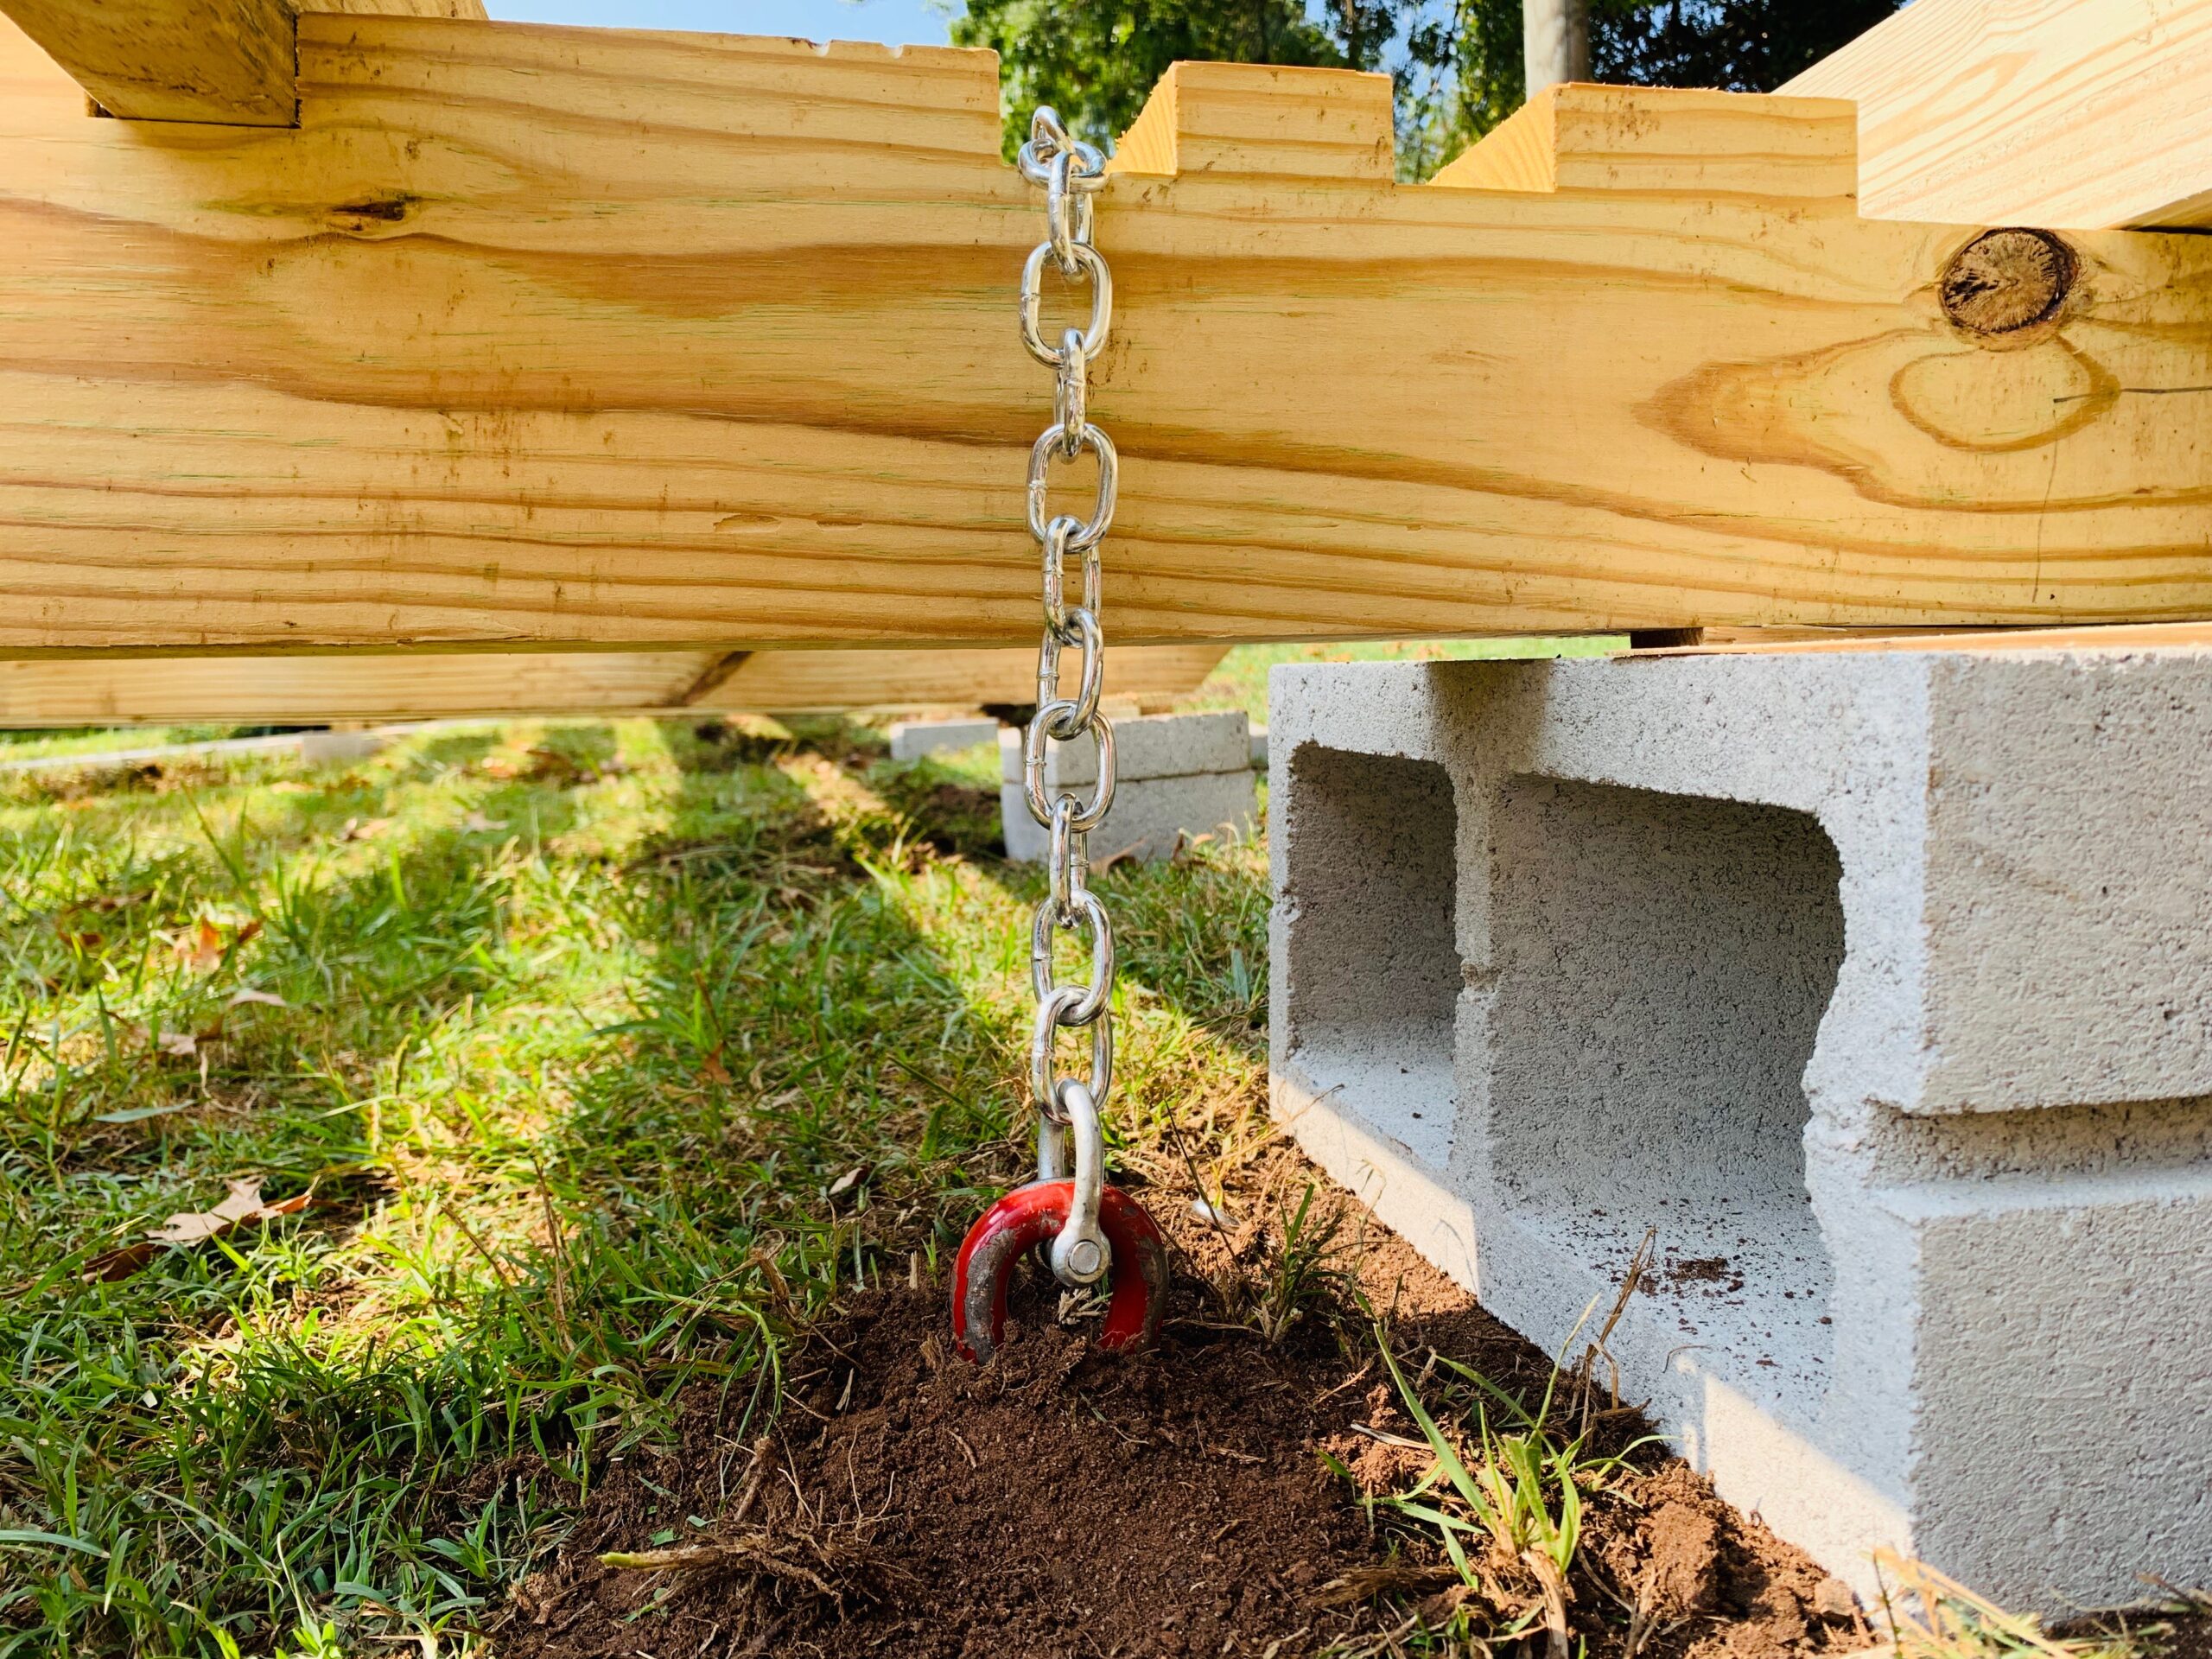
Securing The Shed Frame
Securing the shed frame is a key step to keep the structure stable. A properly anchored frame stops the shed from moving or tipping over. It also protects the shed during strong winds or storms. Focus on strong connections between the shed and the ground.
Attaching Anchor Straps
Anchor straps hold the shed frame tightly to the ground. Use heavy-duty metal straps made for outdoor use. Fasten the straps to the shed’s base frame. Wrap the straps around the frame securely. Drive stakes or anchors into the ground and connect the straps. Tighten the straps to remove any slack. This creates a firm hold between the shed and the earth.
Fastening Techniques
Use screws or bolts to fasten straps to wood frames. Nails may loosen over time and are less reliable. Pre-drill holes to avoid splitting the wood. Tighten bolts firmly but avoid overtightening. Secure each strap at multiple points for even strength. Check all fasteners regularly to maintain a strong hold. Proper fastening stops the frame from shifting or lifting.
Credit: shedsbydesign.com
Maintenance And Inspection
Maintaining and inspecting your shed’s anchors is vital for safety and durability. Regular checks help catch problems early. This saves time and money. Keeping the anchors in good shape prevents damage from wind and weather.
Inspecting the anchors ensures your shed stays firmly in place. It avoids costly repairs or accidents. Simple maintenance steps keep the shed secure all year long.
Checking Anchor Integrity
Look at each anchor closely. Check for cracks, bends, or loose parts. Tighten any bolts or screws. Make sure the anchors are still deep in the ground. Shifting soil can loosen them over time. Replace any damaged anchors to keep the shed stable. Do this at least twice a year, especially after storms.
Preventing Rust And Corrosion
Rust weakens metal anchors and causes failure. Clean anchors regularly with a wire brush to remove dirt and rust. Apply a rust-resistant paint or spray to protect the metal. Use anchors made from galvanized steel or stainless steel for better protection. Avoid letting water pool around the base of the anchors. Good drainage helps reduce rust problems.
Common Mistakes To Avoid
Anchoring a shed to the ground is vital for stability and safety. Many people make simple mistakes that weaken their shed’s hold. Avoiding these errors ensures your shed stays secure in wind and bad weather.
Improper Anchor Placement
Placing anchors too close to the shed walls reduces their effectiveness. Anchors must go deep and far enough to hold tight. Shallow or uneven placement can cause the shed to tilt or lift. Mark spots carefully before you start drilling or digging. Correct spacing and depth make a strong foundation.
Using Inadequate Materials
Using weak or wrong materials leads to quick failure. Cheap anchors or soft ropes break under pressure. Choose anchors made for the ground type and shed size. Steel anchors resist rust and provide better grip. Avoid using nails or weak stakes as anchors. Good quality materials protect your investment and keep the shed safe.
Credit: americanearthanchors.com
Frequently Asked Questions
How Do I Anchor A Shed To Prevent Wind Damage?
Use ground anchors or concrete footings to secure the shed firmly. This stops the shed from moving during strong winds. Proper anchoring increases shed safety and durability.
What Tools Are Needed To Anchor A Shed To The Ground?
Common tools include a drill, wrench, shovel, and ground anchors or bolts. These help fix the shed base firmly into the soil. Having the right tools makes the job easier and faster.
Can I Anchor A Shed On Concrete Or Asphalt?
Yes, use expansion bolts or wedge anchors designed for hard surfaces. Drill holes into the concrete or asphalt for a strong hold. This prevents the shed from shifting or tipping.
How Deep Should Shed Anchors Be Installed?
Anchors should be at least 18 to 24 inches deep for firm support. Depth depends on soil type and local weather conditions. Deeper anchors provide better resistance to wind and movement.
Is Anchoring A Shed Necessary For All Shed Types?
Anchoring is important for all sheds, especially large or lightweight ones. It improves stability and prevents damage during storms. Even small sheds benefit from proper ground anchoring.
Conclusion
Anchoring a shed to the ground keeps it safe and steady. Strong anchors stop it from moving in wind or storms. Choose the right method based on your soil and shed type. Take your time to install anchors properly for best results.
A well-secured shed lasts longer and protects your belongings. Now, you can enjoy peace of mind with a stable shed. Simple steps make a big difference in safety and durability.