
Is your garage door keypad blinking but refusing to open your garage? It’s frustrating when you’re standing right outside, ready to get in, and the keypad just won’t respond.
You might be wondering what’s wrong and how to fix it fast. Don’t worry—you’re not alone, and this problem doesn’t mean you need a costly repair. You’ll discover the common reasons behind a blinking garage door keypad and simple steps you can take to get it working again.
Keep reading to regain control of your garage door without stress or confusion.
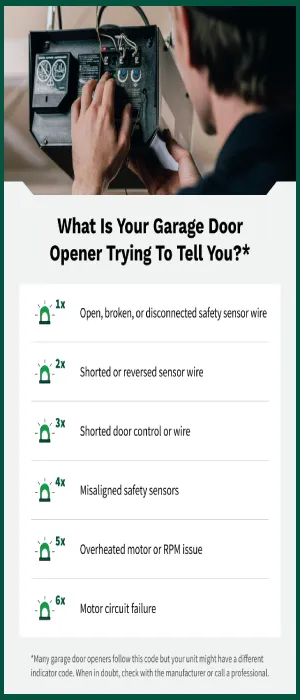
Credit: www.precisiondoor.net
Common Causes Of Keypad Blinking
Garage door keypads blink for various reasons. This blinking often means the keypad cannot open the door. Knowing the common causes helps fix the problem faster. It also prevents further damage to your garage door system.
Low Battery Issues
Most garage door keypads run on batteries. A weak or dead battery causes the keypad to blink. The blinking signals the keypad is not getting enough power. Replacing the batteries can often stop the blinking and restore function.
Signal Interference
Keypads send signals to the garage door opener. Objects or devices nearby can block or interfere with these signals. Wireless devices, thick walls, or metal objects cause interference. This stops the keypad from working properly and makes it blink.
Wiring Problems
Wired keypads rely on a stable electrical connection. Loose or damaged wires cause blinking issues. Corrosion or wear on the wires may break the circuit. Checking and fixing the wiring restores the connection and stops blinking.
Faulty Keypad Components
Sometimes the keypad itself has a defect. Internal parts can wear out or break over time. A faulty keypad cannot send the right signals. This causes blinking and failure to open the door. Replacing the keypad may be necessary.
Troubleshooting Battery Problems
Battery problems often cause garage door keypads to blink and fail to open. Batteries provide the power the keypad needs to send signals. Weak or dead batteries can interrupt this process. Troubleshooting battery issues is an essential first step to fix the problem. Follow these simple tips to check and replace your batteries properly.
Checking Battery Life
Start by checking the current battery life. Look for signs of low power, like dim keypad lights or slow response. Use a battery tester or replace old batteries with new ones to see if that helps. Many keypads show a low battery indicator, which can be a blinking light or a specific color. Always check this before moving to other fixes.
Replacing Batteries Correctly
Remove the battery cover carefully to avoid damage. Note the battery’s position and polarity before removing it. Insert new batteries following the correct positive and negative ends. Press firmly to ensure good contact with terminals. Close the cover tightly to protect the batteries from moisture and dirt. Incorrect replacement can cause the keypad to malfunction or keep blinking.
Using Compatible Battery Types
Use the battery type recommended by the keypad manufacturer. Common types include AA, AAA, or 9-volt batteries. Using the wrong type can cause poor performance or damage the device. Always check the keypad manual or label for the correct battery type. Choosing compatible batteries ensures reliable power and longer keypad life.
Fixing Signal Interference
Signal interference often causes a garage door keypad to blink and fail to open. This issue happens when the keypad cannot communicate properly with the garage door opener. Fixing signal interference involves finding what blocks or disturbs the signal and then taking steps to remove or reduce it.
Simple changes can improve the signal strength and restore the keypad’s function. These fixes do not require special tools or expertise. Most homeowners can do them quickly and safely.
Identifying Interference Sources
Common interference sources include wireless devices, metal objects, and thick walls. Devices like Wi-Fi routers, cordless phones, and baby monitors can disrupt the keypad signal. Metal objects, such as filing cabinets or shelves near the keypad, can also block signals. Thick concrete or brick walls weaken the wireless connection.
Check the area around your garage and keypad for such items. Moving or turning off devices near the keypad helps identify the problem. Note any changes in the keypad’s blinking or response after moving items.
Relocating The Keypad
Moving the keypad to a new spot often solves interference issues. Place it closer to the garage door opener without metal between them. Avoid areas near wireless electronics or metal surfaces. Mount the keypad at eye level for easy use and better signal.
Test the keypad after moving it. If it stops blinking and opens the door, the new location is better. If not, try another spot. Small changes in location can make a big difference.
Resetting The Garage Door Opener
Resetting the garage door opener can clear signal problems. Turn off power to the opener for about 30 seconds. Turn it back on and wait for it to restart fully. This resets the system and may fix communication errors with the keypad.
After resetting, test the keypad again. If blinking stops and the door opens, the reset worked. Repeat the process if necessary. Always follow the manufacturer’s instructions for resetting your specific model.
Addressing Wiring And Connection Issues
Addressing wiring and connection issues is important when a garage door keypad blinks but does not open the door. Faulty wiring can cause the keypad to malfunction or lose communication with the garage door opener. Checking connections helps ensure the system works properly.
Start by carefully inspecting all wiring and connections related to the keypad and opener. Small problems like damaged wires or loose plugs can stop the keypad from working. Fixing these issues often restores normal function.
Inspecting Wiring For Damage
Look closely at the wires connected to the keypad and opener. Check for cuts, cracks, or worn spots on the wires. Damaged wiring can block the signal between the keypad and the door opener. Replace any wires that look broken or frayed. Also, make sure no wires are pinched or bent sharply.
Securing Loose Connections
Loose connections can cause the keypad to blink and not open. Firmly push all wire connectors into their terminals. Tighten any screws holding the wires in place. If a wire feels loose or falls out, reconnect it securely. Clean any dirty or corroded connection points before reconnecting.
Testing The Door Opener’s Receiver
The door opener’s receiver may fail to receive signals from the keypad. Test the receiver by pressing the keypad buttons while standing near the opener. Listen for any sounds or observe if the opener reacts. If the receiver does not respond, reset or replace it following the manufacturer’s instructions.
Resetting And Reprogramming The Keypad
Resetting and reprogramming the garage door keypad often solves blinking or unresponsive issues. This process clears errors and refreshes the connection between the keypad and the opener. It helps the keypad recognize new or existing codes properly. Follow these simple steps to reset and reprogram your keypad.
Performing A Factory Reset
Start by locating the reset button on the keypad or the garage door opener motor unit. Press and hold the reset button for about 10 seconds until the keypad lights blink rapidly. This action erases all stored codes and settings. Wait for the lights to stop blinking before proceeding. The keypad is now back to its original factory settings.
Re-entering Access Codes
After the reset, you need to program your access codes again. Choose a secure code with 4 to 8 digits. Enter the new code on the keypad, then press the enter or lock button. The keypad should flash or beep to confirm the code is saved. Repeat for any additional codes you want to use. Keep your codes private for safety.
Syncing With The Garage Door Opener
Syncing connects the keypad to your garage door opener. Press the learn or program button on the opener unit. Within 30 seconds, enter your access code on the keypad and press enter. The opener light may blink or you may hear a beep. This signals successful syncing. Test the keypad by entering your code to open the door.

Credit: www.youtube.com
When To Replace The Keypad
Knowing when to replace your garage door keypad is important. A blinking keypad that won’t open the door often signals a problem. Some issues can be fixed, but others mean the keypad needs replacement. Acting at the right time saves you frustration and keeps your garage secure.
Signs Of Irreparable Damage
Keypads show clear signs when they are beyond repair. Constant blinking without response is a major warning. Buttons that do not press or stick also indicate damage. Corrosion or water damage inside the keypad means replacement is needed. Physical cracks or broken parts can stop the keypad from working properly.
Choosing A Compatible Replacement
Select a keypad that works with your garage door system. Check the model and brand to match the new keypad. Look for keypads with similar features and frequency. A compatible keypad ensures smooth operation and avoids connection problems. Read the manual or consult a professional for advice on compatibility.
Professional Installation Tips
Professional help can make keypad replacement easier and safer. Technicians ensure the keypad is correctly programmed to your garage door opener. They test the new keypad to confirm it works well before finishing. Proper installation prevents future issues and extends the keypad’s life. Ask the technician to explain keypad use and maintenance tips after installation.
Preventive Measures For Keypad Issues
Garage door keypads can stop working and blink due to simple issues. Preventive steps help avoid these problems. Regular care keeps your keypad working smoothly. Small actions can save you time and money. Stay ahead by protecting the keypad from damage and checking its power source often.
Regular Maintenance Tips
Clean the keypad with a soft, dry cloth. Dirt and dust can block the buttons. Avoid harsh chemicals that may damage the surface. Test all buttons monthly to ensure they respond well. Tighten any loose screws or mounts. Loose parts can cause connection problems.
Protecting The Keypad From Weather
Install a protective cover if your keypad is outdoors. Rain and sunlight can wear out the keypad fast. Avoid placing it where water can drip directly. Use weatherproof keypads for extra protection. Shield from extreme cold or heat to prevent damage.
Routine Battery Checks
Check the keypad battery every three months. Replace batteries before they run out completely. Weak batteries cause blinking and failure to open. Use the recommended battery type for your model. Keep spare batteries handy for quick changes.

Credit: www.reddit.com
Frequently Asked Questions
Why Is My Garage Door Keypad Blinking But Not Opening?
A blinking keypad often means low battery or signal interference. Check and replace the keypad batteries first, then try again.
How Do I Reset A Blinking Garage Door Keypad?
To reset, press and hold the reset button inside the garage door opener. Wait for the light to stop blinking before testing the keypad.
Can A Faulty Keypad Cause The Garage Door Not To Open?
Yes, a damaged or worn-out keypad can stop the door from opening. Inspect the keypad for cracks or loose buttons and replace if needed.
What Should I Do If The Keypad Won’t Respond At All?
Ensure the keypad has fresh batteries and is within range of the opener. Also, clean the keypad to remove dirt or grime blocking the buttons.
Is There A Way To Fix Signal Interference On Garage Door Keypads?
Try moving nearby devices or metal objects away from the keypad area. This helps reduce signal interference and improves the keypad’s performance.
Conclusion
A blinking garage door keypad often signals a simple issue. Check the batteries or wiring first. Resetting the keypad can also help fix the problem. Make sure your code is entered correctly. Small steps like these save time and frustration.
If problems continue, contacting a professional may be necessary. Don’t ignore warning signs; act quickly to avoid being locked out. Your garage door keypad should work smoothly again soon. Keep these tips handy for future keypad troubles.