
Are you ready to upgrade your shed with strong, functional double doors? Building double shed doors with plywood might sound tricky, but it’s easier than you think—and you’ll save money by doing it yourself.
In this guide, you’ll learn simple steps that anyone can follow, even if you’re new to woodworking. Imagine having doors that open wide for easy access, look great, and stand the test of time. Keep reading, and you’ll discover how to turn plain plywood into sturdy, reliable double doors that fit your shed perfectly.
Your project starts here!

Credit: www.youtube.com
Materials And Tools Needed
Gathering the right materials and tools is the first step to build a double shed door with plywood. Having everything ready makes the project smooth and faster. Choose quality materials to ensure the door lasts long and works well.
Materials Needed
- Exterior-grade plywood sheets (3/4 inch thick)
- 2×4 lumber for framing and support
- Galvanized screws and nails
- Door hinges (heavy-duty, suitable for outdoor use)
- Weatherstripping to seal gaps
- Wood glue for extra strength
- Exterior paint or wood sealer
- Sandpaper (medium and fine grit)
Tools Required
- Power drill with screwdriver bits
- Circular saw or handsaw
- Measuring tape and pencil
- Carpenter’s square
- Clamps to hold pieces together
- Hammer or nail gun
- Paintbrush or roller
- Safety goggles and gloves
Credit: buildblueprint.com
Choosing The Right Plywood
Choosing the right plywood is key to building strong double shed doors. The right plywood ensures durability and a good fit. It also affects how the doors look and last over time.
Not all plywood is the same. Each type has different qualities that suit certain projects better. Picking the best plywood for your shed doors helps avoid warping and damage.
Types Of Plywood For Shed Doors
Exterior grade plywood works best for shed doors. It resists moisture and holds up in bad weather. This plywood is often labeled as “CDX” or “marine grade.”
CDX plywood is affordable and strong enough for most sheds. Marine grade plywood is pricier but lasts longer outdoors. Both types prevent the doors from bending or rotting.
Thickness Of Plywood
Choose plywood that is at least 3/4 inch thick. Thicker plywood adds strength and keeps the doors sturdy. Thin plywood might flex or break under pressure.
Thicker sheets also help with insulation and soundproofing. They create a solid barrier against wind and rain.
Surface Finish And Appearance
Look for plywood with a smooth surface. It makes painting or staining easier. Smooth plywood also gives the doors a clean, neat look.
Some plywood types come with a veneer layer. This layer improves appearance and protects the wood underneath. A good finish helps the doors stay attractive for years.
Measuring And Planning The Door
Measuring and planning the door is the first step in building a double shed door with plywood. Accurate measurements help avoid mistakes and save materials. A clear plan guides the cutting and assembly stages.
Take your time during this phase to ensure everything fits perfectly. The goal is to create doors that open smoothly and match your shed’s frame.
Measuring The Door Opening
Start by measuring the width and height of the door opening. Use a tape measure and write down the numbers. Measure at the top, middle, and bottom for width. For height, measure both sides and the center.
Choose the smallest width and height to avoid fitting problems. Double-check your measurements before moving on.
Planning The Door Size
Decide how wide and tall each door panel will be. Usually, the total width equals the door opening width minus a small gap for clearance. This gap helps the doors swing open without sticking.
Make each door half the total width for a balanced look. Keep the height slightly shorter than the opening for smooth movement.
Sketching The Door Design
Draw a simple sketch of your double door on paper. Mark the dimensions and note where hinges and handles will go. Planning these details avoids surprises during assembly.
Label the plywood sheets you will cut. This helps keep track of parts during construction.
Credit: www.shedking.net
Cutting The Plywood Panels
Cutting the plywood panels is a key step in building double shed doors. Accurate cuts ensure the doors fit well and work smoothly. Take time to measure and mark the plywood carefully before cutting. Use the right tools to get clean edges and avoid splinters. Safety is important too, so wear protective gear and work in a safe space.
Preparing Your Workspace
Clear a flat surface to lay the plywood. Make sure there is enough room to move around. Good lighting helps see your measurements clearly. Have all tools ready before starting to cut. A stable workspace reduces mistakes and makes cutting easier.
Measuring And Marking The Plywood
Measure twice, cut once. Use a tape measure to mark the exact size of each door panel. Draw straight lines with a pencil and a straight edge. Double-check all measurements before cutting. Clear marks guide your saw and prevent errors.
Choosing The Right Saw
A circular saw works best for straight cuts on plywood. Use a fine-tooth blade for smooth edges. A jigsaw suits curved cuts but is less common here. Keep the saw steady and follow the marked lines carefully. Slow and steady cuts avoid splintering the wood.
Cutting The Panels Safely
Wear safety glasses and ear protection. Clamp the plywood to keep it from moving. Start the saw before touching the wood. Follow the marked lines steadily without forcing the saw. Let the tool do the work to get clean cuts.
Building The Door Frame
Building the door frame is a key step in creating sturdy double shed doors. The frame holds the plywood panels and keeps the doors strong. A well-built frame ensures the doors open and close smoothly. Take your time to measure and cut the frame parts carefully.
Measuring And Cutting The Frame Pieces
Start by measuring the door opening width and height. Add a small gap for easy door movement. Cut two vertical stiles and two horizontal rails from 2×4 lumber. Make sure all pieces are straight and smooth. Accuracy here helps the doors fit perfectly.
Assembling The Frame
Lay the stiles and rails on a flat surface. Arrange them to form a rectangle matching your measurements. Use wood screws to join the corners tightly. Check the corners with a carpenter’s square for right angles. A square frame keeps doors aligned.
Adding Cross Bracing For Strength
Add a diagonal brace from one corner to the opposite corner. This prevents the frame from sagging or twisting. Secure the brace with screws at both ends. The brace adds extra support to the door frame. This step makes the doors last longer.
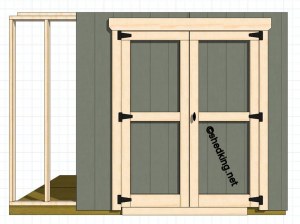
Assembling The Double Doors
Building double doors with plywood takes careful assembly. This step shapes the door’s strength and appearance. Follow clear steps to join the pieces firmly. Use simple tools and materials for the best results.
Each door needs a solid frame to hold the plywood. The frame keeps the door straight and prevents warping. After framing, attach the plywood to create the door panels. Secure everything tightly for lasting use.
Preparing The Door Frames
Start by cutting the frame pieces to the right size. Use 2×4 lumber for strong support. Lay out two vertical side pieces and two horizontal crosspieces. Assemble these with screws or nails to form a rectangle.
Check the corners with a square to keep them straight. Add a diagonal brace from one corner to the opposite. This brace stops the frame from twisting or sagging later.
Attaching Plywood Panels
Cut plywood sheets to match the frame size. Place the plywood flat on the frame surface. Use wood glue along the frame edges for extra hold. Nail the plywood to the frame every 6 to 8 inches.
Start nailing from the center and move outward. Avoid pushing too hard to prevent plywood cracks. Fill any gaps or holes with wood filler for smoothness.
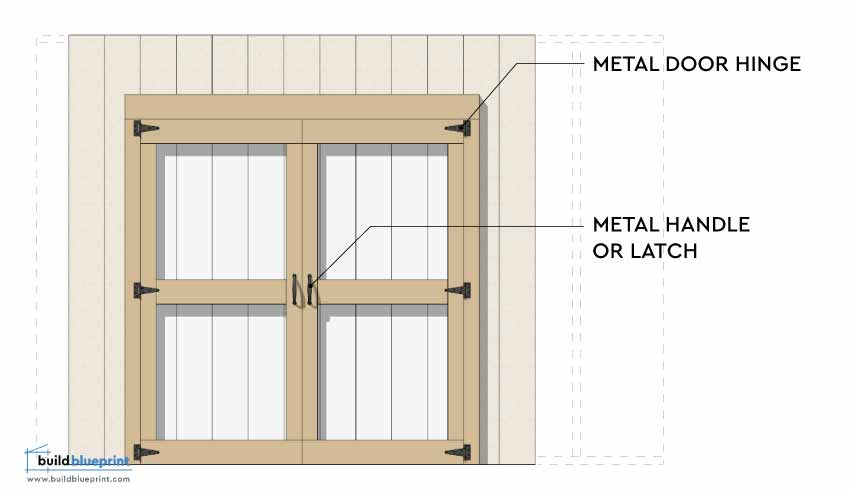
Installing Door Hardware
Choose strong hinges that fit your door size. Attach two or three hinges along each door edge. Position hinges evenly to balance door weight. Use screws that go deep into the frame wood.
Add handles and locks as needed. Mark the spots carefully before drilling. Test the door swing to make sure it opens smoothly without dragging.
Installing Hinges And Hardware
Installing hinges and hardware is a key step in building double shed doors. It allows the doors to open and close smoothly. Proper installation keeps the doors strong and secure. This section covers how to attach hinges and hardware correctly to your plywood doors.
Choosing The Right Hinges
Select heavy-duty hinges made for outdoor use. Galvanized or stainless steel hinges resist rust. Choose hinges wide enough to support the door’s weight. Typically, three hinges per door provide good stability. Pick hinges that match the door size and thickness.
Marking Hinge Placement
Hold the hinge on the door edge. Mark where the screws will go with a pencil. Place one hinge near the top, one near the bottom. Put the third hinge in the middle for extra support. Make sure the hinges align evenly on both doors.
Attaching Hinges To Doors
Drill pilot holes where you marked screw spots. Use a drill bit smaller than the screws. This prevents the wood from splitting. Screw the hinges firmly into the door edges. Tighten screws but avoid stripping them.
Mounting Hardware For Secure Closure
Install door handles or pulls on the outside edges. Use a latch or bolt to keep doors closed. Position the latch where the doors meet in the center. Attach hardware at comfortable heights for easy use. Check that all hardware moves freely and fits well.
Sealing And Finishing The Doors
Sealing and finishing your double shed doors protects them from weather damage. It also keeps the plywood strong and looking good. Proper sealing stops water from soaking into the wood. Finishing adds a smooth, clean surface that lasts longer.
Taking time to seal and finish your doors saves effort later. It prevents warping, cracking, and peeling. Your shed doors will stay functional and attractive for years.
Preparing The Surface For Sealing
Start by sanding the doors with medium-grit sandpaper. This removes rough spots and splinters. Wipe off all dust with a damp cloth. Clean surfaces help sealers stick better. Check for holes or cracks. Fill them with wood filler and let dry. Sand the filled spots smooth before sealing.
Choosing The Right Sealer
Pick a sealer made for outdoor wood. Waterproof sealers or wood preservatives work best. They block moisture and stop rot. Use a brush or roller to apply. Cover all edges, especially the bottom. Apply two coats for strong protection. Let each coat dry fully before the next.
Applying Paint Or Stain
Paint or stain adds color and extra defense. Stain shows the wood grain. Paint hides it but offers more coverage. Use exterior-grade paint or stain. Apply evenly with a brush in long strokes. Allow drying time between coats. Two or three coats give the best finish.
Adding A Protective Topcoat
For extra durability, add a clear topcoat. Polyurethane or spar varnish works well outdoors. It seals paint or stain from sun and rain. Apply thin, even layers with a clean brush. Wait until each layer is dry before adding more. This step extends your doors’ life.
Tips For Maintenance And Longevity
Maintaining your double shed door made from plywood is key to its long life. Simple care steps keep it working well and looking good. Regular checks and small fixes stop big problems later. Follow these tips to keep your door strong and durable.
Inspect The Door Regularly
Look over the door at least once a month. Check for cracks, warping, or loose screws. Early spotting helps you fix small issues fast. Keep the door frame and hinges tight and solid.
Apply Protective Sealant
Use a good water-resistant sealant on the plywood. Sealants stop water from soaking into the wood. Reapply the sealant every year or after heavy rain. This keeps the door safe from rotting and swelling.
Keep The Door Clean
Wipe off dirt and dust with a soft cloth. Clean the door gently to avoid scratches. Avoid harsh chemicals that damage the wood or finish. Clean doors last longer and look better.
Lubricate Hinges And Hardware
Oiling the hinges helps the door open smoothly. Use light machine oil or spray lubricant. Do this every few months or when the door squeaks. Tighten any loose bolts or screws while you work.
Protect From Extreme Weather
Shield the door from direct rain and strong sun. Use an overhang or awning if possible. Extreme weather can cause the plywood to crack or fade. Protection extends the door’s life and keeps it looking fresh.
Frequently Asked Questions
What Materials Do I Need To Build Double Shed Doors?
You need plywood sheets, wood screws, hinges, a saw, measuring tape, and wood glue. These basic materials help create strong, functional doors.
How Do I Measure For Double Shed Doors?
Measure the width and height of the shed opening carefully. Add a small gap for easy door movement and proper fitting.
What Thickness Of Plywood Is Best For Shed Doors?
Use 3/4-inch thick plywood for durable and sturdy doors. Thinner plywood may not hold up well to weather and use.
How Do I Attach Hinges To Double Shed Doors?
Place hinges evenly along the door edges and screw them into the frame securely. This ensures smooth door opening and closing.
Can I Paint Or Seal Plywood Shed Doors?
Yes, paint or seal the doors to protect them from weather damage. Use outdoor-grade paint or sealant for longer door life.
Conclusion
Building a double shed door with plywood is simple and practical. Follow each step carefully for best results. Use quality materials to ensure durability and strength. Take your time to measure and cut accurately. Enjoy the satisfaction of creating something useful yourself.
This project saves money and adds value to your shed. Now, your shed has easy access and a sturdy door. Try this DIY project and see the difference it makes!