
Thinking about adding a roof deck to your pitched roof? You’re about to discover how this smart upgrade can transform your outdoor space into a stunning retreat.
Building a roof deck might seem tricky at first, but with the right steps, you can create a safe, beautiful spot to relax or entertain. In this guide, you’ll learn exactly what you need to know—from planning and materials to construction tips—so you can confidently bring your vision to life.
Keep reading to unlock the secrets of building a roof deck that not only looks great but stands strong for years to come.
Credit: www.landisconstruction.com
Choosing The Right Roof Deck Design
Choosing the right roof deck design is a critical step in building on a pitched roof. The design affects safety, comfort, and the overall look. Careful planning ensures the deck fits well with the roof’s shape and structure.
Consider the roof’s angle and strength. Pick materials that last long and handle weather. Plan the deck to support weight safely. These factors work together to create a stable, attractive roof deck.
Assessing Roof Pitch And Structure
Measure the roof pitch accurately. Steeper roofs need different support than gentle slopes. Check the roof’s frame for strength. Some roofs can hold a deck easily. Others may require extra reinforcement.
Look for beams and joists that can carry weight. Understand the angles where the deck will sit. This step helps avoid problems later. A strong structure means a safer deck.
Selecting Materials For Durability
Choose materials that resist water and sun damage. Wood treated for outdoor use works well. Composite decking can also last a long time. Use rust-proof fasteners and connectors.
Think about maintenance needs. Some materials need more care than others. Pick options that suit your lifestyle and budget. Durable materials keep the deck safe and beautiful.
Planning For Weight And Load Capacity
Calculate the total weight the deck will hold. Include furniture, plants, and people in your plan. Make sure the roof and deck supports can handle this load. Overloading can cause damage or accidents.
Follow local building codes for weight limits. Consult a professional if unsure. Proper planning avoids costly repairs and ensures safety.

Credit: www.youtube.com
Preparing The Roof Surface
Preparing the roof surface is a crucial step before building a roof deck on a pitched roof. It ensures the deck will be safe and durable. Proper preparation helps avoid leaks and structural problems. Careful work here saves time and money later.
Inspecting Roof Condition
Start by checking the roof’s current condition. Look for damaged shingles, cracks, or weak spots. Check the roof structure for rot or insect damage. Make sure the roof can support extra weight. Fix any issues before adding the deck. A strong roof is key for a safe deck.
Waterproofing And Weatherproofing
Protect the roof from water damage with good waterproofing. Apply a waterproof membrane over the roof surface. Seal all edges and seams carefully. Use weatherproof materials to block rain and snow. Proper sealing prevents leaks that can ruin the deck. Keep the roof dry to extend its life.
Installing Support Beams
Support beams hold the deck firmly in place. Install beams across the roof at even intervals. Use strong, treated wood or metal beams. Attach beams securely to the roof frame. Check that beams are level and stable. Proper support prevents deck movement and damage.
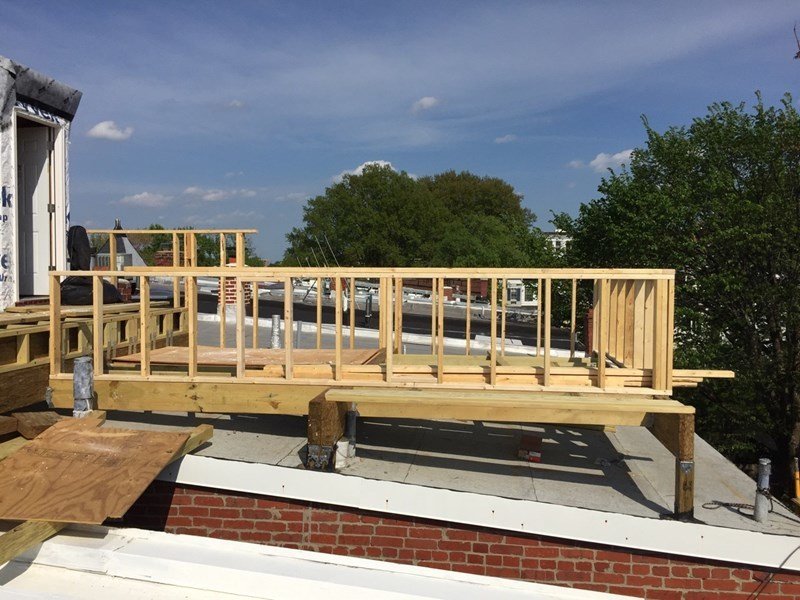
Building The Deck Frame
Building the deck frame is the key step to create a strong roof deck on a pitched roof. The frame supports the entire deck structure. It must be solid and precise. Careful planning and accurate work ensure safety and durability.
This process involves three main tasks: measuring and marking the layout, cutting and installing joists, and securing ledger boards. Each step plays a vital role in making a stable base for the deck boards.
Measuring And Marking Layout
Start by measuring the area where the deck will go. Use a tape measure and level to get exact dimensions. Mark the layout with chalk or pencil. Mark lines where the joists and ledger boards will sit. Double-check all marks to avoid mistakes later.
Cutting And Installing Joists
Cut joists from quality lumber to match your measurements. Joists are the horizontal supports that hold the deck boards. Space them evenly, usually 16 inches apart. Attach them securely to the ledger board and roof structure. Use galvanized nails or screws to prevent rust. Check that each joist is level and straight.
Securing Ledger Boards
Attach the ledger board firmly to the house or roof edge. The ledger board holds one side of the deck frame. Use lag bolts or heavy-duty screws for a strong hold. Seal around the ledger board to prevent water leaks. Make sure it is level and aligned with the roof pitch. This step is crucial for deck stability and safety.
Credit: www.finehomebuilding.com
Installing Decking Boards
Installing decking boards is a key step in building a roof deck on a pitched roof. The right boards provide a safe, comfortable surface to enjoy your outdoor space. Proper installation ensures durability and stability. Focus on choosing the right materials, spacing boards correctly, and allowing water to drain well. These details protect your roof and extend the deck’s life.
Choosing Decking Material
Pick decking boards that resist weather and moisture. Wood like cedar or redwood works well for natural looks. Composite boards last longer and need less upkeep. Avoid softwoods that decay fast. Consider weight too. Lightweight materials reduce load on the roof. Choose boards with slip-resistant surfaces for safety. Quality materials save money over time.
Spacing And Fastening Boards
Leave small gaps between boards for airflow and water drainage. Space boards about ¼ to ½ inch apart. Use corrosion-resistant screws or nails to prevent rust. Fasten each board firmly to the joists beneath. Check alignment often to keep boards straight. Secure edges tightly to avoid movement. Proper fastening stops boards from warping or shifting.
Ensuring Proper Drainage
Decks on pitched roofs must drain water quickly. Angle boards slightly toward the roof’s lower edge. This guides water off the deck surface. Keep gaps clear of debris to avoid blockages. Install flashing or waterproof barriers under decking for extra protection. Good drainage prevents wood rot and roof damage. Plan drainage before laying boards for best results.
Adding Safety Features
Adding safety features to a roof deck on a pitched roof is very important. It helps prevent falls and accidents. Safety also makes your deck more comfortable and enjoyable for everyone.
Simple safety steps protect your family and guests. These steps keep your roof deck a safe place to relax and have fun.
Installing Railings And Balusters
Railings are a must for any roof deck. They act as a barrier to stop people from falling off. Choose strong, weather-resistant materials like metal or treated wood. Make sure the railings are tall enough to provide good protection.
Balusters fill the space between railings. They keep small children and pets safe. Space balusters closely to prevent slipping through. Secure them firmly to avoid any movement or wobbling.
Adding Non-slip Surfaces
Non-slip surfaces reduce the risk of slipping on the deck. Use special outdoor paint or coatings with grit. These add traction, even when the deck is wet. You can also use non-slip mats or rubber tiles in key areas.
Check surfaces regularly and replace worn materials. Keep your deck safe all year round by maintaining these surfaces.
Incorporating Lighting
Good lighting keeps your roof deck safe after dark. Install lights along railings and steps to show edges clearly. Use solar or LED lights for energy efficiency. Low-level lighting creates a soft glow without glare.
Lighting also helps prevent trips and falls. It makes your deck inviting and usable in the evening.
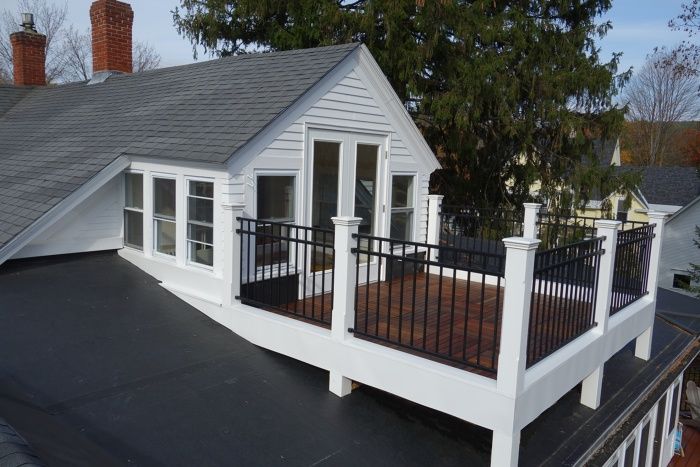
Finishing Touches
Finishing touches give your roof deck a complete, polished look. These steps protect your deck and create a cozy space. Careful sealing, smart furnishing, and regular maintenance keep the deck safe and inviting for years.
Sealing And Staining Deck
Sealing protects wood from water and sun damage. Use a good quality sealant made for outdoor wood. Apply evenly across all surfaces with a brush or roller. Staining adds color and extra protection. Pick a stain that suits your style and matches the house. Let the stain dry fully before using the deck.
Furnishing And Decorating
Choose furniture that fits the space and stands up to weather. Lightweight chairs and tables work well on pitched roofs. Add cushions and outdoor rugs for comfort. Use plants in pots to bring life and color. String lights or lanterns create a warm glow in the evening. Keep decorations simple to avoid clutter and keep safety in mind.
Maintenance Tips For Longevity
Clean your deck regularly to prevent dirt and mold buildup. Sweep leaves and debris off the surface often. Wash the deck with mild soap and water at least twice a year. Check for loose boards or nails and fix them quickly. Reseal the wood every two to three years to keep it protected. Cover furniture during bad weather to extend its life.
Frequently Asked Questions
How Do You Start Building A Roof Deck On A Pitched Roof?
Begin by checking the roof’s structure for strength and slope. Plan the deck size and design carefully. Use strong, weather-resistant materials for safety and durability.
What Materials Work Best For Pitched Roof Decks?
Pressure-treated wood and composite decking are popular choices. They resist weather and last longer. Use corrosion-resistant fasteners to avoid rust.
How Do You Ensure Safety On A Pitched Roof Deck?
Install secure railings around the deck edges. Use non-slip decking materials to prevent falls. Always check local building codes for safety rules.
Can A Roof Deck Cause Leaks On A Pitched Roof?
Proper waterproofing is crucial to prevent leaks. Install a strong membrane under the deck. Regularly inspect and maintain the roof deck for damage.
How Long Does It Take To Build A Roof Deck On A Pitched Roof?
Building time varies by size and complexity. Small decks may take a few days, larger ones weeks. Planning and preparation speed up the process.
Conclusion
Building a roof deck on a pitched roof takes careful planning and effort. Start with a strong frame that fits your roof’s angle. Use quality materials to keep the deck safe and sturdy. Don’t forget to add good drainage to avoid water damage.
A well-built deck adds space and value to your home. Take your time, follow steps closely, and enjoy your new outdoor area. Small details make a big difference in the final result. Your roof deck can become a great place to relax and entertain.