
Have you ever finished a wood project with a polyurethane coat, only to find annoying bumps ruining the smooth surface? Those little imperfections can be frustrating, especially when you want your work to look flawless.
But don’t worry—getting rid of bumps in your polyurethane finish is easier than you think. You’ll discover simple, effective ways to fix those bumps and restore that perfect, glass-like shine. Keep reading, and you’ll learn exactly how to make your finish look professional every time.
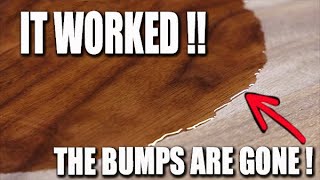
Credit: www.youtube.com
Causes Of Bumps In Polyurethane Finish
Polyurethane finish can develop bumps that spoil the smooth look of wood surfaces. These bumps happen for several reasons. Knowing what causes them helps fix the problem and avoid it next time. This section explains the main causes of bumps in polyurethane finish.
Dust And Debris Contamination
Dust and tiny debris often land on wet polyurethane. These particles get trapped as the finish dries. They create rough spots or bumps on the surface. Even a clean room can have dust in the air. Proper cleaning and dust control reduce this problem.
Improper Application Techniques
Applying polyurethane too thickly can cause bumps. Using old brushes or rollers also leads to uneven layers. Rushing the drying time before the next coat traps air bubbles. Each coat needs to be thin and smooth for best results.
Humidity And Temperature Effects
High humidity slows drying and causes bubbles under the finish. Low temperatures make the polyurethane thicker and harder to spread. Both conditions increase the chance of bumps forming. Ideal temperature and humidity levels help avoid these issues.
Old Or Poor-quality Polyurethane
Using expired or low-quality polyurethane often results in bumps. The finish may not spread evenly or dry properly. Always check the product’s expiration date. Choose high-quality polyurethane for a smooth, clear finish.

Credit: www.reddit.com
Tools And Materials Needed
Fixing bumps in a polyurethane finish needs the right tools and materials. Using proper supplies helps you get a smooth, clear surface. This section lists all essentials for the job. Keep them ready before starting your work.
Sandpaper And Abrasives
Choose fine-grit sandpaper, like 320 to 600 grit. These gently smooth the bumps without damaging the finish. Use a sanding block for even pressure. Abrasive pads can also help in tight spots. Always sand lightly and evenly for best results.
Cleaning Supplies
Clean the surface before and after sanding. Use a soft cloth and mild detergent or wood cleaner. Avoid harsh chemicals that might harm the finish. A tack cloth is perfect to pick up dust. Clean surfaces ensure better adhesion for polishing.
Brushes And Applicators
Use high-quality brushes for applying polish or touch-up coats. Foam brushes work well on polyurethane finishes. Soft cloths or applicator pads help spread compounds smoothly. Choose the right size to reach all areas easily.
Polishing Compounds
Polishing compounds remove fine scratches and restore shine. Select a compound made for polyurethane surfaces. Use a gentle rubbing motion to blend the finish. Finish with a clean cloth to buff the surface bright.
Preparation Before Fixing Bumps
Fixing bumps in a polyurethane finish requires careful preparation. Skipping this step can cause more damage or uneven results. Proper preparation ensures a smooth surface ready for repair. It helps you work safely and efficiently.
Cleaning The Surface
Start by cleaning the area around the bumps. Use a soft cloth and mild soap with water. Remove all dust, grease, and dirt. Dry the surface completely before moving on. A clean surface helps the repair materials stick better.
Choosing The Right Workspace
Pick a well-ventilated area with good lighting. Avoid dusty or humid places. A clean workspace reduces the chance of new bumps forming. Work on a flat, stable surface to keep control. This setup makes the repair process easier and safer.
Protective Measures
Wear gloves to protect your skin from chemicals. Use a mask to avoid breathing fumes from polyurethane. Cover nearby furniture and floors with plastic or cloth. Protect yourself and your surroundings before starting the repair. Safety is key to a successful job.
Step-by-step Methods To Remove Bumps
Removing bumps from a polyurethane finish is doable with clear steps. This guide breaks down easy methods to smooth the surface. Follow these steps carefully to restore a flawless finish.
Light Sanding And Reapplication
Start by lightly sanding the bumpy area with fine-grit sandpaper. Use 320 to 400 grit for gentle abrasion. Sand in a circular motion until the bumps disappear. Wipe off dust with a clean cloth. Apply a thin coat of polyurethane over the sanded spot. Let it dry fully to blend the repair with the rest.
Using A Heat Gun For Small Bumps
A heat gun can soften small bumps on fresh polyurethane. Hold the heat gun a few inches away from the surface. Move it slowly across the bump to avoid burning. The heat will cause the finish to level out. Let the area cool and harden before touching.
Wet Sanding And Buffing Techniques
Wet sanding works well for larger or stubborn bumps. Soak 600-grit sandpaper in water for 10 minutes. Sand the surface gently with water to prevent damage. After smoothing, dry the area completely. Use a buffing pad to polish the finish. This restores shine and removes fine scratches.
Preventing Bumps In Future Polyurethane Projects
Preventing bumps in future polyurethane projects saves time and improves finish quality. A smooth surface starts with good preparation, right conditions, and the best materials. Careful application ensures the final coat looks flawless. This section covers key steps to avoid bumps and achieve a perfect finish every time.
Proper Surface Preparation
Clean the surface thoroughly before applying polyurethane. Remove dust, dirt, and grease with a mild cleaner. Sand the wood with fine-grit sandpaper for a smooth base. Wipe off sanding dust using a tack cloth or damp rag. A clean, smooth surface helps the polyurethane adhere evenly.
Ideal Application Conditions
Apply polyurethane in a dust-free, well-ventilated area. Keep the temperature between 65°F and 75°F for best results. Avoid high humidity, which causes bubbles and bumps. Work in a space with good lighting to spot imperfections early. These conditions help the finish dry smoothly and evenly.
Selecting Quality Products
Choose high-quality polyurethane for better coverage and fewer bumps. Thicker formulas may cause uneven layers. Pick a product suited for your project, such as water-based or oil-based polyurethane. Read reviews and product labels carefully. Using the right product reduces the chance of finish problems.
Applying Thin, Even Coats
Apply polyurethane in thin, even layers using a good brush or foam applicator. Avoid over-brushing, which creates bubbles and streaks. Let each coat dry completely before sanding lightly. Remove dust between coats to prevent bumps. Multiple thin coats give a smooth, durable finish without defects.

Credit: www.reddit.com
Troubleshooting Common Issues
Polyurethane finishes can sometimes show bumps, runs, or cloudiness. These issues make the surface look rough or dull. Fixing these problems helps the finish look smooth and clear. This section explains how to solve common problems with polyurethane finishes.
Dealing With Persistent Bumps
Bumps often happen when dust or debris sticks to the wet finish. Lightly sanding the bumps with fine-grit sandpaper smooths the surface. Use a clean cloth to wipe away dust after sanding. Apply a thin new coat of polyurethane to cover the sanded area. Repeat sanding and coating if bumps remain. Work in a clean, dust-free area to avoid more bumps.
Handling Runs And Drips
Runs and drips form when too much polyurethane is applied. Let the finish dry completely before fixing. Use fine-grit sandpaper to sand down the drips gently. Sand until the surface feels even. Clean the area to remove dust. Apply a thin, even coat of polyurethane to prevent future runs. Thin coats dry faster and reduce the chance of drips.
Fixing Cloudy Or Milky Finishes
Cloudy finishes often occur from moisture trapped in the finish. This can happen if the finish dries in a humid room. Lightly sanding the cloudy area helps clear the surface. Wipe the area clean before applying a fresh coat. Use polyurethane in a dry, well-ventilated room. Allow enough time for the finish to dry fully between coats.
Frequently Asked Questions
What Causes Bumps In Polyurethane Finish?
Bumps often appear due to dust, dirt, or air bubbles trapped during application. Uneven surface or thick coats also cause them. Proper preparation and slow application help reduce bumps.
How Can I Remove Small Bumps From Polyurethane?
Lightly sanding the surface with fine-grit sandpaper smooths small bumps. Clean the dust before applying another thin coat. This method keeps the finish even and shiny.
Can Heat Help Smooth Bumps In Polyurethane?
Heat can sometimes soften the polyurethane and help smooth minor bumps. Use a heat gun carefully at low settings to avoid damage. Keep the heat moving to prevent burns.
Is It Okay To Use A Brush Or Spray For Polyurethane?
Both brush and spray methods work, but spraying reduces brush marks and bumps. Spraying requires clean conditions and proper technique. Choose the method based on your skill and project size.
How Long Should I Wait Before Fixing Bumps In Polyurethane?
Wait until the polyurethane is fully dry before fixing bumps. Drying time depends on temperature, humidity, and product type. Patience ensures the best results and a smooth finish.
Conclusion
Removing bumps from a polyurethane finish takes patience and care. Light sanding smooths the surface without damage. Clean the area before applying another thin coat. Let each layer dry completely for best results. Small imperfections can disappear with gentle work.
Keep tools and workspace clean to avoid future bumps. This simple process helps your finish look smooth and shiny. Practice and attention will improve your skills over time. Your woodwork will look professional and well-protected.