
Have you just noticed a deep gouge in your wood floor and aren’t sure how to fix it? That ugly mark can ruin the look of your whole room and even lower your home’s value.
But don’t worry—repairing it is easier than you might think. You’ll discover simple, step-by-step ways to restore your wood floor’s smooth, beautiful surface. Keep reading, and by the end, you’ll have the confidence to tackle that gouge yourself and bring your floor back to life.

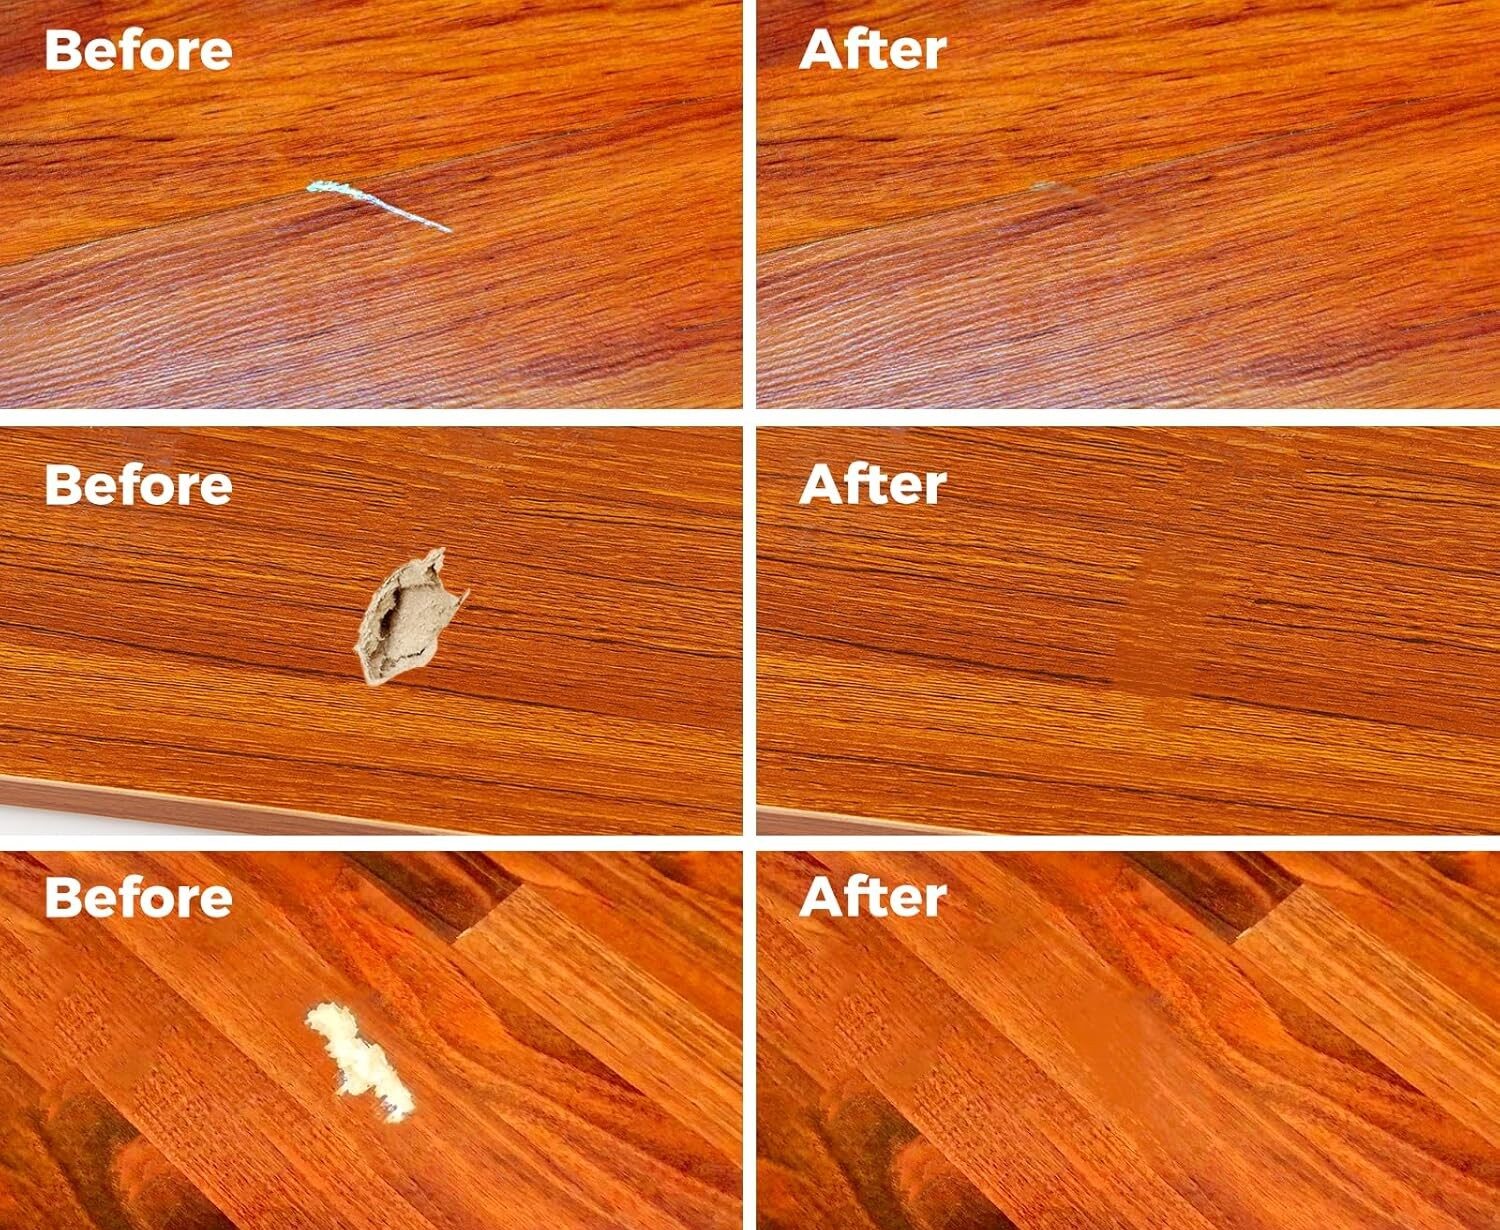
Credit: www.loudounvalleyfloors.com
Assessing The Damage
Before fixing a gouge in your wood floor, you must first assess the damage. This step helps you choose the right repair method. Careful inspection saves time and effort. It also prevents further damage. Knowing the type, depth, and size of the gouge guides your repair process.
Types Of Gouges
Gouges can vary in shape and cause. Some look like scratches, while others are deep cuts. Shallow gouges only affect the surface finish. Deep gouges cut into the wood itself. Some gouges come from heavy objects dropping. Others result from sharp tools or furniture movement. Identifying the type helps you pick the right filler or repair technique.
Depth And Size Matters
Measure the gouge’s depth and width carefully. Small, shallow gouges often need light sanding or wood filler. Larger gouges may require wood patches or professional help. Deeper gouges can weaken the floor if left untreated. Checking size and depth helps decide if you can fix it yourself or need expert tools. Accurate assessment ensures a long-lasting repair.
Credit: mrsander.co.uk
Gathering Repair Materials
Before fixing a gouge in your wood floor, gather all needed materials. Having the right tools and filler ready makes the repair smooth. It saves time and prevents mistakes. This section covers what you need for a proper fix.
Essential Tools
Start with basic tools that help clean and shape the gouge. A putty knife works well to spread filler evenly. Sandpaper smooths the surface after the filler dries. Use a small brush or cloth to clean dust and debris. A vacuum cleaner or soft broom helps clear loose particles. Make sure tools are in good condition for best results.
Choosing The Right Wood Filler
Pick a wood filler that matches your floor color and type. Some fillers come pre-stained for easy color matching. Water-based fillers dry fast and are easy to clean. Oil-based fillers offer strong durability but take longer to dry. Check if the filler can be sanded and stained after drying. This helps blend the repair with the rest of the floor.
Preparing The Floor
Preparing the floor is a crucial first step in fixing a gouge in wood flooring. Proper preparation helps the repair materials stick well and ensures a smooth finish. Taking time to prepare the area prevents future damage and makes the repair last longer.
Cleaning The Area
Start by removing dust, dirt, and loose wood from the gouge. Use a soft brush or vacuum to clear debris. Clean the area with a damp cloth and mild soap. Avoid soaking the wood; use just enough moisture. Let the floor dry completely before moving to the next step.
Sanding For Better Adhesion
Lightly sand around the gouge with fine-grit sandpaper. Sanding creates a rough surface for the filler to stick. Do not sand too deep or wide. Wipe away dust with a dry cloth after sanding. Proper sanding improves the bond and smoothness of the repair.

Credit: www.reddit.com
Filling The Gouge
Filling the gouge is the key step in repairing your wood floor. It restores the damaged area and prepares it for finishing. The right filler will match the wood and hold up over time. This section covers how to apply and smooth wood filler for the best results.
Applying Wood Filler
Choose a wood filler that matches your floor color. Use a putty knife to scoop a small amount of filler. Press the filler firmly into the gouge. Overfill slightly to account for shrinkage as it dries. Remove any excess filler around the edges. Let the filler dry according to the package instructions.
Smoothing The Surface
After the filler dries, check the surface for bumps. Use fine-grit sandpaper to smooth the area gently. Sand in the direction of the wood grain. Wipe away dust with a clean cloth. The surface should feel even and blend with the surrounding floor. Now your floor is ready for staining or sealing.
Drying And Sanding
Drying and sanding are key steps in fixing a gouge on a wood floor. These steps help the repair blend smoothly with the rest of the floor. Taking time to dry and sand properly ensures a clean, neat finish.
Proper Drying Time
After filling the gouge, let it dry completely. Drying time depends on the filler type and room temperature. Usually, it takes a few hours to dry fully. Avoid rushing this step. Touching the repair too soon can cause damage. Check the filler with your finger. It should feel hard and dry, not sticky. Patience here leads to a stronger repair.
Blending The Repair
Use fine-grit sandpaper to smooth the dried filler. Sand gently to avoid scratching the surrounding wood. Sand until the repair is flush with the floor. This step helps the patch disappear. Wipe away dust with a soft cloth. Sanding blends the repair and prepares it for finishing. The smoother the surface, the better the final look.
Finishing Touches
The final steps make your wood floor repair look perfect. These finishing touches help the patch blend with the rest of the floor. They also protect the repair, making it last longer. Take your time and be careful to get the best results.
Staining The Patch
Choose a stain that matches your floor color. Test the stain on a small, hidden area first. Use a small brush or cloth to apply the stain to the patched area. Apply thin layers and let each dry before adding more. This helps the patch blend naturally with the floor. Avoid putting too much stain at once. It can make the patch look darker than the rest of the floor.
Applying Protective Coating
After staining, protect the patch with a clear finish. Use a polyurethane or varnish made for wood floors. Apply the coating with a clean brush or foam applicator. Spread it evenly and thinly across the patched area. Let the first coat dry fully, then add a second coat. This seals the patch and prevents damage. It also gives a smooth, shiny surface that matches the floor.
Alternative Quick Fixes
Small gouges in wood floors can spoil the look of a room. Fixing these marks does not always need big tools or expert skills. Quick fixes help hide these flaws fast and keep your floor looking nice. These easy methods work well for minor damage and save time.
Using Wax Sticks
Wax sticks are a handy tool for covering small gouges. Choose a wax color close to your floor. Rub the wax stick over the gouge. Press the wax into the scratch firmly. Use a plastic scraper or old credit card to smooth the surface. Wipe away extra wax with a soft cloth. This method fills the gouge and blends it well.
Diy Crayon Method
Crayons can act like wax sticks in a pinch. Pick a crayon color that matches your wood floor. Rub the crayon over the gouge slowly. Fill the scratch completely with crayon wax. Use a plastic card to level the wax surface. Buff the area gently with a cloth. This simple trick hides small gouges quickly without special products.
Preventing Future Gouges
Preventing future gouges in your wood floor saves time and money. Small steps protect the wood surface and keep it looking new. Taking care of your floor stops damage before it starts.
Protective Pads For Furniture
Attach soft pads under chair and table legs. These pads stop hard edges from scratching the floor. Choose pads made of felt or rubber for best results. Check pads often and replace them if worn out. Moving furniture carefully also reduces the risk of gouges.
Regular Floor Maintenance
Clean the floor regularly to remove dirt and grit. Dirt acts like sandpaper and can cause scratches. Use a soft broom or vacuum with a floor brush. Avoid wet mopping too often, as water can damage wood. Apply wood floor cleaner recommended by manufacturers. Routine care keeps the floor strong and less prone to gouges.
Frequently Asked Questions
How Do I Fix A Deep Gouge In My Wood Floor?
Fill the gouge with wood filler that matches your floor color. Let it dry, then sand it smooth and apply a finish.
What Tools Are Needed To Repair A Wood Floor Gouge?
You need wood filler, a putty knife, sandpaper, and matching floor finish. A clean cloth helps to smooth and clean the area.
Can I Repair A Gouge Without Sanding The Whole Floor?
Yes. Sand only the gouged area gently after filling. This keeps the repair less noticeable and saves time.
How Long Does It Take For Wood Filler To Dry?
Most wood fillers dry within 30 minutes to an hour. Check the product instructions for exact drying time before sanding.
Will The Repaired Gouge Match My Wood Floor Color?
Using a wood filler that closely matches your floor helps. You can also stain or paint the repair for better color match.
Conclusion
Repairing a gouge in a wood floor can save your flooring’s look. Small fixes prevent bigger problems later. Use the right tools and materials for best results. Take your time and follow each step carefully. You can restore your floor’s smooth surface and shine.
A little effort brings great satisfaction and lasting beauty. Keep your floor clean and dry to protect your work. Enjoy your refreshed wood floor every day.