
Splitting large logs can feel like a tough, tiring job—especially if you don’t have the right tools or know-how. But what if you could make the work easier and faster?
Using a wedge is a simple, powerful way to break down big logs without wasting all your energy. You’ll learn clear, step-by-step tips that anyone can follow. By the end, you’ll be ready to handle even the biggest logs with confidence and less effort.
Keep reading, and discover how to turn heavy wood into manageable pieces like a pro.
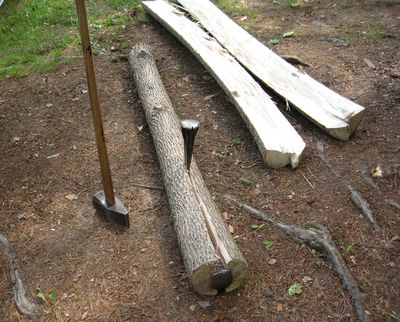
Credit: woodgears.ca
Choosing The Right Wedge
Choosing the right wedge is key to splitting large logs safely and easily. The correct wedge makes the work faster and reduces the effort. It also helps prevent damage to tools and injury to the user. Different wedges fit different tasks. Understanding the types, materials, and safety features guides your choice.
Types Of Splitting Wedges
There are several types of wedges for splitting wood. Standard wedges have a simple triangular shape. They work well for most logs. Cone wedges are round and pointed. They push wood apart as they go deeper. Hammer wedges are flat and wide. These require a sledgehammer to drive them in. Each type suits different log sizes and wood hardness.
Material And Size Considerations
Wedges come in steel, aluminum, and sometimes plastic. Steel wedges are strong and last long. Aluminum wedges are lighter but less durable. The wedge size depends on log size. Small wedges fit thin logs. Large wedges handle thick, tough logs. The wedge should be heavy enough to split the wood but not too heavy to control.
Safety Features To Look For
Safety is important when choosing a wedge. Look for wedges with bright colors. These are easier to see in wood piles. Some wedges have handles or grips to hold better. Rounded edges on wedges reduce the risk of cuts. Choose wedges with clear instructions for safe use. A good wedge helps protect your hands and body.
Preparing The Work Area
Preparing the work area is the first step in splitting large logs with a wedge. A safe and organized space helps you work better and avoid accidents. Take time to set up your area before you start splitting.
Selecting A Stable Surface
Choose a flat and firm surface to work on. This keeps the log steady while you split it. Avoid soft or uneven ground that might cause the log to roll or tip. Concrete, packed dirt, or wooden platforms work well.
Clearing The Surroundings
Remove all objects near your work area. Clear stones, sticks, and tools to prevent tripping or injury. Keep a safe distance from people and pets. A clear space lets you swing the wedge freely without hitting anything.
Positioning The Log Properly
Place the log upright or lying flat, depending on its shape. Make sure it does not wobble or move. If needed, use smaller logs or blocks to support it. Proper positioning helps the wedge split the log cleanly and safely.
Techniques For Effective Splitting
Splitting large logs with a wedge requires more than just strength. Using the right techniques makes the job easier and safer. Good technique helps you avoid mistakes and work faster. These tips focus on how to use your tools properly and control your force.
Placing The Wedge Correctly
Start by finding the log’s natural cracks or weak spots. Place the wedge in the center of these lines. Make sure the wedge stands straight and not tilted. Press it gently into the wood before hitting. This keeps the wedge steady and ready to split the log.
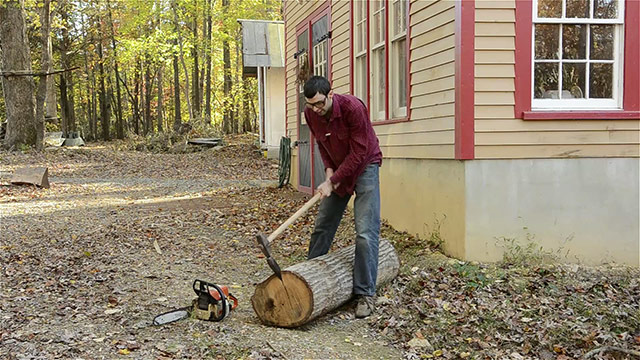
Using A Sledgehammer Safely
Hold the sledgehammer firmly with both hands. Keep your feet apart for balance. Check that no one stands nearby. Swing the hammer smoothly, not wildly. Aim straight at the top of the wedge. This avoids slipping and protects your body from injury.
Applying Controlled Force
Hit the wedge with steady, strong blows. Avoid hitting too hard at first. Let the wedge sink in slowly. Increase force only when the wedge starts to split the log. This saves energy and reduces tool damage. Control keeps every hit effective and safe.
Credit: www.reddit.com
Dealing With Tough Logs
Large logs can be hard to split, especially when they have tough spots. These spots slow down your work and need extra care. Knowing how to handle tough logs makes splitting easier and safer.
Use the right tools and techniques. Watch for areas that need special attention. This helps you split logs faster with less effort.
Identifying Knots And Hard Spots
Knots are dense parts where branches grew. They feel harder when you tap the log. Look for dark rings or swirls on the wood surface. These spots resist wedges and axes.
Mark knots before you start. Plan to hit around them or use extra force. Avoid trying to split right through them. That can damage your tools or make the log stuck.
Multiple Wedge Method
Use more than one wedge for tough logs. Start with one wedge to create a crack. Then, drive a second wedge into the crack. This widens the split and reduces tool strain.
Place wedges evenly along the crack. Tap each wedge gently at first. Then hit harder as the split grows. This method works well on thick or knotty logs.
When To Use A Maul Instead
A splitting maul combines an axe and a hammer. It has a heavy head that drives wedges deeper. Use a maul if wedges alone don’t work well.
Mauls are better for very hard or large logs. They help break knots and tough grain. Choose a maul with a handle you can grip firmly. This gives better control and safety.
Safety Tips And Best Practices
Splitting large logs with a wedge can be tough and risky without the right safety measures. Following safety tips and best practices helps you avoid injury and work more efficiently. Knowing how to protect yourself and maintain your tools keeps the job safer and easier.
Protective Gear Essentials
Always wear safety glasses to protect your eyes from flying wood chips. Use heavy gloves to shield your hands from splinters and sharp edges. Wear sturdy boots with good grip to prevent slipping. Long pants and a long-sleeve shirt help guard your skin against cuts and scrapes. A hard hat is wise if you work under trees or near falling branches.
Avoiding Common Injuries
Keep your body clear of the wedge’s path. Never hold the log near the wedge while striking. Use steady, controlled swings to avoid losing control. Check your footing before every hit to stay balanced. Take breaks to avoid fatigue, which can cause accidents. Always face the log squarely to strike accurately and safely.
Maintaining Your Tools
Regularly sharpen the wedge for easier splitting and less force needed. Clean the wedge after each use to prevent rust. Check the handle of your hammer or maul for cracks or splinters. Replace any damaged tools right away to avoid accidents. Store your tools in a dry place to keep them in good condition.
Troubleshooting Common Issues
Splitting large logs with a wedge can sometimes be tricky. Problems may slow your work or cause frustration. Knowing how to fix common issues helps you split logs safely and faster. This section covers frequent problems and how to solve them.
Wedge Getting Stuck
The wedge may get stuck in the wood during splitting. This happens when the wedge is not hammered straight. It also occurs if the wedge is too narrow for the log. Try tapping the wedge gently from different angles. Pull the wedge out carefully using a hammer or pry bar. Use a wider wedge for thick logs to avoid sticking.
Uneven Splitting
Sometimes the log splits unevenly or not at all. This happens when the wedge hits a knot or hard part of the wood. Look for cracks or weak spots on the log before splitting. Hit the wedge near these weak spots to guide the split. Avoid swinging too hard on one side to keep the split even.
Fatigue And Efficiency
Splitting large logs takes energy and can tire you quickly. Using a dull wedge or poor technique wastes effort. Keep your wedge sharp and your swings smooth and controlled. Take breaks if you feel tired to avoid accidents. Using the right tools keeps you safe and efficient.
Maintaining Your Wedge
Maintaining your wedge is key to safe and effective log splitting. A well-kept wedge lasts longer and works better with less effort. Regular care prevents damage and keeps the edge sharp for smooth splitting.
Cleaning And Sharpening
After each use, clean dirt and sap from the wedge. Use a wire brush or cloth to remove debris. Dry the wedge completely to stop rust. Sharpen the edge using a file or grinder. A sharp wedge cuts through wood faster and safer. Avoid removing too much metal; keep the original shape.
Proper Storage
Store the wedge in a dry place to avoid rust. Keep it off the ground on a rack or shelf. Cover the wedge with a cloth or plastic to protect it from moisture. Do not leave it outside or in damp areas. Proper storage extends the life of your wedge.
When To Replace Your Wedge
Replace the wedge if it shows deep cracks or chips. A bent or warped wedge is unsafe to use. If sharpening no longer restores the edge, it is time for a new wedge. Using a damaged wedge risks injury and poor splitting results. Always check your wedge before each use.
Credit: woodandshop.com
Frequently Asked Questions
What Tools Do I Need To Split Large Logs With A Wedge?
You need a splitting wedge, a sledgehammer or heavy mallet, and safety gear. These tools help you split logs effectively and safely.
How Do I Position The Wedge To Split A Log?
Place the wedge in a crack or at the log’s center. Tap it gently at first, then strike harder to split the wood.
Can I Split Any Type Of Wood Using A Wedge?
Most hardwoods and softwoods can be split with a wedge. Very green or wet wood may be harder and take more effort.
How Much Force Is Needed To Split Large Logs With A Wedge?
Use strong, controlled hits with a sledgehammer to drive the wedge in. Too light won’t split; too hard can be unsafe.
How Do I Stay Safe While Splitting Logs With A Wedge?
Wear gloves, safety glasses, and sturdy boots. Keep your hands clear and strike carefully to avoid injury.
Conclusion
Splitting large logs with a wedge is simple and effective. Use steady force and safety gear for best results. Place the wedge carefully in the log’s crack. Tap it gently at first, then harder as it splits. Take your time and keep your hands clear.
This method saves effort and works well outdoors. Try it on your next wood project and see how easy it can be. You’ll enjoy chopping wood with less strain and more control.