
If your Ryobi charger is blinking green, you might be feeling confused or frustrated right now. You rely on your tools to get the job done, and a blinking light can leave you wondering if your battery is charging properly or if something is wrong.
Don’t worry—this blinking green light is a common signal, and understanding what it means can save you time and stress. Keep reading to learn exactly why your Ryobi charger is blinking green and what you can do to fix it quickly.
Your next project depends on it!

Credit: theblokecave.co.uk
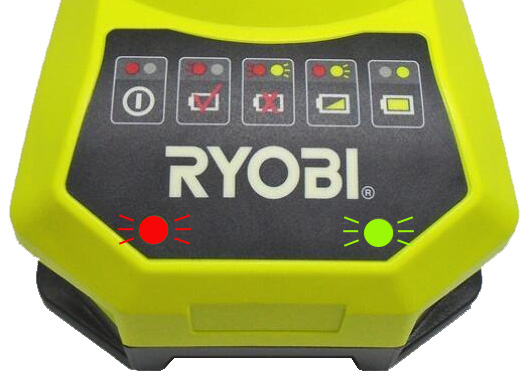
Blinking Green Light Meaning
The blinking green light on your Ryobi charger tells you important information about the charging process. It shows the charger’s current status. Understanding what this blinking means helps you use your tools safely and correctly.
This section explains the meaning of the blinking green light. It covers normal charging signals and error alerts. Knowing these signals can save time and avoid damage to your battery or charger.
Normal Charging Indicator
A blinking green light usually means the battery is charging properly. The charger sends power to the battery carefully. This keeps the battery healthy and ready to use.
The light blinks steadily while charging continues. It stops blinking and turns solid green when charging finishes. This shows your battery is full and safe to remove.
Error Signals Explained
If the green light blinks irregularly, it could mean an error. The charger might detect a problem with the battery or connection. The blinking pattern may change to warn you.
Common issues include a bad battery, poor contact, or overheating. Stop charging and check the battery and charger. Fix any problems before trying again.
Credit: www.direct-powertools.co.uk
Common Causes Of Blinking Green
The blinking green light on a Ryobi charger often signals an issue. Understanding common causes helps fix the problem quickly. Several factors can make the green light blink. Some relate to the battery itself. Others come from the charger or the environment.
Knowing these causes can save time and avoid frustration. It also keeps your tools ready to use. Below are the main reasons behind the blinking green light.
Battery Issues
Batteries that are too hot or cold may cause blinking. A damaged battery can also trigger the light. Sometimes, the battery might be old and lose its charge. Poor contact between the battery and charger leads to blinking too. Checking the battery’s condition is the first step.
Charger Problems
A faulty charger often causes the blinking green light. Loose connections inside the charger can break the charge cycle. Dirt or debris on the charging contacts prevents proper charging. Using the wrong charger for the battery might cause issues. Testing the charger with another battery can help identify the problem.
Environmental Factors
Extreme temperatures affect the charging process. Too much heat or cold can stop the battery from charging. Dust and moisture near the charger can cause blinking too. Make sure to charge in a clean, dry place. Proper environment keeps the charger and battery working well.
Quick Fixes To Try
Seeing your Ryobi charger blinking green can be confusing. This light usually means the charger is trying to communicate a problem. Before calling for help, try some quick fixes. These simple steps often solve the issue fast.
Use the following quick fixes to get your charger working again. Each step is easy and takes only a few minutes.
Resetting The Charger
Unplug the charger from the power outlet. Wait for 30 seconds to let it reset. Plug it back in and insert the battery. This can clear minor errors causing the green blinking light.
Cleaning Battery Contacts
Turn off the charger and remove the battery. Use a dry cloth to clean the battery contacts. Clean the charger contacts as well. Dirt or dust can stop proper charging and cause blinking lights.
Checking Power Source
Make sure the outlet provides steady power. Try plugging the charger into a different outlet. Avoid using power strips or extension cords. Unstable power can trigger the blinking green light.
When To Replace The Battery
Knowing when to replace your Ryobi battery helps keep your tools working well. A blinking green charger light can mean the battery needs attention. Replacing the battery at the right time avoids damage to your tools and charger. Watch for signs that show the battery is failing. Testing the battery health gives you a clear answer.
Signs Of Battery Failure
The battery may fail if it does not hold a charge. Notice if your tool stops working quickly. The charger light may blink green but never turn solid. The battery feels hot after charging or use. Swollen or damaged battery packs need immediate replacement. These signs mean the battery is weak or unsafe.
Testing Battery Health
Use a multimeter to check battery voltage. A fully charged Ryobi battery usually reads about 18 volts. If the voltage is much lower, the battery needs replacing. Some Ryobi chargers show error codes for bad batteries. You can also test the battery in another tool. Poor performance confirms the battery must be replaced.
Preventing Future Charging Issues
Preventing future charging issues with your Ryobi charger starts with good habits. Taking care of your battery and charger can save time and money. Small steps can keep your tools ready and working longer.
Proper Battery Storage
Store batteries in a cool, dry place. Heat and moisture can damage them quickly. Avoid leaving batteries in the charger after they are fully charged. Remove batteries from tools if you do not use them for a long time. Keep batteries away from metal objects to prevent short circuits. Charge batteries regularly to keep them healthy. This prevents deep discharge, which harms battery life.
Routine Charger Maintenance
Clean your charger often to avoid dust and dirt buildup. Use a dry cloth to wipe the contacts and casing. Check the charger for cracks or damage before use. Replace damaged parts immediately to avoid hazards. Ensure the charger vents are clear to prevent overheating. Store the charger in a safe place when not in use. Regular care helps the charger work correctly and last longer.
Expert Tips For Optimal Charging
Charging Ryobi batteries correctly helps them last longer. It also keeps tools ready for use. Following expert tips improves battery life and performance. Small changes can make a big difference.
Proper charging stops damage and avoids overheating. It keeps the battery healthy and safe. Use these tips to get the most from your charger and batteries.
Charging Best Practices
Always charge Ryobi batteries at room temperature. Avoid very hot or cold areas. Extreme temperatures can harm battery cells. Remove the battery from the tool before charging. Check the charger indicator lights during charging. A blinking green light often means the battery is charging. Wait until the light turns solid green. This shows the battery is fully charged. Do not leave batteries on the charger for too long. Overcharging may reduce battery life. Unplug the charger when not in use.
Choosing The Right Charger
Select a charger made for your Ryobi battery type. Using the wrong charger may cause damage. Match the charger voltage with your battery voltage. Use only Ryobi-approved chargers for safety. Cheap, generic chargers might not work properly. They can give wrong signals or overcharge the battery. Check the charger model number before buying. Always buy from trusted sellers or directly from Ryobi.
Credit: www.reddit.com
Frequently Asked Questions
Why Is My Ryobi Charger Blinking Green Light?
A blinking green light means the charger is in standby mode. It may not detect the battery or the battery is not connected properly.
How To Fix Ryobi Charger Blinking Green Quickly?
Try removing and reconnecting the battery firmly. Clean the battery contacts and ensure the charger is plugged into a working outlet.
Does Blinking Green Light Mean Battery Is Fully Charged?
No, a solid green light usually shows a full charge. Blinking green means the charger is waiting or not charging.
Can A Faulty Battery Cause Ryobi Charger Blinking Green?
Yes, a damaged or dead battery can cause this issue. Test with another battery to confirm if the charger or battery is the problem.
Is It Safe To Use Ryobi Charger With Blinking Green Light?
It is generally safe but the battery won’t charge properly. Avoid forcing the battery; check connections or try a different battery.
Conclusion
A blinking green light on your Ryobi charger signals a charging issue. Check the battery and charger for dirt or damage. Make sure the battery fits properly in the charger. Try charging a different battery to see if the problem remains.
Clean the contacts gently with a dry cloth. Sometimes, resetting the charger helps fix the blinking light. If the light keeps blinking, the battery might be faulty. Knowing these simple steps saves time and worry. Keep your tools ready by understanding what the blinking green means.
Stay safe and maintain your equipment well.