
If you want to secure your yard or garden without breaking the bank, building a welded wire fence with wooden posts is a smart choice. It’s strong, durable, and looks great.
But how do you get started? This guide will walk you through each step, making the process simple—even if you’ve never built a fence before. By the end, you’ll have the confidence and know-how to create a fence that lasts for years.
Ready to take control of your property and add value to your home? Let’s dive in!
Materials And Tools Needed
Building a welded wire fence with wooden posts needs the right materials and tools. Choosing quality items makes the fence strong and long-lasting. Knowing what to prepare helps the project go smoothly. Below are the key materials and tools you need.
Choosing The Right Wooden Posts
Wooden posts hold the fence steady. Use posts made from durable wood like cedar or treated pine. Posts should be at least 4 inches wide and 6 feet tall. Treated wood resists rot and insect damage. Make sure posts are straight and free from cracks. The number of posts depends on your fence length. Space posts about 6 to 8 feet apart for best support.
Selecting Welded Wire Mesh
Welded wire mesh forms the fence barrier. Select mesh with a strong gauge, such as 14 or 16 gauge wire. Smaller mesh openings, like 2×4 inches, keep animals out. Choose galvanized wire to prevent rust. Roll out the mesh carefully to avoid bends. Measure the height needed before buying to cover your area fully.
Essential Tools For Installation
Tools make installation easier and faster. Prepare a post hole digger or auger to set posts deep. Use a hammer or mallet to drive posts if needed. A wire cutter trims the mesh to fit. Pliers help twist and secure wire ties or staples. A level ensures posts stand straight. Finally, wear gloves and safety glasses for protection.
Preparing The Fence Line
Preparing the fence line is the first step in building a strong welded wire fence with wooden posts. This stage sets the foundation for the entire project. Taking time to do it right will make the installation easier and ensure the fence lasts longer.
Measuring And Marking The Area
Start by measuring the total length of the fence line. Use a tape measure to get accurate results. Mark the corners and post locations with stakes or spray paint. Keep the marks visible and spaced evenly for proper post placement. Accurate measuring helps avoid gaps or overlaps in the fence.
Clearing And Leveling The Ground
Remove rocks, plants, and debris from the fence path. Clear the area wide enough for the posts and fence wire. Use a shovel or hoe to level uneven ground. A smooth surface helps keep the fence stable. Level ground also makes digging post holes easier and more precise.
Locating Underground Utilities
Check for any underground utilities before digging. Call your local utility marking service to identify cables or pipes. Avoiding these prevents damage and dangerous accidents. Mark the utility lines clearly on the ground. This step protects you and keeps the project safe.
Installing Wooden Posts
Installing wooden posts is a key step in building a strong welded wire fence. The posts hold the wire tight and keep the fence stable. Proper installation ensures the fence lasts long and works well. This section explains how to dig post holes, set posts in concrete, and check alignment.
Digging Post Holes
Start by marking the spots for each post. Space them evenly, usually 6 to 8 feet apart. Use a post hole digger or an auger to dig holes. The holes should be about one-third as deep as the post length. Make them wide enough for concrete and the post to fit comfortably.
Setting Posts In Concrete
Place the wooden post in the hole. Pour concrete around the post to hold it firm. Fill the hole with concrete up to ground level. Use a stick or rod to remove air bubbles from the concrete. Let the concrete dry for at least 24 hours before attaching the wire.
Ensuring Proper Post Alignment
Check that each post is straight using a level. Adjust the post before the concrete sets. Line up posts in a straight row by stretching a string between the first and last post. Make sure each post touches the string. Proper alignment keeps the fence tight and looks neat.

Credit: www.tractorsupply.com
Attaching Welded Wire Mesh
Attaching the welded wire mesh to wooden posts is a key step in building a strong fence. Proper attachment keeps the fence stable and secure. This process includes unrolling the wire, placing it correctly, fastening it to the posts, and stretching it tight. Each step requires care to ensure the fence lasts long and looks neat.
Unrolling And Positioning The Wire
Start by unrolling the welded wire mesh along the fence line. Roll it out smoothly to avoid kinks or bends. Lay the wire on the ground next to the posts. Align the bottom edge of the mesh with the ground level. Make sure the wire is straight and covers the area between posts evenly. This setup makes fastening easier and the fence stronger.
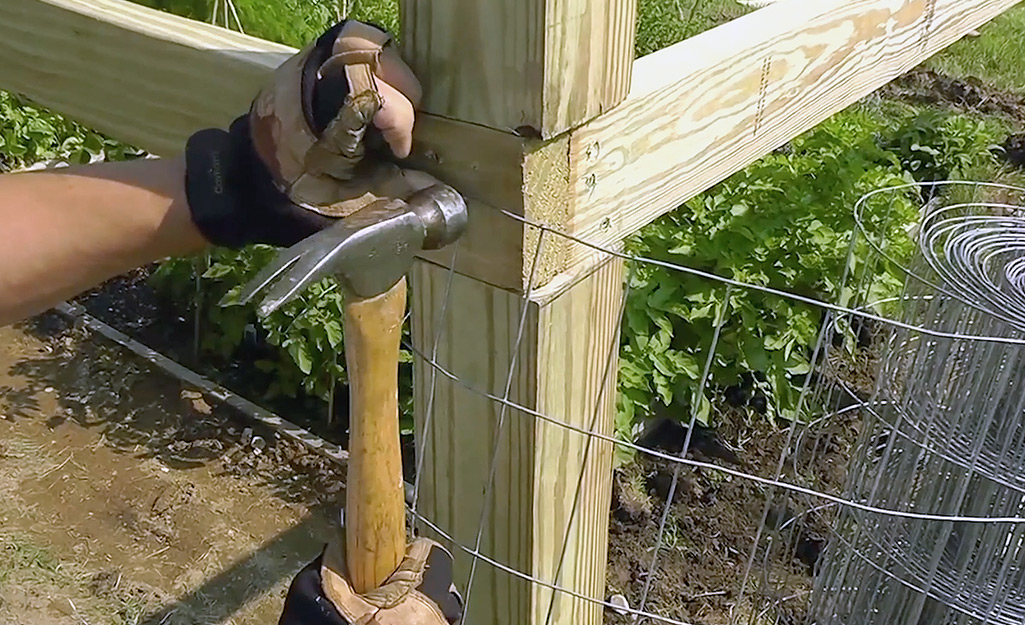
Securing Wire To Posts
Attach the wire mesh to each wooden post using staples or fencing nails. Place staples every 6 to 8 inches along the post for solid hold. Hammer the staples carefully to avoid damaging the wire. At corners and gates, use extra staples for more support. Check that the wire stays flat against the posts with no gaps. This helps keep animals out and the fence steady.
Stretching Wire For Tightness
Use a fence stretcher or come-along tool to pull the wire tight. Tight wire prevents sagging and adds fence strength. Start stretching at one end and move toward the other posts. Keep the wire firm but avoid over-tightening, which can damage the mesh or posts. After stretching, secure the wire again with staples. Tight wire mesh creates a neat, durable fence that stands strong over time.
Finishing Touches
Finishing touches make your welded wire fence strong and practical. These steps help protect your fence and make it easy to use. Take time to add gates, protect the wood, and plan for upkeep. This care keeps your fence lasting longer and looking neat.
Adding Gates And Access Points
Gates give easy entry and exit through your fence. Choose gate sizes that fit your needs. Attach gates to sturdy wooden posts with strong hinges. Use latches or locks to keep gates secure. Make sure gates open smoothly and close tightly.
Applying Protective Coatings
Wooden posts need protection from weather damage. Apply a waterproof sealant or wood preservative. This prevents rot, cracks, and insect damage. Paint or stain adds color and extra shield. Reapply coatings every few years for best results.
Regular Maintenance Tips
Check your fence regularly for damage or wear. Tighten loose wires and nails. Replace any broken or rotted wooden posts quickly. Clean dirt and debris from the fence to avoid rust. Keep plants and grass trimmed near the fence line.

Credit: www.reddit.com
Credit: www.homedepot.com
Frequently Asked Questions
What Tools Are Needed To Build A Welded Wire Fence?
You will need wooden posts, welded wire mesh, a post hole digger, wire cutters, and a hammer. Gloves and safety glasses are also helpful. These tools make the job easier and safer.
How Deep Should Wooden Posts Be For Fencing?
Posts should be buried at least 2 feet deep for stability. This helps the fence stay strong against wind and pressure. Use gravel at the bottom for better drainage.
Can Welded Wire Fences Keep Animals Out?
Yes, welded wire fences are strong and good for keeping animals in or out. The small mesh size stops small animals from slipping through. It’s a common choice for gardens and farms.
How Do I Attach Wire To Wooden Posts?
Use staples or fencing nails to fasten wire to posts. Pull the wire tight before nailing to avoid sagging. Check that the wire is even along the fence line.
How Long Does A Welded Wire Fence Last?
A well-built welded wire fence can last 10 to 20 years. Proper maintenance like checking posts and rust prevention extends its life. Wooden posts may need replacement sooner than wire.
Conclusion
Building a welded wire fence with wooden posts is a practical choice. It offers strength and durability for your property. Take your time to measure and place the posts correctly. Stretch the wire tight to keep it secure and neat.
Use simple tools to make the job easier and faster. This fence style works well for gardens, yards, and farms. With careful work, your fence will last for years. Enjoy the safety and look it adds to your space. Start your project step-by-step, and you will succeed.