
Are you ready to give your yard a fresh new look with a stylish, durable fence? Building a board on board fence might sound tricky, but it’s easier than you think—and the results are worth every effort.
This type of fence not only offers great privacy but also adds a classic, elegant charm to your outdoor space. In this guide, you’ll learn step-by-step how to build your own board on board fence, even if you’ve never tackled a project like this before.
Keep reading, and by the end, you’ll have the confidence and know-how to transform your yard into a beautiful, private retreat.

Credit: americasfencestore.com
Materials And Tools Needed
Building a board on board fence requires the right materials and tools. This ensures the fence is strong and looks good. Choosing quality wood and having the proper tools makes the job easier. A clear list helps you prepare before starting the project.
Below are the key materials and tools needed for a successful fence build.
Choosing The Right Wood
Select wood that resists rot and insects. Cedar and redwood are popular choices. Pressure-treated pine also works well. These woods last longer outdoors. Avoid soft woods that can decay fast. Choose wood with straight, tight grain for strength. Buy wood with smooth surfaces to reduce splinters.
Essential Tools For The Job
Use a power drill with drill bits for screws. A circular saw or handsaw cuts wood to size. A tape measure helps ensure precise cuts and spacing. A level keeps the fence straight and even. A hammer is handy for nails and adjustments. Post hole diggers or an auger make digging easier. Safety glasses protect your eyes during work.
Additional Supplies
Wood screws or galvanized nails hold pieces firmly. Concrete mix sets fence posts securely in the ground. Wood stain or sealant protects wood from weather. Use gloves to protect your hands. Sandpaper smooths rough edges. String line and stakes help mark fence lines. These extras improve the fence’s durability and finish.
Planning Your Fence Layout
Planning your fence layout is the first step in building a strong board on board fence. It helps you know exactly where to place each post and panel. Good planning saves time and money. It also ensures your fence looks neat and lasts longer.
Measuring The Area
Start by measuring the length and width of the area where you want the fence. Use a tape measure for accuracy. Write down your measurements clearly. This helps you know how many boards and posts you need. Measure twice to avoid mistakes. Check for any slopes or uneven ground that may affect the fence.
Marking Post Locations
Mark where each fence post will go. Space posts evenly, usually 6 to 8 feet apart. Use stakes or spray paint to mark the ground. Accurate post placement keeps the fence strong and stable. Make sure posts are straight along the fence line. This step guides digging and setting posts.
Checking Local Regulations
Check your city or town rules about fences. Some places have height or style limits. You may need a permit before you start. Look for underground utility lines before digging. Following rules avoids fines and problems later. Contact your local building office for details.
Preparing The Site
Preparing the site is the first and most important step in building a board on board fence. It helps ensure the fence stands strong and looks great. Careful preparation saves time and avoids problems later. Follow these steps to get your site ready for a solid fence.
Clearing The Ground
Remove all plants, rocks, and debris from the fence line. Clear the ground to create a smooth, level surface. This makes digging post holes easier. It also prevents damage to the fence over time. Use a shovel or rake to clear the area fully.
Locating Underground Utilities
Check for underground utilities before digging any holes. Call your local utility company to mark gas, water, and electric lines. Digging without checking can cause accidents and service interruptions. Mark the safe spots clearly with spray paint or flags. This step keeps you safe and avoids costly repairs.
Setting Up A String Line
Use a string line to mark the fence’s path. Attach the string tightly between two stakes at each end of the fence line. This gives a straight guide for digging post holes. Keep the string at the fence’s height level. A straight fence looks neat and professional.
Credit: austexfenceanddeck.com
Installing Fence Posts
Installing fence posts is the first step in building a strong board on board fence. The posts hold the entire fence in place. Proper installation ensures the fence lasts for years. This part requires careful measuring and solid footing. Follow these simple steps for a sturdy foundation.
Digging Post Holes
Start by marking where each post will go. Space posts about 6 to 8 feet apart. Use a post hole digger to make holes at least 2 feet deep. The width should be three times the post’s thickness. Clear out any loose soil from the hole. This makes setting posts easier and more stable.
Setting Posts In Concrete
Place the post in the hole, standing straight. Mix concrete according to the package instructions. Pour concrete around the post inside the hole. Fill the hole up to ground level. Smooth the surface and let the concrete set. Wait 24 to 48 hours before adding fence boards.
Ensuring Posts Are Level And Plumb
Check each post with a level tool. Use a carpenter’s level to ensure the post is vertical. Adjust the post until it stands perfectly straight. Keep checking while the concrete dries. Straight posts make the fence look neat and last longer.
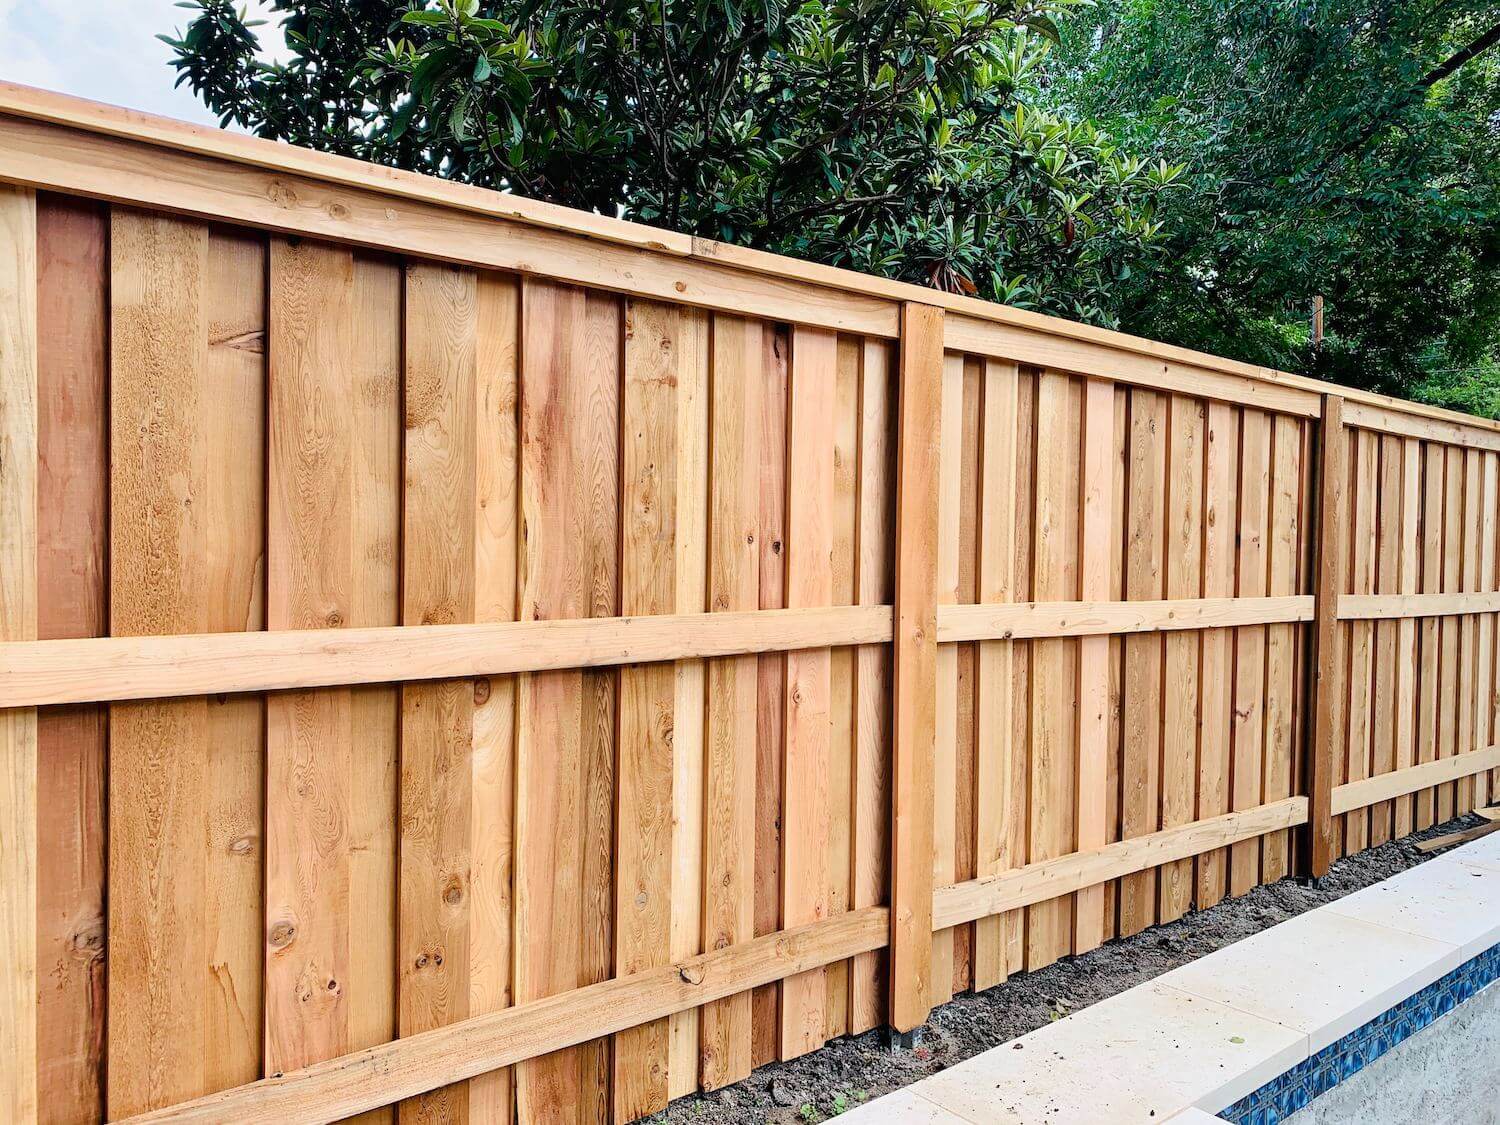
Building The Boards
Building the boards is a key step in creating a board on board fence. This part shapes the fence’s look and strength. Careful work here ensures a clean and solid fence that lasts.
Cutting Boards To Size
Measure each board carefully before cutting. Use a saw to cut boards to the right length. Keep cuts straight and smooth for a better fit. Label boards if needed to keep track.
Assembling Board Panels
Lay the boards side by side with small gaps between. Attach horizontal rails behind the boards to hold them. Use screws or nails to fix boards to rails. Check panels for even spacing and alignment.
Prepping Boards For Installation
Sand the boards to remove rough edges and splinters. Apply a wood preservative or paint to protect against weather. Let the coating dry fully before putting panels up. This step helps the fence last longer.

Credit: www.youtube.com
Attaching Boards To Posts
Attaching boards to posts is a crucial step in building a board on board fence. This process holds the fence together and gives it strength. Proper attachment ensures the fence lasts longer and stands firm against wind and weather. Take care with spacing, alignment, and the way you fasten the boards to the posts.
Spacing And Alignment
Keep boards evenly spaced for a neat look. Use a spacer to maintain the same gap between each board. Align the bottom edges of all boards for a level appearance. Check the boards from different angles to avoid crooked lines. Consistent spacing helps the fence look professional and tidy.
Nailing Or Screwing Boards
Choose nails or screws based on your tools and fence type. Screws hold better and allow easy repairs. Nails are faster to install but may loosen over time. Drive fasteners straight into the posts to avoid splitting the wood. Use galvanized or coated fasteners to prevent rust and decay.
Securing Overlapping Boards
Overlap the boards so one covers the edge of the next. This design creates a solid barrier and hides gaps. Secure the overlapping parts with two fasteners per board for extra strength. Make sure the overlaps line up evenly along the fence. Tight overlaps improve privacy and add to the fence’s durability.
Finishing Touches
Finishing touches bring your board on board fence to life. They protect the wood and improve the fence’s look. Small details make a big difference. Let’s explore key steps for a polished finish.
Sanding Rough Edges
Start by smoothing all rough edges with sandpaper. Use medium-grit first, then fine-grit for a soft finish. Sand along the wood grain to avoid scratches. This step prevents splinters and helps stain or paint stick better. Take your time to check every board and post.
Applying Stain Or Paint
Choose a stain or paint made for outdoor use. Stain shows the wood’s natural beauty and protects it from moisture. Paint offers a colorful, solid finish that hides imperfections. Apply evenly with a brush or sprayer. Let the first coat dry completely before adding a second. This keeps the fence looking fresh and helps it last longer.
Adding Caps And Trim
Caps and trim add style and protect fence posts. Post caps stop water from soaking into the wood ends. Trim boards cover gaps and sharpen the fence’s lines. Nail them carefully to avoid splitting the wood. Finish caps and trim with the same stain or paint. This creates a clean, unified look.
Maintenance Tips
Keeping your board on board fence in good shape takes regular care. Simple maintenance helps your fence last longer and look better. It prevents small problems from turning into big repairs.
Regular Cleaning
Clean the fence often to remove dirt and debris. Use a soft brush or cloth with mild soap and water. Rinse well to avoid soap buildup. Cleaning stops mold and mildew from growing. It also keeps the wood looking fresh and neat.
Inspecting For Damage
Check your fence every few months for signs of damage. Look for cracks, loose boards, or rot. Pay close attention to the bottom, where water can cause problems. Early spotting of issues saves time and money later.
Repairing And Replacing Boards
Fix small cracks with wood filler or sealant quickly. Replace boards that are broken or rotten to keep the fence strong. Use matching materials to keep the fence uniform. Proper repairs keep the fence safe and sturdy.
Frequently Asked Questions
What Materials Do I Need To Build A Board On Board Fence?
You need wooden boards, posts, nails, screws, and concrete for support. Tools like a saw, hammer, and drill are also necessary. Quality materials ensure the fence lasts longer.
How Much Does It Cost To Build A Board On Board Fence?
Costs vary by wood type and fence length but expect $15 to $30 per linear foot. Labor adds to the price if you hire professionals. Doing it yourself saves money but takes time.
How Long Does It Take To Build This Type Of Fence?
Building a board on board fence usually takes one to three days. It depends on the fence size and your skill level. Proper planning helps finish the job faster.
Can I Build A Board On Board Fence Myself?
Yes, building this fence yourself is possible with basic carpentry skills. Follow step-by-step instructions and take safety precautions. It saves money and allows customization.
How Do I Maintain A Board On Board Fence?
Regularly check for loose boards and nails, and replace damaged wood. Apply wood sealant or paint every few years to prevent weather damage. Simple upkeep keeps the fence strong and looking good.
Conclusion
Building a board on board fence takes time and patience. Follow each step carefully to get strong, lasting results. Choose good materials and measure twice before cutting. Keep posts straight and boards even for a neat look. This fence style offers great privacy and charm for any yard.
With some effort, you can create a fence that stands tall and looks great. Enjoy the process and the final outcome of your hard work. Your yard will thank you for it.