
Are you dreaming of sleek, custom cabinets but don’t want to spend a fortune? Ikea cabinets are a great starting point, but making them look built-in can completely transform your space.
Imagine your kitchen or living room with seamless, high-end cabinetry that fits perfectly—and all without the hefty price tag. You’ll discover simple, smart tricks to upgrade your Ikea cabinets so they blend effortlessly with your walls and floors. Ready to give your home that polished, designer look?
Keep reading to find out how you can achieve built-in style with everyday pieces.

Credit: www.ramblingrenovators.ca
Choosing The Right Ikea Cabinets
Choosing the right Ikea cabinets is key to making them look built-in. The right style and size can blend seamlessly with your walls. It creates a custom, polished look without the high cost.
Focus on cabinets that fit your space well. Think about how they will line up with your room’s layout. The goal is to make the cabinets feel like part of the room’s structure.
Popular Ikea Cabinet Styles
Ikea offers many cabinet styles. Shaker-style fronts provide a classic, clean look. Flat-front cabinets give a modern, sleek feel. Raised panel doors add a touch of elegance.
Choose a finish that matches your room’s color scheme. White or light gray are popular for a built-in look. Darker finishes work well in large spaces or for contrast.
Sizing And Layout Tips
Measure your space carefully before buying. Cabinets that fit tightly to walls look built-in. Leave no gaps between cabinets and walls or ceilings.
Consider adding filler pieces to close small gaps. Align cabinet heights with existing trim or moldings. This makes the installation look intentional and custom.
Plan the layout to maximize storage and flow. Place taller cabinets on the ends for balance. Use shorter cabinets under windows or counters for a seamless look.
Preparing Your Space
Preparing your space is the first step to making Ikea cabinets look built in. It sets the foundation for a smooth and successful project. Proper preparation saves time and prevents mistakes.
Start by understanding the area where you want to install the cabinets. Clear and clean the space to work comfortably. Accurate measurements and good planning are essential for a professional look.
Measuring And Planning
Measure the walls and floor carefully. Note the height, width, and depth of the area. Double-check your measurements to avoid errors. Sketch a simple plan showing where each cabinet will go. Think about how you want the cabinets to fit together. Planning helps you buy the right size and style of cabinets.
Clearing And Cleaning The Area
Remove furniture and items from the installation space. Sweep or vacuum the floor to clear dust and dirt. Clean walls and corners to ensure a smooth surface. A clean area helps cabinets sit flush and look built in. It also makes installation safer and easier.
Customizing Cabinet Exteriors
Customizing the outside of Ikea cabinets helps them blend with your room. It makes them appear like built-in furniture. Small changes can improve how cabinets look and feel. These changes add charm and style without heavy remodeling.
Adding Trim And Molding
Trim and molding create a polished, finished look. Attach crown molding to the top edge of cabinets. Base molding along the bottom adds weight and depth. Use flat trim around cabinet doors for a shaker style. Choose simple designs for a modern look. Paint the trim the same color as the cabinets. This keeps the design smooth and consistent.
Painting And Finishing Techniques
Painting changes the cabinet’s style completely. Use primer first for a smooth base. Choose matte or satin paint for a soft, built-in look. Light colors make small rooms feel larger. Use a sanding sponge between coats for even paint. Finish with a clear sealer to protect the surface. Try distressing paint for a vintage feel.
Installing Decorative Hardware
Hardware adds personality and function. Select knobs and handles that match your room’s style. Brass or black metal fits modern and rustic themes. Larger hardware creates a bold statement. Smaller knobs give a subtle, clean look. Install hardware in the same position on each door. This creates balance and a professional finish.

Credit: www.blesserhouse.com
Integrating Cabinets With Walls
Integrating Ikea cabinets with your walls helps create a smooth, built-in look. It blends the cabinets into the room, making them appear custom-made. The key is to connect the cabinets firmly and cover gaps where the cabinets meet the walls. This section explores how to use simple techniques to achieve this seamless effect.
Building Surrounding Framework
Start by building a frame around your Ikea cabinets. Use wood strips to fill gaps between the cabinets and the walls. The frame adds support and hides uneven spaces. Attach the wood strips to the wall and cabinet edges. Make sure the frame is level and flush with the cabinet surface. This step creates a solid base to add finishing touches.
Using Drywall And Paneling
Cover the surrounding framework with drywall or paneling. Cut pieces to fit tightly around the cabinets. Secure them with screws or nails to the wood frame. Sand the edges smooth to remove rough spots. Use joint compound to fill seams and gaps. This creates a flat surface that matches your wall texture. Paint or wallpaper the drywall to blend with the room.
Seamless Baseboards And Crown Molding
Add baseboards and crown molding to finish the look. Choose styles that match your room’s design. Install baseboards where the cabinets meet the floor. Crown molding goes on top, filling gaps between cabinets and ceiling. Nail the trim pieces into the frame and walls. Caulk joints for a smooth, seamless connection. Paint the trim to match your walls or cabinets.
Enhancing Functionality
Enhancing the functionality of Ikea cabinets makes them more practical and stylish. Built-in cabinets do more than just look good. They help organize your space better and make daily tasks easier.
Simple changes can add smart features. These changes improve how you use the cabinets every day. Small upgrades can turn basic cabinets into a custom-like installation.
Incorporating Lighting
Lighting brightens the cabinet area and adds a warm feel. Under-cabinet LED lights highlight shelves and create a cozy mood. Motion sensor lights turn on automatically, saving energy and effort.
Good lighting helps you find items quickly. It also adds a polished look that fits built-in designs. Choose soft white or warm tones for a welcoming effect.
Adding Shelves And Storage Accessories
Extra shelves increase storage space inside the cabinets. Adjustable shelves let you change heights for different items. Use pull-out trays and baskets to keep things neat and easy to reach.
Storage accessories like hooks and dividers improve organization. They prevent clutter and make the cabinet more useful. These additions make your Ikea cabinets feel custom and built-in.
Tools And Materials Needed
Creating built-in style cabinets from Ikea units requires the right tools and materials. Proper preparation makes the project easier and the result neater. Having everything ready before starting saves time and avoids frustration. Below is a list of what you need for this DIY task.
Essential Tools For Diy
- Measuring tape – for precise measurements
- Level – ensures cabinets and trims are straight
- Power drill – for drilling holes and screwing
- Screwdriver set – for manual adjustments
- Miter saw or handsaw – to cut trim and molding
- Stud finder – locates wall studs for secure mounting
- Caulking gun – applies sealant neatly
- Sandpaper or sanding block – smooths edges and surfaces
- Clamps – holds parts steady while gluing or screwing
- Paintbrush or roller – for finishing touches
Recommended Materials And Supplies
- Wood trim and molding – to frame cabinets
- Shims – for leveling cabinets on uneven floors
- Wood filler – covers nail holes and gaps
- Primer and paint – matches cabinets or walls
- Construction adhesive – secures trim pieces
- Caulk – seals edges and gaps for smooth finish
- Cabinet screws – strong enough for mounting
- Sandpaper – medium and fine grit for finishing
- Painter’s tape – protects surfaces during painting
- Drop cloth – keeps work area clean
Common Mistakes To Avoid
Making Ikea cabinets look built-in is a popular home upgrade. Many try it but run into common errors. Avoiding these mistakes saves time and gives a polished finish. Below are key pitfalls to watch for during your project.
Alignment Issues
Misaligned cabinets spoil the built-in look. Even small gaps stand out. Check cabinet edges and doors for perfect level and spacing. Use a level tool often. Fix any unevenness before securing the cabinets. Proper alignment creates a seamless appearance.
Improper Finishing
Skipping or rushing the finishing touches reduces quality. Paint, trim, and caulk need smooth application. Rough edges or visible nails draw attention. Sand surfaces lightly before painting. Choose paint that matches your wall color. Clean, even finishing blends cabinets into the room.
Ignoring Wall Preparation
Unprepared walls cause fitting problems. Remove old baseboards or uneven wallpaper first. Fill holes and smooth the wall surface. Uneven walls make cabinets look crooked. A clean, flat wall ensures cabinets sit flush. Proper prep helps the cabinets feel like part of the house.
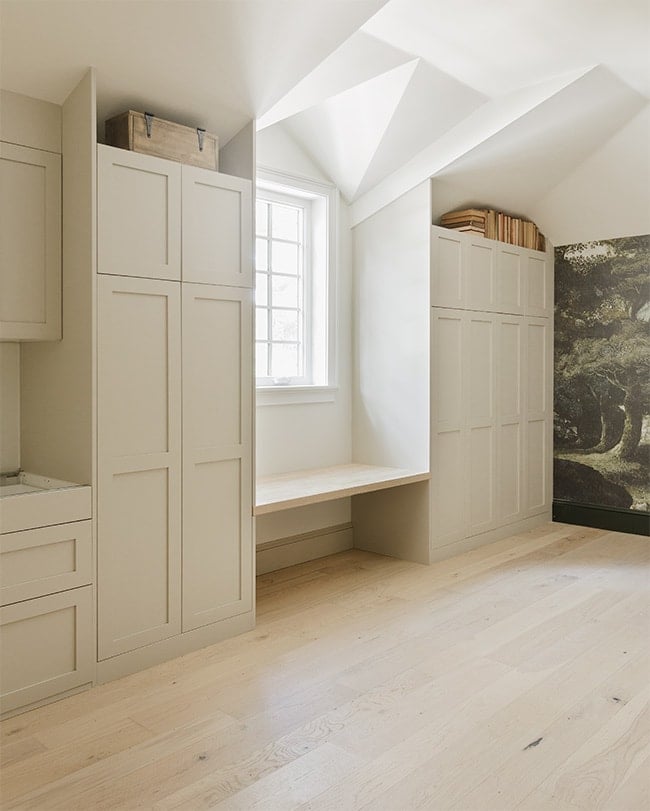
Credit: www.jennasuedesign.com
Inspiration From Real Projects
Real projects offer great ideas for making Ikea cabinets look built in. Seeing actual transformations helps you understand what works best. These examples show simple changes that create a custom look. Inspiration from real homes makes the process clear and doable.
Before And After Transformations
Many homeowners start with plain Ikea cabinets. After some changes, the space looks like it has custom built-ins. Adding trim and paint often makes the biggest difference. Some add new hardware or molding to complete the look. Photos of before and after show how small updates improve the design.
These transformations prove that you do not need expensive cabinets. Careful planning and smart styling create a high-end feel. The changes fit well with the room’s style and size. Real before and afters give you confidence to try your own project.
Creative Styling Ideas
Styling Ikea cabinets to look built in is about details. Some use crown molding along the top for a finished look. Others add baseboards to blend the cabinets with the floor. Paint color matching the wall also helps the cabinets disappear.
Open shelves mixed with closed cabinets add interest and function. Some add lighting inside or under the cabinets for a warm glow. Using knobs or handles that match other room fixtures ties the space together. These creative touches make Ikea cabinets feel part of the home.
Frequently Asked Questions
How Can I Make Ikea Cabinets Look Custom Built?
Add trim around the edges and crown molding on top. Paint the cabinets the same color as the walls. This creates a seamless built-in look.
What Materials Help Ikea Cabinets Blend Into Walls?
Use filler panels and side panels to close gaps. Match the cabinet finish with wall paint. These simple steps help cabinets blend well.
Can I Add Molding To Ikea Cabinets For A Built-in Look?
Yes, adding baseboards, crown molding, and trim frames the cabinets. This detail makes the cabinets look like custom carpentry. It’s an easy upgrade.
How Do I Hide Gaps Between Ikea Cabinets And Walls?
Install filler strips or trim pieces in gaps. Paint them to match cabinets or walls. This hides gaps and creates a smooth finish.
What Paint Colors Work Best For Built-in Ikea Cabinets?
Neutral tones like white, beige, or gray work well. They match most walls and create a clean look. Choose matte or satin finishes for subtle style.
Conclusion
Making Ikea cabinets look built-in takes some simple steps. Add trim and molding to hide gaps and seams. Paint cabinets to match your walls for a seamless look. Use custom panels or cover edges to blend cabinets with the room.
Small changes create a big difference in style. Your space feels polished and unique without spending much. Try these tips to give your cabinets a fresh, built-in appearance today.