
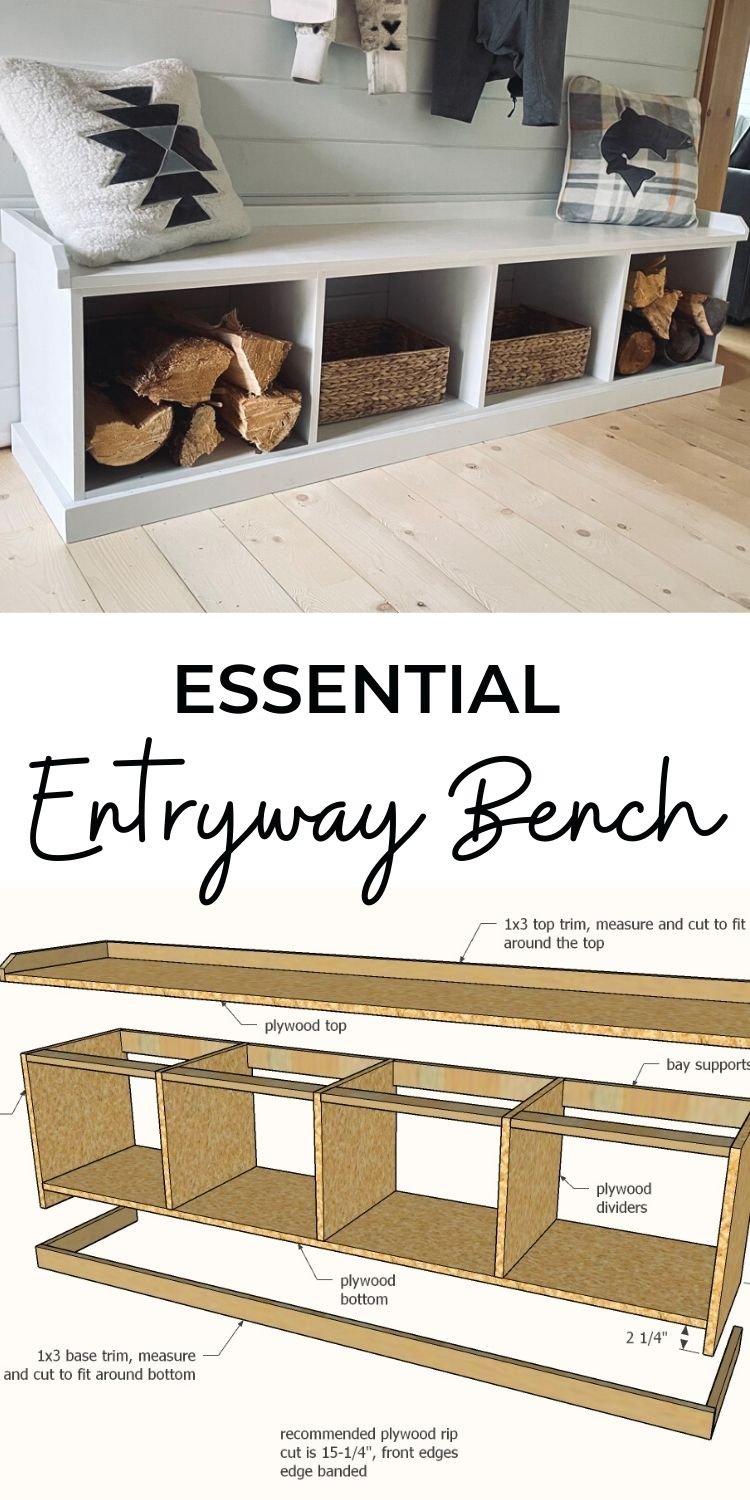
Are you tired of clutter piling up in your entryway? Imagine having a stylish bench where you can sit, store your shoes, and keep your keys all in one place.
Building an entryway bench with drawers is easier than you think, and it can transform your space instantly. In this guide, you’ll discover simple steps to create a functional piece that fits your style and needs. Ready to make your entryway more organized and inviting?
Keep reading—you’re just a few easy steps away from your perfect bench.
Choosing The Right Materials
Choosing the right materials is key to building a strong entryway bench with drawers. The materials affect the bench’s look, strength, and how long it lasts. Picking good wood and hardware will make your project easier and better. Let’s break down the best choices for wood and tools.
Selecting Wood Types
Wood is the main material for your bench. It needs to be sturdy and look nice. Pine is a popular choice. It is soft, easy to work with, and affordable. Oak is stronger and has a nice grain, but it costs more. Birch offers a smooth finish and holds paint well. Choose wood that fits your budget and style.
Consider how the wood will handle wear and tear. The entryway is a busy place. The wood should resist dents and scratches. Solid wood is better than plywood for durability. Avoid very soft woods; they get damaged quickly.
Picking Hardware And Tools
Hardware includes drawer slides, handles, screws, and hinges. Good quality hardware makes drawers open smoothly. Metal slides last longer and support weight well. Choose handles that are easy to grip. Screws should be rust-resistant to last long.
Tools like saws, drills, and sanders make building easier. A power drill speeds up screwing parts together. A sander smooths rough edges for a clean finish. Make sure your tools are sharp and in good condition. This saves time and improves the bench’s look.
Credit: www.ana-white.com
Designing Your Bench
Creating an entryway bench with drawers adds both seating and storage to your space. Start by choosing the right wood and tools. Measure carefully to fit your area and build sturdy drawers for easy organization.
Measuring Space And Dimensions
Start by measuring the entryway space where the bench will go. Use a tape measure to get the width, depth, and height available. Note any obstacles like doors or heating vents. This helps avoid mistakes during building.
Decide how big your bench should be based on the space and how many people will sit. Leave enough room for easy movement around the bench. Consider drawer size too, so they fit well under the seat.
Sketching The Layout
Draw a simple sketch of your bench design on paper or a digital app. Include the seat, legs, and drawers. Mark measurements clearly to keep track of sizes.
Plan drawer placement and how many you want. Think about drawer depth for storing shoes or small items. A neat layout saves time and materials during building.
Use the sketch to visualize the final look. Adjust the design for balance and style. This step makes building easier and more accurate.
Cutting And Preparing Wood
Cutting and preparing wood is the first big step in building your entryway bench with drawers. This step sets the foundation for the entire project. Taking time here helps ensure all pieces fit well together. Accurate cuts and smooth surfaces make assembly easier and the final product stronger.
Before cutting, organize your wood and tools. Check measurements twice. A clean workspace helps keep everything in order and safe.
Marking And Measuring Cuts
Use a tape measure and pencil to mark your wood. Measure each piece carefully. Mark straight, clear lines to guide your saw. Double-check each measurement. Even small mistakes can cause problems later.
Draw lines on the wood’s surface where you will cut. Keep marks visible but thin. Use a square or ruler for straight edges. Take your time to be precise.
Sanding And Smoothing Surfaces
After cutting, your wood edges may be rough. Sand all surfaces to remove splinters and rough spots. Start with medium-grit sandpaper, then finish with fine grit. Sand along the grain for a smooth finish.
Sanding also helps paint or stain stick better. Wipe away dust with a clean cloth after sanding. Smooth wood feels better and looks more professional on your bench.
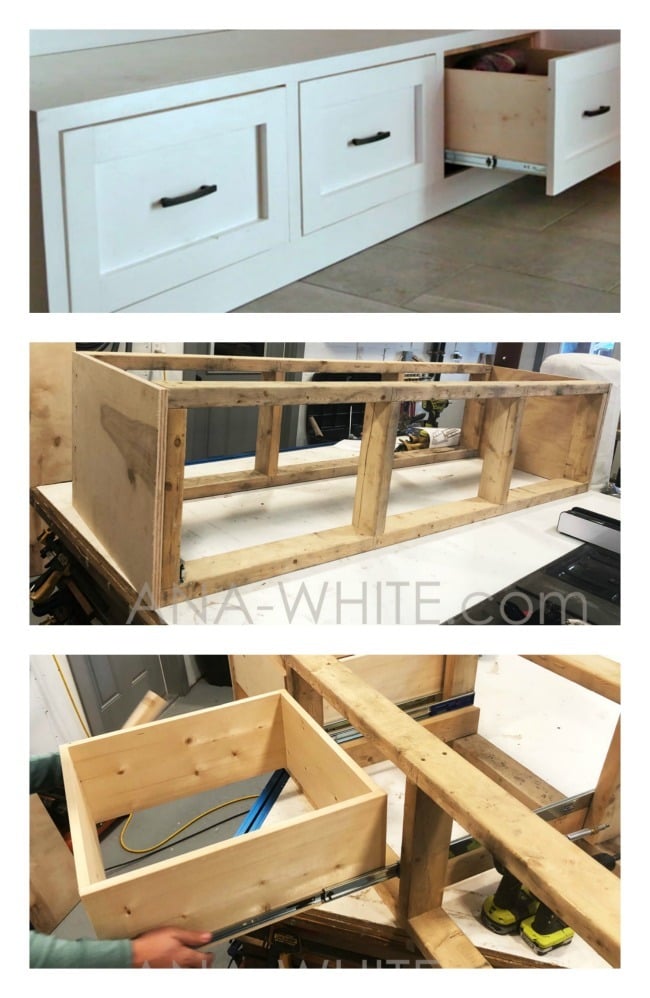
Assembling The Frame
Assembling the frame is a key step in building your entryway bench with drawers. This step gives the bench its shape and strength. A strong frame holds the weight and keeps the bench sturdy over time.
Take your time to follow each instruction carefully. Using the right tools and screws will make the assembly easier. A well-built frame makes the rest of the project smooth and stable.
Joining The Base And Sides
Start by attaching the base to the side panels. Place the base flat on your work surface. Align the sides so they sit flush with the base edges.
Use wood glue on the edges for extra strength. Secure the pieces with screws or nails. Drive screws slowly to avoid splitting the wood.
Check that the corners form perfect right angles. Use a square or measure diagonals for accuracy. Tight joints ensure the bench stays balanced and strong.
Securing The Seat
Once the frame is solid, position the seat on top. Align it evenly with the frame edges. This keeps the bench looking neat and professional.
Attach the seat with screws from underneath or inside the frame. Make sure screws are long enough to hold the seat firmly. Avoid going through the top surface.
Double-check the seat for stability. Press down gently to test for any movement. A secure seat means the bench will be safe to use.
Building Drawer Boxes
Building drawer boxes is a key step in creating a functional entryway bench. The drawers add storage space and keep the area neat. Making strong and smooth drawer boxes ensures they slide well and last long.
Focus on accurate measurements and sturdy materials. This helps the drawers fit perfectly inside the bench frame. Each part of the drawer must be cut and assembled carefully.
Constructing Drawer Sides And Bottoms
Start by cutting the drawer sides from solid wood or plywood. The sides should be equal in length and height. Sand the edges to avoid splinters.
For the drawer bottom, use a thinner piece of plywood. It needs to fit snugly inside the drawer sides. Attach the bottom with wood glue and small nails or screws.
Make sure the corners are square for a tight fit. This keeps the drawer box sturdy and prevents gaps.
Installing Drawer Slides
Choose drawer slides that match the drawer size and weight. Full-extension slides allow easy access to the drawer contents.
Attach one side of the slide to the drawer box. Use screws and check for level placement. The other side goes inside the bench frame.
Test the drawer by sliding it in and out. Adjust if it sticks or feels loose. Proper installation ensures smooth operation and durability.

Credit: www.youtube.com
Attaching Drawers To The Bench
Attaching drawers to the bench is a key step in completing your entryway project. Proper attachment ensures smooth drawer operation and a sturdy finish. Take your time to fit each drawer carefully and check the alignment before finalizing. This section guides you through fitting and adjusting the drawers for a perfect fit.
Fitting Drawers Into Frame
Start by sliding each drawer gently into the bench frame. Align the drawer sides with the frame runners or grooves. Make sure the drawer moves smoothly without forcing it. If the drawer sticks, check for any obstructions or rough edges. Use a small level to confirm the drawer sits evenly inside the frame. Secure the drawer with screws or brackets as needed. Double-check all screws are tight but avoid overtightening, which can damage the wood.
Adjusting Drawer Alignment
After fitting, test the drawer alignment by opening and closing it several times. Look for gaps or uneven spacing between drawers and the bench frame. If the drawer tilts or binds, loosen the screws slightly. Adjust the position by moving the drawer or frame runners. Tighten screws again once the drawer moves freely and sits flush. Repeat this for each drawer to maintain a balanced look. Proper alignment improves both function and the bench’s overall appearance.
Finishing Touches
Finishing touches bring your entryway bench to life. They protect the wood and improve its look. Small details make a big difference. These steps make your bench both useful and beautiful.
Applying Paint Or Stain
Choose a paint or stain that matches your style. Paint gives bright colors and hides wood grain. Stain shows the natural wood texture and color. Use a brush or cloth to apply it evenly. Let each coat dry fully before adding another. Light sanding between coats helps smooth the surface. A clear sealant protects the finish and adds shine.
Adding Handles And Cushions
Select handles that fit your drawer size and style. Screw them in firmly for durability. Cushions add comfort and a welcoming feel. Pick a cushion with a fabric that matches your decor. Attach the cushion with ties or non-slip pads. These final touches make your bench cozy and easy to use.
Credit: www.ana-white.com
Maintaining Your Entryway Bench
Maintaining your entryway bench with drawers keeps it looking fresh and lasts longer. A well-cared bench adds charm and function to your home. Simple steps help protect the wood and hardware from wear and tear.
Regular upkeep saves money by avoiding costly repairs. This section covers easy cleaning tips and how to fix minor damages. Keep your bench neat and sturdy with little effort.
Cleaning Tips
Dust your bench weekly using a soft cloth. Avoid harsh chemicals that can damage the finish. Use a mild soap and water solution for sticky spots. Wipe gently and dry immediately to stop water damage.
Clean the drawer handles often to avoid dirt buildup. Use a small brush to reach corners and crevices. Keep shoes and bags off the bench surface to prevent scratches and stains.
Repairing Minor Damages
Fix small scratches with a wood touch-up marker or crayon. Match the color to your bench for the best look. For dents, try a damp cloth and iron method to lift the wood slightly.
Tighten loose screws or drawer handles to keep parts secure. Replace worn drawer slides if drawers stick or do not open smoothly. Small repairs make your bench safer and more comfortable to use.
Frequently Asked Questions
What Materials Do I Need To Build An Entryway Bench With Drawers?
You need wood boards, screws, drawer slides, handles, and paint or stain. Basic tools like a drill, saw, and measuring tape are also required.
How Much Time Does It Take To Build The Bench With Drawers?
It usually takes 4 to 6 hours depending on your skill level and tools available. Allow extra time for drying paint or stain.
Can I Customize The Size Of The Entryway Bench?
Yes, you can adjust the length, width, and height to fit your space. Just measure your entryway before starting.
How Do I Install Drawers Smoothly In The Bench?
Use drawer slides that match the drawer size and follow the instructions carefully. Proper alignment ensures smooth opening and closing.
What Finishing Options Work Best For An Entryway Bench?
Paint, stain, or clear sealant protect the wood and enhance the look. Choose a finish that matches your home décor and use waterproof options for durability.
Conclusion
Building an entryway bench with drawers adds style and function. It offers a place to sit and extra storage space. You save money by creating it yourself. Simple tools and materials make the project easy. Follow each step to ensure good results.
Your home feels more organized and welcoming. Enjoy using your new bench every day. This project suits beginners and experienced DIYers alike. Start building and improve your entryway today.