
Fixing a burnt coil in a disposable vape is tricky but possible. It can save you money and extend the life of your vape.
Disposable vapes are convenient and easy to use. But, a burnt coil can ruin the experience. Instead of throwing away your vape, you can try to fix it. This guide will help you understand the common reasons behind a burnt coil and offer practical steps to fix it.
By following these tips, you can enjoy a better vaping experience and get the most out of your device. Let’s dive into the details and make your disposable vape work like new again.
Identifying Burnt Coil Symptoms
A burnt coil in a disposable vape can ruin your vaping experience. Identifying the symptoms early can save you from an unpleasant taste. It can also prevent potential damage to your device. Let’s dive into the key signs of a burnt coil.
Recognizing The Taste
The first sign of a burnt coil is the taste. A burnt coil produces a harsh, burnt flavor. This taste is unpleasant and can linger. If your vape juice tastes off, you likely have a burnt coil. Avoid vaping if the taste is bad. It can make the problem worse.
Checking For Discoloration
Discoloration is another symptom of a burnt coil. Remove the pod or tank to inspect. Look at the coil’s color. A healthy coil is usually light in color. A burnt coil will be dark or black. This indicates it’s time to replace it. Discoloration often comes with a burnt smell. If you notice these signs, change the coil immediately.
Causes Of Burnt Coils
Understanding the Causes of Burnt Coils is vital for enjoying a smooth vaping experience. Burnt coils can ruin the taste and feel of your vape. Let’s explore the common reasons behind this issue.
Chain Vaping
One of the main causes of burnt coils is chain vaping. This means taking multiple puffs in a short time. When you do this, the coil does not get enough time to cool down. The wick inside the coil also does not soak up enough e-liquid.
Without enough liquid, the coil gets too hot. This leads to a burnt taste. To avoid this, take breaks between puffs. Let the coil and wick rest.
Using High Vg Liquids
Another common cause is using high VG liquids. VG stands for Vegetable Glycerin. High VG liquids are thick. This makes it hard for the wick to soak them up. When the wick is dry, the coil burns it.
If you prefer high VG liquids, choose a vape with a coil designed for this type. You can also mix VG with PG (Propylene Glycol) to make it thinner. This helps the wick absorb the liquid better.
Preventative Measures
Burnt coils can ruin your vaping experience. Taking preventative measures is crucial. This section will cover some effective methods to avoid burnt coils in disposable vapes.
Proper Priming Techniques
Proper priming is essential. It ensures the coil is ready for use.
Follow these steps:
- Remove the vape from its packaging.
- Take a few primer puffs. Do this without pressing the fire button.
- Let the vape sit for 5-10 minutes.
This allows the e-liquid to soak the coil. It prevents a dry hit and extends coil life.
Adjusting Wattage Settings
Adjusting wattage settings is another key step. Too high wattage can burn the coil.
Here’s a simple guide:
- Start at the lowest wattage setting.
- Gradually increase until you find your sweet spot.
- Avoid going beyond the recommended wattage range.
Keeping the wattage within the recommended range helps in preserving the coil.
Credit: vaping360.com
Temporary Fixes
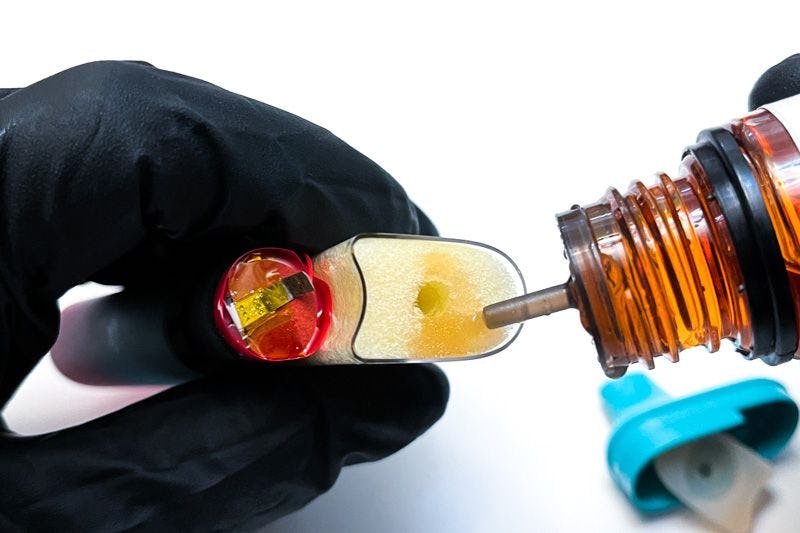
Fixing a burnt coil in a disposable vape can be challenging. Sometimes, you’re not ready to toss it away just yet. Temporary fixes can help extend the life of your device. Here are two methods to try: soaking the coil and cleaning with alcohol.
Soaking The Coil
Soaking the coil in warm water can help remove residue. Here’s how to do it:
- Remove the coil from the vape.
- Fill a bowl with warm water.
- Place the coil in the water and let it soak for 10-15 minutes.
- Remove the coil and let it dry completely.
- Reassemble the vape and test it out.
This method can dissolve and remove some of the burnt residue. It’s a temporary solution, but it might help.
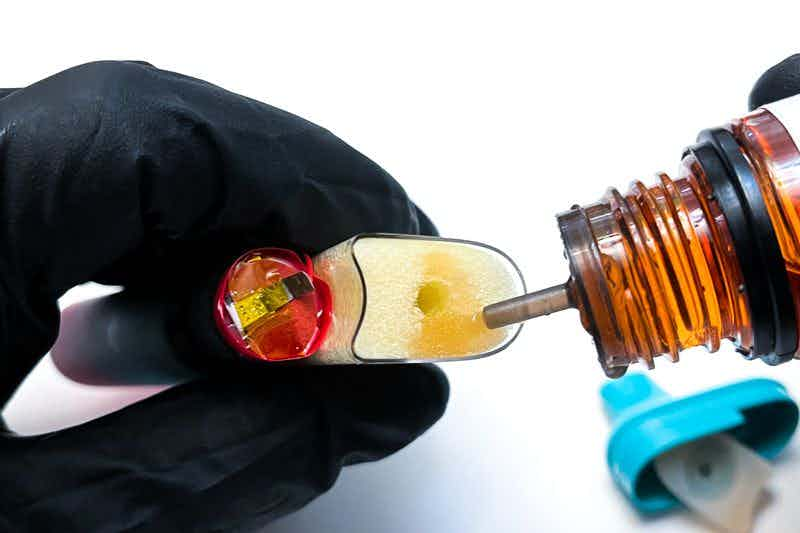
Cleaning With Alcohol
Isopropyl alcohol can be effective in cleaning coils. Follow these steps:
- Detach the coil from the vape.
- Fill a small container with isopropyl alcohol.
- Place the coil in the alcohol for 5-10 minutes.
- Use a cotton swab to gently scrub the coil.
- Rinse the coil with warm water.
- Allow the coil to dry completely.
- Reattach the coil and check the performance.
Cleaning with alcohol helps remove stubborn residue. It can be a quick fix for improving vape performance.
Replacing The Coil
Replacing the coil in a disposable vape can be tricky. But with the right guidance, it becomes manageable. This guide will help you choose the right coil and walk you through the replacement process step-by-step.
Choosing The Right Coil
First, find the correct coil for your vape model. Check your vape’s manual or manufacturer’s website. Some vapes use specific coils only. Using the wrong coil can damage your vape or affect the taste. Always make sure the new coil is compatible with your device.
Step-by-step Replacement Guide
Here’s a simple guide to replace your burnt coil:
- Turn off your vape. This ensures safety while working.
- Remove the tank from the battery. Unscrew it carefully.
- Dispose of any remaining e-liquid. This prevents spills.
- Unscrew the old coil from the tank. It might take a bit of force.
- Take the new coil and screw it in place. Ensure it’s tight but not overly so.
- Fill the tank with e-liquid. Let it sit for a few minutes.
- Reassemble your vape. Screw the tank back onto the battery.
- Turn on your vape. Test it to ensure everything is working correctly.
Following these steps will help you replace a burnt coil in a disposable vape. Always be cautious and handle your vape with care.
Maintaining Coil Longevity
Fixing a burnt coil in a disposable vape can help extend its life. Start by checking if the coil is truly burnt. If so, replace it carefully to avoid further damage.
Maintaining Coil Longevity is crucial for an enjoyable vaping experience. It helps you save money and ensures the best flavor from your disposable vape. By following some simple steps, you can extend the life of your coil and avoid the burnt taste. Here are a few tips to help you maintain your coil’s longevity.Using Quality E-liquids
Always use high-quality e-liquids. Cheap e-liquids can harm your coil. They often contain impurities that clog the coil. This leads to a burnt taste and a shorter coil life. Look for e-liquids with fewer artificial sweeteners. These are gentler on your coil.Regular Cleaning
Keep your vape clean. Residue can build up inside and affect the coil. Regular cleaning prevents this buildup. Disassemble your vape and clean each part. Use a soft cloth and warm water. Dry each part thoroughly before reassembling. This simple task can greatly extend the coil’s life. By following these steps, you can ensure a longer-lasting coil. This means better flavor, more savings, and a better vaping experience.When To Consult A Professional
Fixing a burnt coil in a disposable vape can be tricky. Sometimes, it’s best to consult a professional. This can save time and prevent further damage. Knowing when to seek help is important for your vape’s longevity.
Recognizing Persistent Issues
Some issues can persist even after trying to fix a burnt coil yourself. Here are some signs that you may need professional help:
- Persistent Burnt Taste: If you still taste burnt flavor after cleaning or replacing the coil, it is time to consult a professional.
- Weak Vapor Production: If your vape produces weak vapor despite troubleshooting, seek expert help.
- Device Heating Up: If your device gets too hot, it could be a sign of a deeper issue.
Finding A Reliable Vape Shop
Finding a trustworthy vape shop is crucial. Here are some tips:
- Read Reviews: Check online reviews to find shops with good reputations.
- Ask for Recommendations: Friends or family who vape can recommend reliable shops.
- Visit in Person: Visiting the shop can give you a sense of their expertise and customer service.
Professional help can make a big difference. It ensures your device is in good hands. Don’t hesitate to seek help if needed.
Credit: vaping360.com
Credit: ecigator.com
Frequently Asked Questions
How Do You Identify A Burnt Coil In A Disposable Vape?
A burnt coil in a disposable vape typically produces a burnt taste. Additionally, you may experience reduced vapor production and an unpleasant smell. If these signs are present, it’s likely the coil is burnt.
Can You Fix A Burnt Coil In A Disposable Vape?
Fixing a burnt coil in a disposable vape is often not possible. Disposable vapes are designed for single use. Replacing the entire device is usually the best solution.
What Causes A Coil To Burn In A Disposable Vape?
A coil can burn due to several reasons. These include vaping with low e-liquid, chain vaping, or using the device excessively. Proper usage can help prevent this issue.
How Can You Prevent A Coil From Burning?
To prevent a coil from burning, avoid chain vaping and ensure the e-liquid doesn’t run low. Always follow the manufacturer’s usage recommendations. Proper care can extend the coil’s lifespan.
Conclusion
Fixing a burnt coil in a disposable vape can seem tricky. But with some care, you can extend its life. Always start with clean, fresh liquid. Avoid chain vaping to prevent overheating. Regularly check and maintain your device. Practice these steps to enjoy a better vaping experience.
Simple actions can make a big difference. Keep your vape in top shape. Enjoy smoother, more flavorful puffs. Happy vaping!