
If you’ve ever wanted to add a professional touch to your woodworking projects, learning how to cut a groove in wood by hand is a skill you need. Imagine creating clean, precise grooves without expensive power tools—just your hands, a few simple tools, and the right technique.
Whether you’re fixing a piece of furniture, making a drawer, or building something from scratch, this guide will show you exactly how to do it step-by-step. By the end, you’ll have the confidence to make perfect grooves that fit like a glove.
Ready to take your woodworking to the next level? Let’s dive in.
Tools Needed For Hand-grooving
Cutting a groove in wood by hand requires the right tools. Using proper tools makes the work easier and more accurate. Each tool plays a specific role in the process. Knowing which tools to use is the first step to successful hand-grooving.
Essential Hand Tools
You need a few basic hand tools to cut grooves. A hand saw helps to make the initial cuts. A mallet is used to tap chisels carefully. A bench vise or clamps hold the wood steady. These tools provide control and precision during cutting.
Choosing The Right Chisels
Chisels come in different sizes and shapes. For grooves, use a beveled edge chisel. It fits well into tight spaces. Sharp chisels cut clean grooves without splintering wood. Keep chisels sharp for better results and safety.
Using A Marking Gauge
A marking gauge helps measure and mark groove lines accurately. It creates a clear guide for sawing and chiseling. Adjust the marking gauge to the desired groove width. This tool ensures straight and even grooves every time.
Credit: toolsforworkingwood.com
Preparing The Wood Surface
Preparing the wood surface is the first step to cutting a clean groove by hand. A smooth and stable surface makes the work easier. Proper preparation helps keep the groove straight and precise.
Every detail matters, from choosing the right wood to holding it firmly in place. This part of the process sets the foundation for a neat groove.
Selecting The Wood Type
Start by choosing wood that is easy to work with. Softwoods like pine or cedar are good for beginners. Hardwoods like oak or maple are tougher but last longer. Avoid wood with knots or cracks. These can cause the chisel to slip or split the wood.
Marking The Groove Layout
Use a pencil and ruler to mark the groove lines. Measure carefully to keep the groove even. Draw clear, straight lines on the wood surface. This guide helps you stay on track. Double-check your measurements before cutting.
Securing The Wood Properly
Clamp the wood to your workbench. This keeps it from moving while you cut. Make sure the clamps do not block your cutting area. Tighten the clamps just enough to hold the wood firm. A steady piece of wood ensures a safer and cleaner groove.
Step-by-step Groove Cutting
Cutting a groove in wood by hand is a useful skill for many woodworking projects. The process requires patience and careful work. Follow these steps to create a clean, precise groove. Each step builds on the previous one to ensure accuracy and smooth results.
Setting The Marking Gauge Depth
Start by setting the marking gauge to the groove depth you want. Usually, this depth matches the wood thickness or project needs. Adjust the gauge so the pin or blade just touches the wood surface when pressed. This step creates consistent groove lines on both sides.
Scoring The Groove Lines
Use the marking gauge to score lines along the wood where the groove will go. Hold the gauge firmly and run it slowly along the edge. The scored lines guide your cutting and reduce wood splintering. Score both sides of the groove area for better accuracy.
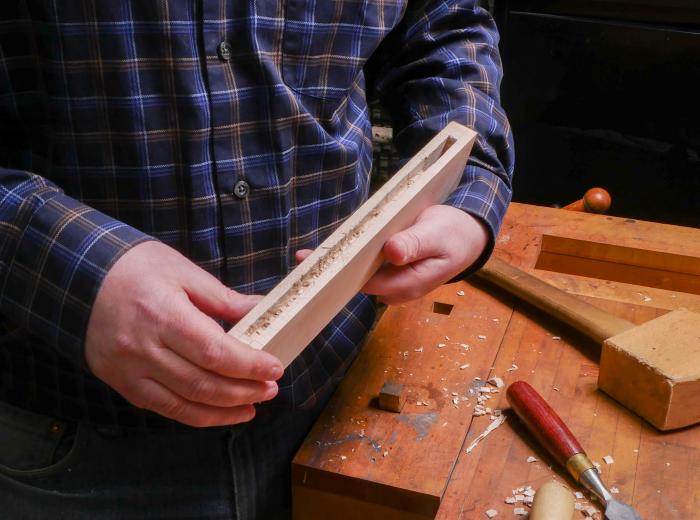
Chiseling The Groove Carefully
Begin chiseling inside the scored lines with a sharp chisel. Make small cuts, removing thin layers of wood. Work slowly to avoid going beyond the lines. Keep the chisel angled slightly to control the depth. Stop often to check the groove depth with the marking gauge.
Cleaning And Smoothing The Groove
After chiseling, clean out loose wood chips with a brush or cloth. Use a finer chisel or sandpaper to smooth rough edges inside the groove. Check the groove width and depth again for consistency. Smooth grooves ensure parts fit together tightly and look professional.
Credit: kmtools.com
Tips For Precision And Safety
Cutting a groove in wood by hand needs care and focus. Precision helps the groove fit perfectly. Safety stops injuries and keeps your work smooth. Follow clear tips to improve both.
Maintaining Sharp Tools
Sharp tools cut cleanly and require less force. Dull tools slip easily and cause mistakes. Check your chisel often. Use a sharpening stone or file to keep edges sharp. Clean tools after use to avoid rust. Sharp tools make cutting easier and safer.
Controlling Your Chisel Angle
Hold your chisel at the right angle for best results. Too steep or too flat causes rough grooves. Aim for about 25 to 30 degrees. Keep your hand steady and apply even pressure. Small adjustments improve accuracy. Good control reduces wood splinters and slips.
Avoiding Common Mistakes
Mark your groove clearly before you start cutting. Cut shallow passes instead of deep ones. Deep cuts cause the wood to split. Use a mallet with gentle taps, not hard hits. Don’t rush; take your time. Watch your fingers and keep your workspace tidy. Avoiding these errors leads to better grooves and safer work.
Finishing Touches
Finishing touches make your groove look neat and last longer. They improve both the appearance and function of your woodwork. Taking time to finish the groove well shows care and skill.
Sanding The Groove Edges
Sanding smooths rough spots and sharp edges inside the groove. Use fine-grit sandpaper wrapped around a small block or a thin stick. Move gently along the groove edges to avoid changing its shape. Clean out dust with a soft brush or cloth after sanding.
Applying Wood Finish
Apply a wood finish to protect and enhance the groove. Use a small brush or cloth to reach inside the groove. Choose a finish that matches your project, such as oil, varnish, or wax. Apply thin coats and let each dry fully for best results.
Checking Groove Fit And Alignment
Test the groove fit with the corresponding wood piece. It should slide in smoothly without forcing. Check alignment to ensure both pieces fit flush. Adjust sanding or trimming if the fit is too tight or loose. Proper fit ensures strength and a clean look.

Credit: www.youtube.com
Alternative Methods For Groove Cutting
Grooves in wood add strength and style to projects. Cutting them by hand takes skill and patience. Some woodworkers want faster or easier ways. Alternative methods can save time and give clean results. These tools help cut grooves accurately and quickly. They suit different skill levels and project sizes.
Using A Router By Hand
A handheld router offers control and precision. It uses a spinning bit to carve grooves. Set the depth and width on the router. Move it steadily along the wood’s marked line. A guide or fence keeps the cut straight. Routers work well for shallow and medium grooves. They create smooth edges and consistent depth. Safety gear is important because the bit spins fast.
Employing A Dado Blade On A Table Saw
A dado blade set fits on a table saw. It cuts wide grooves in one pass. Adjust the blade width to match your groove size. Push the wood carefully through the blade. Use a fence to guide the wood straight. This method is quick and good for large projects. It produces clean, even grooves. Take care and use push sticks for safety. This setup needs more equipment but works well for many cuts.
Frequently Asked Questions
What Tools Do I Need To Cut A Groove In Wood By Hand?
You need a marking gauge, a hand saw, and a chisel for cutting grooves. These tools help you measure, cut, and clean the groove accurately.
How Do I Mark The Groove On The Wood Surface?
Use a marking gauge to score the wood where the groove will go. This ensures a straight and even line to guide your cuts.
What Is The Best Hand Saw For Cutting Grooves?
A backsaw or tenon saw is best for cutting grooves by hand. Their stiff blades make precise, controlled cuts along the marked lines.
How Deep Should The Groove Be Cut Into The Wood?
Cut the groove to the depth specified in your project plans or about one-third the wood thickness. Consistency in depth ensures a strong fit.
How Can I Clean And Smooth The Groove Edges?
Use a sharp chisel to remove waste wood and square the groove corners. Light sanding can smooth rough edges for a clean finish.
Conclusion
Cutting a groove in wood by hand takes practice and patience. Use the right tools and measure carefully. Work slowly to keep the groove straight and even. Check your progress often to avoid mistakes. With time, your skills will improve.
This simple technique adds strength and style to your woodworking projects. Keep practicing, and enjoy the satisfaction of crafting by hand.