
If you’ve ever tried to make a bevel cut, you know how tricky it can be to get the measurements just right. A small mistake can mean wasted wood or a joint that doesn’t fit properly.
But don’t worry—measuring wood for a bevel cut doesn’t have to be complicated. You’ll learn simple, step-by-step methods to measure your wood accurately every time. Whether you’re a beginner or looking to sharpen your skills, these tips will help you work smarter and avoid costly errors.
Keep reading and discover how to make your next bevel cut perfect.
Choosing The Right Tools
Choosing the right tools is the first step to a perfect bevel cut. The tools you pick affect the accuracy and ease of your work. Using the correct measuring tools and saw makes the process smooth and safe. Let’s explore the essential tools you need for this task.
Essential Measuring Tools
Start with a reliable tape measure. It helps you get the length and angles right.
A combination square is useful for marking precise angles. It ensures your bevel cuts are exact.
A protractor or angle finder shows the exact angle for the bevel. This tool helps avoid mistakes.
Marking tools like a pencil or chalk make your measurements visible on the wood. Clear marks guide your cut.
Selecting The Proper Saw
A miter saw is ideal for bevel cuts. It offers adjustable angles for precise cuts.
A circular saw also works well if it has a bevel feature. It is handy for larger pieces of wood.
A handsaw can be used but requires steady hands and patience. It suits small projects or touch-ups.
Choose a saw blade made for clean cuts. Sharp blades reduce splintering and improve results.
Preparing The Wood
Preparing the wood is the first step before making a bevel cut. It helps ensure the cut is clean and accurate. Taking time here makes your project look professional. Start by checking the wood surface for any dirt or rough spots. Clean and smooth wood gives a better cutting line. Proper preparation also helps keep the wood steady during cutting. This reduces mistakes and improves safety.
Marking Your Cut Line
Use a pencil with a sharp tip to draw your cut line. A fine line is easier to follow while cutting. Measure twice to avoid mistakes. Use a ruler or tape measure for straight lines. Mark the angle of the bevel clearly. Draw the line on the side where you will cut. This makes it easy to see and follow the line. Double-check the measurements before moving on.
Securing The Wood For Accuracy
Hold the wood firmly before cutting. Use clamps to keep it from moving. Secure the wood on a stable surface like a workbench. Movement during cutting can ruin the bevel angle. Clamping also helps keep your hands safe. Make sure the clamps do not block the cut line. Check that the wood does not wobble before starting your saw. A steady piece of wood leads to a precise cut.
Calculating The Bevel Angle
Measuring the bevel angle is a key step in making precise bevel cuts. The bevel angle is the angle between the face of the wood and the cut surface. Knowing this angle helps you set your saw correctly and get clean, accurate cuts every time.
Without the right angle, your pieces may not fit well. It can cause gaps or uneven edges in your project. Measuring the bevel angle carefully prevents these issues and saves time on adjustments later.
Using A Bevel Gauge
A bevel gauge is a simple tool to measure and transfer angles. It has a handle and a movable blade that locks at any angle. Place the blade along the edge of the wood, then adjust the handle to match the angle you want to cut.
After locking the blade, you can read the angle using a protractor or an angle finder. This method is quick and accurate. It works well for both beginners and experienced woodworkers.
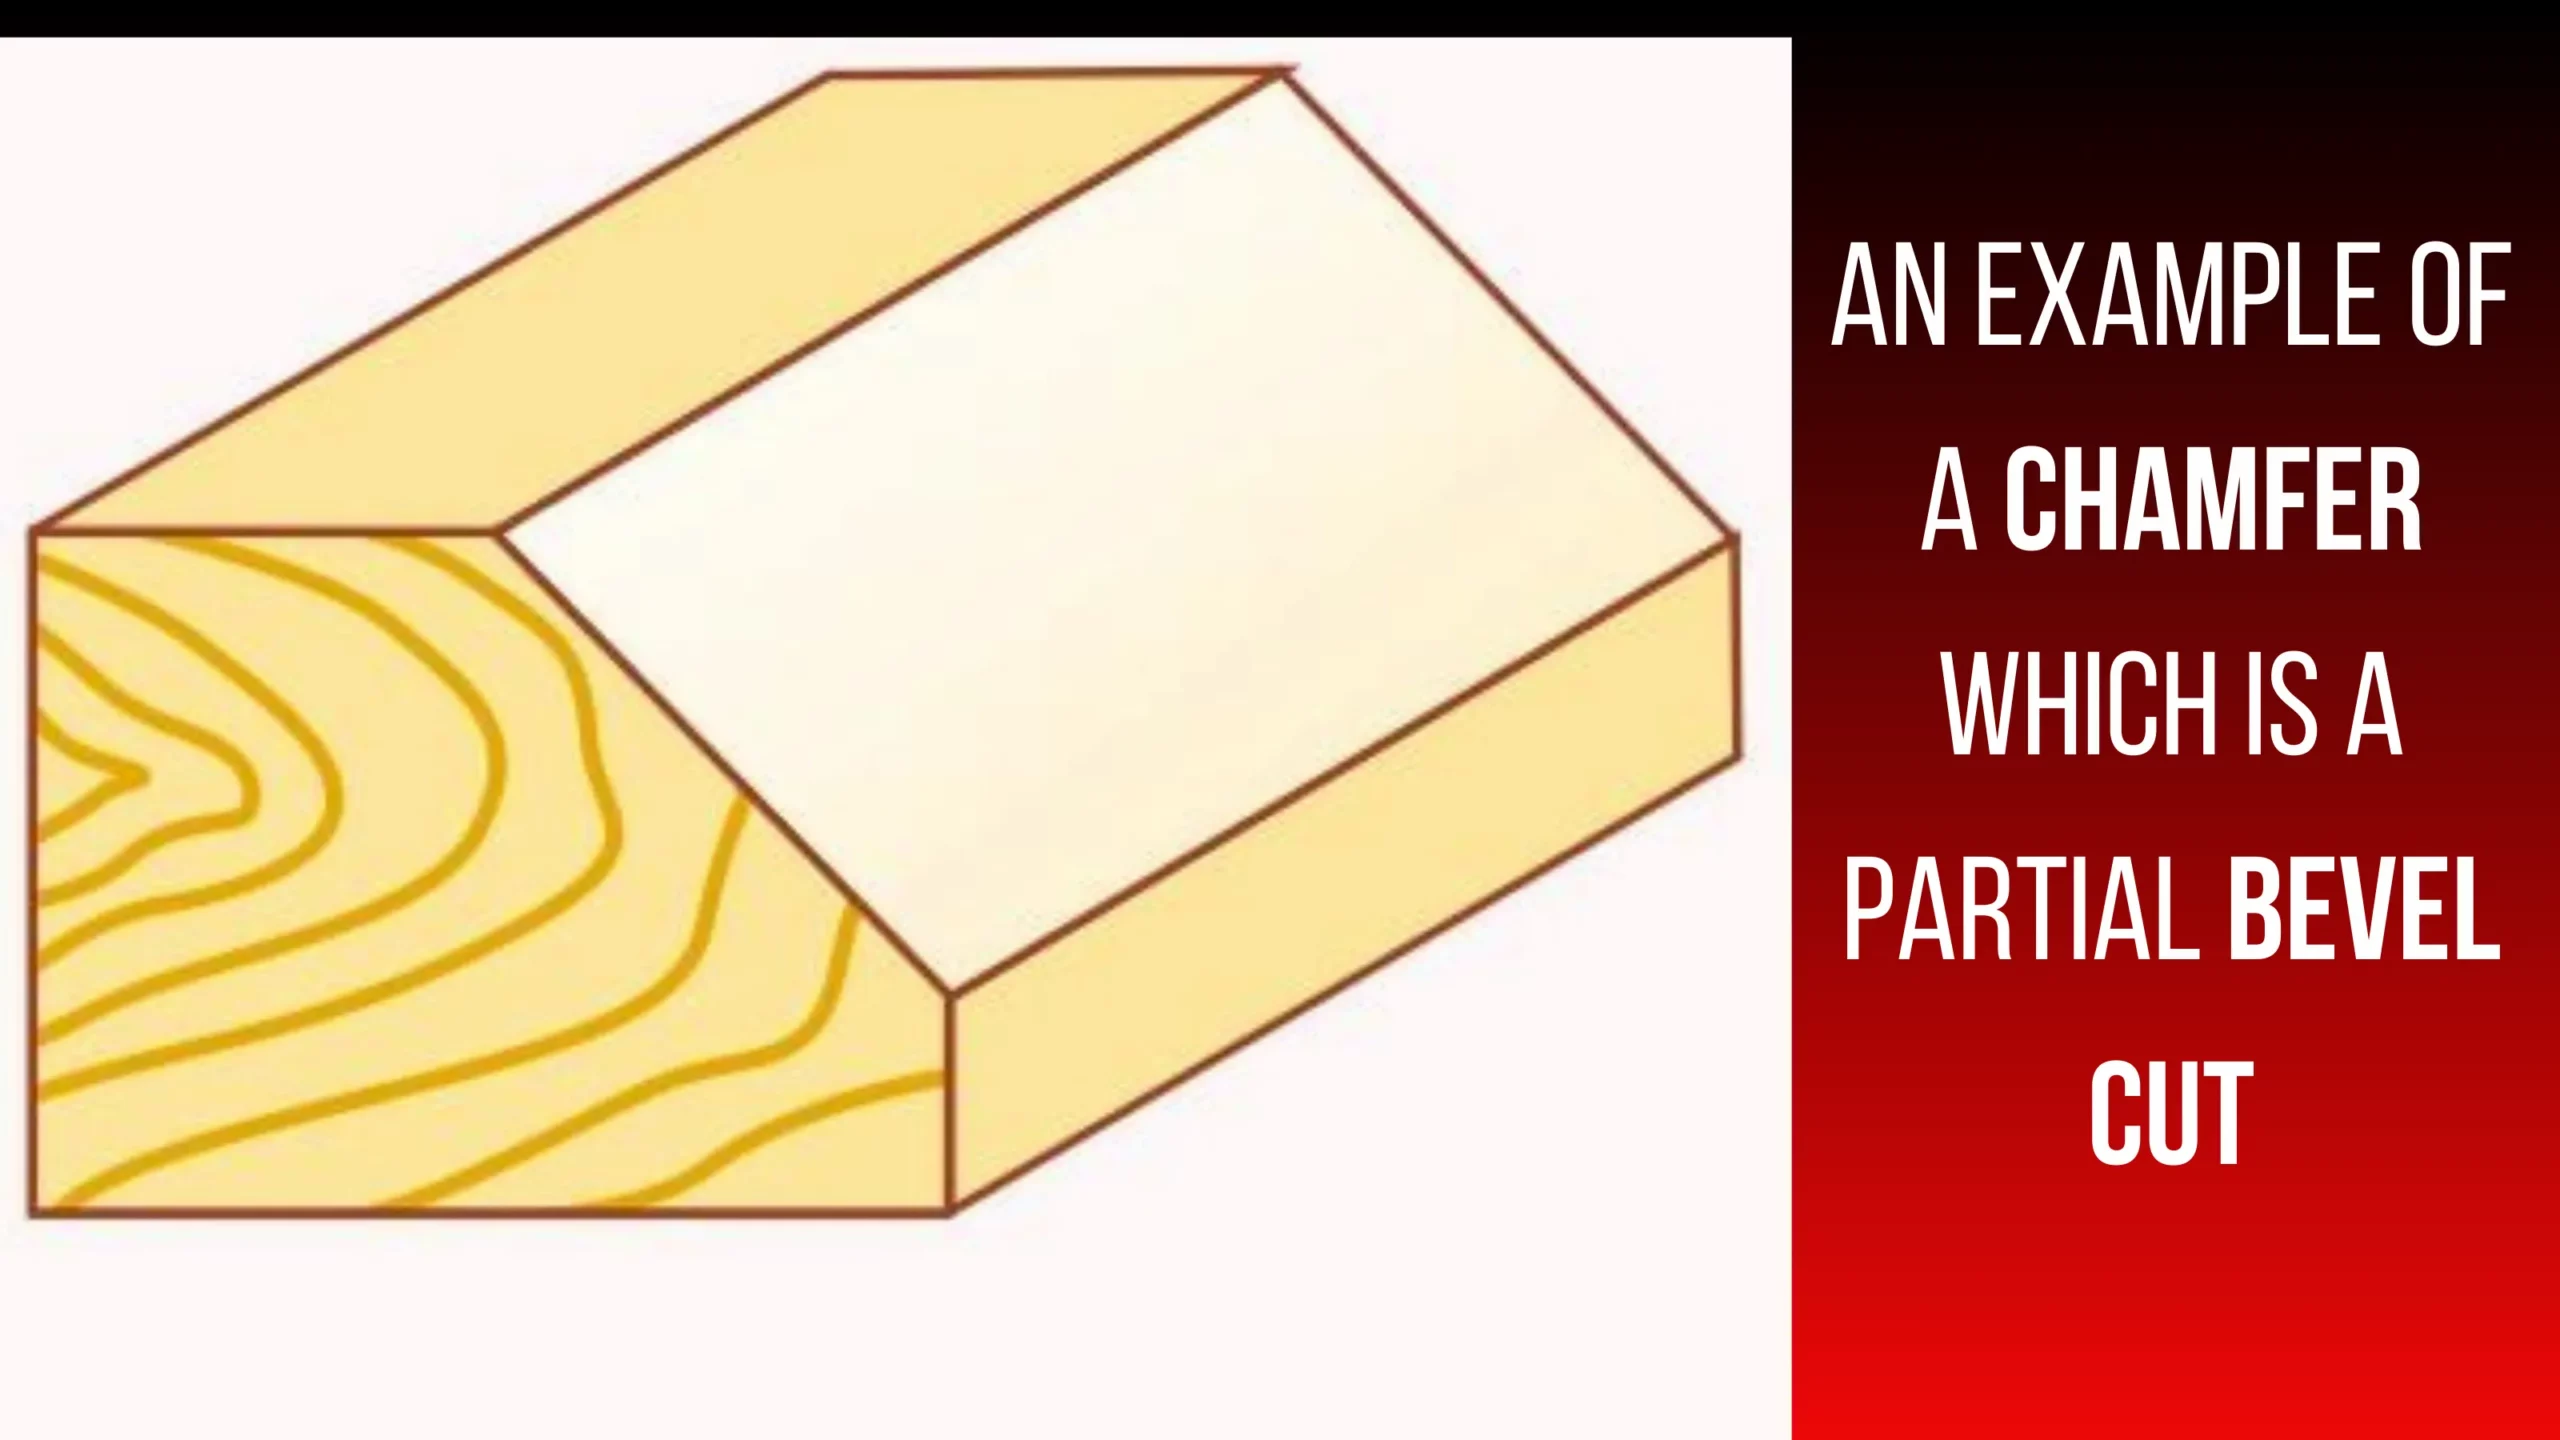
Common Bevel Angles And Their Uses
Some bevel angles are more common because they suit many projects. A 45-degree bevel angle is popular for making picture frames and trim work. It creates neat corners that join perfectly.
A 30-degree angle is often used for decorative edges and molding. It gives a softer look than a sharp 45-degree cut. A 22.5-degree bevel works well for creating octagonal shapes and detailed woodworking.
Understanding these common angles helps you choose the right cut for your project. It also makes setting your tools easier and faster.
Credit: ronixtools.com
Measuring For The Cut
Measuring for a bevel cut requires accuracy and clear steps. Proper measurement ensures your wood pieces fit perfectly. Small mistakes can cause gaps or uneven edges. Take your time and follow each step carefully.
Determining Cut Length
Start by measuring the length you want to cut. Use a tape measure or ruler for precision. Mark the point clearly with a pencil. Double-check the measurement before making any cuts. Remember, the bevel angle changes the visible length slightly.
Adjusting For Material Thickness
Consider the thickness of your wood. Thicker wood may need adjustments for the bevel angle. Measure the thickness at the cutting edge. Mark the thickness on your wood to guide the saw. This step helps avoid inaccurate cuts and wasted material.
Setting Up The Saw
Setting up the saw correctly is key for a perfect bevel cut. This step ensures your cut matches the angle you need. Taking time now will save wood and effort later.
Adjusting The Bevel Angle
First, locate the bevel adjustment knob or lever on your saw. This part controls the blade angle. Loosen the knob to move the blade tilt. Set the blade to your desired angle using the angle scale. Tighten the knob to lock the angle firmly. Double-check the angle on the gauge for accuracy. Precision here leads to clean, sharp bevel cuts.
Testing The Cut On Scrap Wood
Always test the set angle on a scrap piece. Choose a wood piece similar to your project material. Make a bevel cut on this scrap to check the angle. Examine the cut edge for smoothness and angle accuracy. Adjust the bevel angle if the cut looks off. Repeat testing until you get the perfect bevel angle. This step protects your main wood piece from mistakes.
Making The Bevel Cut
Making the bevel cut is the step where precision meets skill. It requires careful handling and focus to get a clean, angled edge on your wood piece. The right approach helps avoid mistakes and ensures a smooth finish.
Before starting, set your saw to the correct bevel angle. Double-check the measurements on your wood. Align the cut line with the saw blade carefully. Take your time and prepare for a steady cut.
Safety Tips During Cutting
Always wear safety goggles to protect your eyes from wood chips. Use ear protection to guard against loud noises. Keep your hands away from the blade path at all times. Make sure the workpiece is securely clamped or held. Avoid loose clothing or jewelry that could get caught. Check that the saw blade is sharp and in good condition.
Maintaining Steady Control
Hold the saw firmly but not too tight to avoid shaking. Move the blade slowly along the marked line. Let the saw do the work without forcing it. Keep your body steady and balanced during the cut. Watch the blade closely to stay on track. Pause if you feel the saw drifting off the line.
Checking And Adjusting The Cut
Checking and adjusting the cut is an important step after making a bevel cut on wood. It ensures the angles and dimensions are accurate. This process helps to avoid errors in your project. Taking time to verify and correct the cut improves the final result. Precision here leads to better fitting pieces and a cleaner look.
Verifying Angles And Dimensions
Start by measuring the angle of the cut using a protractor or angle gauge. Compare this angle to your desired bevel angle. Check the length and width of the cut piece against your plan. Use a square to confirm the edges are straight and meet at the right angle. Mark any differences clearly for correction. Accuracy now saves time later.
Making Fine Corrections
Small errors can be fixed by sanding or trimming the wood. Use a sanding block for gentle smoothing on the edges. For larger adjustments, carefully trim with a hand saw or a power tool. Always cut a little at a time. Re-measure often to avoid cutting too much. Fine corrections help achieve a perfect fit and clean finish.

Credit: ronixtools.com
Common Mistakes To Avoid
Measuring wood for a bevel cut can be tricky. Small mistakes can cause big problems. Avoiding common errors saves time and wood. This section covers the most frequent mistakes and how to avoid them.
Misreading Measurements
Reading measurements wrong is a top error. It happens when you rush or don’t double-check. Mark the wood clearly with a sharp pencil. Measure twice, cut once. Use a reliable tape measure or ruler. Always read the scale carefully, especially on angled lines. Avoid guessing or rounding numbers. Even a small mistake can ruin the cut.
Incorrect Saw Settings
Setting the saw wrong causes uneven bevels. Check the blade angle before cutting. Most saws have a gauge for this. Adjust the bevel angle to match your measurement exactly. Tighten the settings to keep the blade steady. Don’t start cutting until the saw is set correctly. A wrong angle means a poor fit and extra work.
Tips For Complex Bevel Cuts
Complex bevel cuts can be tricky to measure and cut accurately. These cuts often require precise angles and careful planning. Taking the right approach helps avoid mistakes and saves time. The following tips focus on methods that make complex bevel cuts easier and more precise.
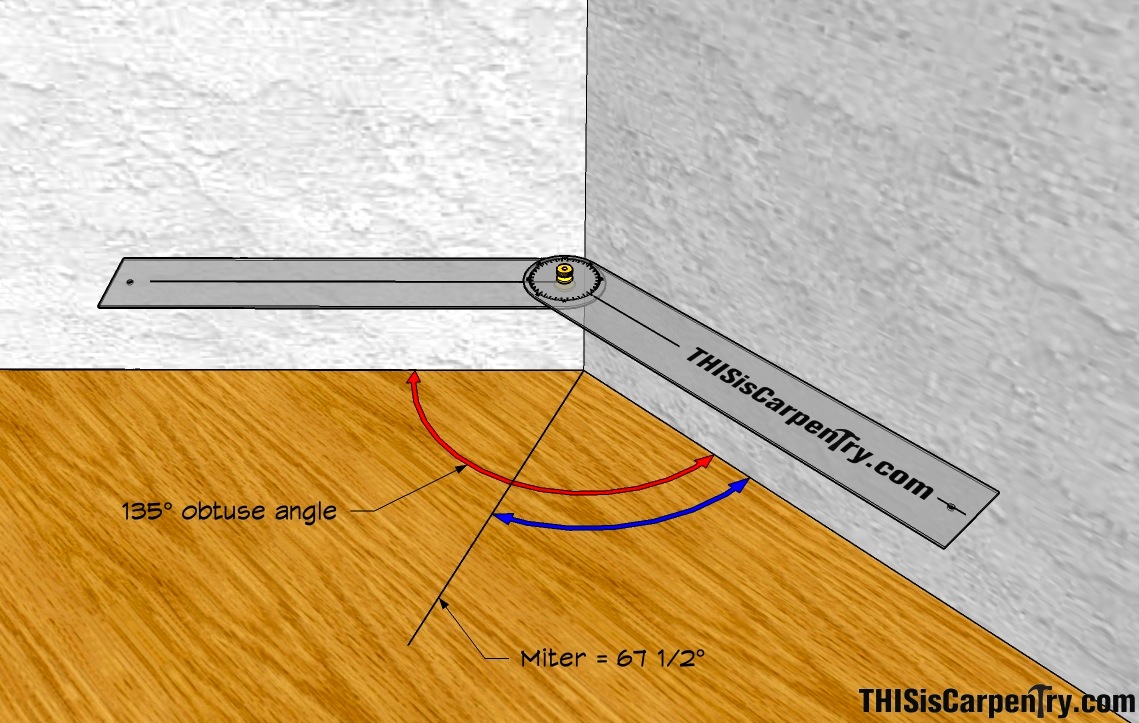
Compound Angle Techniques
Compound bevel cuts involve cutting wood at two angles. One angle is the bevel, and the other is the miter. Measuring both angles accurately is key. Use an angle finder or protractor to get the exact angles. Mark the wood clearly before cutting. Double-check your measurements to prevent errors. Setting your saw to the correct compound angle ensures a clean cut. Practice on scrap wood to gain confidence.
Using Templates And Jigs
Templates and jigs help maintain consistency in complex cuts. Create a template from cardboard or thin plywood. This template guides your saw or router along the correct path. Jigs hold the wood steady and guide the blade. They reduce the chance of slipping or wrong cuts. Build jigs that fit your tools and project needs. Using these aids speeds up work and improves accuracy. Always test templates and jigs on scrap pieces first.
Credit: www.thisiscarpentry.com
Frequently Asked Questions
How Do I Measure Wood For A Bevel Cut Accurately?
Use a protractor or angle finder to measure the bevel angle. Mark the wood with a pencil along the edge at the angle. Double-check measurements before cutting for accuracy.
What Tools Help Measure Angles For Bevel Cuts?
A bevel gauge, protractor, or digital angle finder are great tools. These help set and measure angles precisely on your wood. Choose one that is easy for you to read and use.
How Do I Mark The Wood For A Bevel Cut?
Draw a clear line using a pencil along the measured angle. Use a ruler or straight edge for a straight mark. This line guides your saw for an accurate bevel cut.
Why Is Measuring The Bevel Angle Important?
Correct angle measurement ensures your cut fits perfectly in your project. Wrong angles can cause gaps or weak joints. Measuring helps avoid mistakes and saves wood.
Can I Measure Bevel Cuts Without Special Tools?
Yes, use a combination square or a paper template with the angle. You can also estimate angles with a protractor app on your phone. Though less precise, these methods work for simple projects.
Conclusion
Measuring wood for a bevel cut takes care and focus. Always double-check your measurements before cutting. Use a protractor or angle finder to get the exact angle. Mark clearly on the wood for a clean guide. Take your time to avoid mistakes and waste.
Practicing these steps will help your cuts look sharp and fit well. Keep tools sharp and work safely. With these simple tips, your bevel cuts will come out just right.