
Are you ready to create a beautiful, sturdy cedar wood bed frame that not only looks amazing but also lasts for years? Building your own bed frame might sound tough, but with the right steps, you can do it yourself—even if you’re new to woodworking.
Imagine the satisfaction of lying down on a bed you crafted with your own hands. In this guide, you’ll discover simple, clear instructions to help you make a cedar wood bed frame that fits your style and space perfectly. Keep reading, and by the end, you’ll have everything you need to start building your dream bed today.

Credit: www.cabinfield.com
Choosing Cedar Wood
Choosing the right cedar wood is key to building a strong, beautiful bed frame. Cedar offers unique qualities that make it a popular choice for furniture. Picking the correct type and size of wood ensures your project will last for years.
This section covers the benefits of cedar wood, how to select the right grade, and tips for measuring and planning. Understanding these points helps you start your woodworking project with confidence.
Benefits Of Cedar Wood
Cedar wood smells nice and naturally resists insects. It does not warp or crack easily. Its light weight makes it easy to work with. Cedar also has a warm color that fits many room styles. These qualities make cedar great for a bed frame.
Selecting The Right Grade
Wood comes in different grades based on quality. Choose clear cedar for furniture. It has fewer knots and blemishes. Knotty cedar is cheaper but less smooth. Pick wood with straight grain for strength. Avoid pieces with large cracks or splits.
Measuring And Planning
Measure your mattress size first. Add extra length and width for the frame. Plan the frame height for comfort and style. Sketch your design on paper. Note the wood dimensions you will need. Accurate measuring saves time and wood waste.

Credit: www.reddit.com
Tools And Materials Needed
Building a cedar wood bed frame requires the right tools and materials. Getting these ready makes your work easier and faster. This section breaks down what you need to start your project. Keep things simple and organized. Prepare well to make a strong, beautiful bed frame.
Essential Tools
You will need a saw to cut the wood to size. A drill helps make holes and drive screws. A measuring tape ensures correct dimensions. Sandpaper smooths rough edges for a clean finish. A screwdriver or power driver is useful. Clamps hold pieces together while you work. A level keeps the frame even and straight. A pencil marks where to cut or drill.
Required Hardware
Buy screws made for wood, about 2 to 3 inches long. Wood glue adds extra strength to joints. Metal brackets or corner braces help support the frame. Bed slats need screws or nails to stay in place. Use washers with screws to avoid splitting the wood. Choose hardware with rust resistance for durability.
Safety Equipment
Wear safety glasses to protect your eyes from dust and debris. Use ear protection if using loud power tools. Gloves protect your hands from splinters and cuts. A dust mask keeps you safe from inhaling sawdust. Wear sturdy shoes to protect your feet. Keep your workspace clean to avoid accidents.
Preparing The Wood
Preparing the wood is the first step in building a cedar wood bed frame. Good preparation makes the building process easier and ensures a strong, beautiful bed. You must handle the wood with care to keep it in the best condition. Follow each step carefully to get smooth, well-cut pieces ready for assembly.
Cutting To Size
Start by measuring the wood pieces needed for your bed frame. Use a tape measure and mark the cutting lines clearly. Cut the cedar wood with a saw that matches your skill level. Straight, clean cuts help the frame fit well together. Take your time to avoid mistakes. Double-check measurements before cutting each piece.
Sanding Techniques
Sanding smooths the wood and removes rough edges. Use medium-grit sandpaper first to even out the surface. Then, switch to fine-grit sandpaper for a softer finish. Sand along the grain of the wood to avoid scratches. Pay attention to corners and edges. Proper sanding prevents splinters and improves the bed’s look.
Treating And Sealing
After sanding, treat the cedar wood to protect it. Use a wood preservative to prevent rot and insect damage. Apply the treatment evenly with a brush. Let the wood dry completely before sealing. Choose a clear sealant to keep the natural color of cedar. Seal the wood to protect it from moisture and wear. This step helps your bed frame last for years.
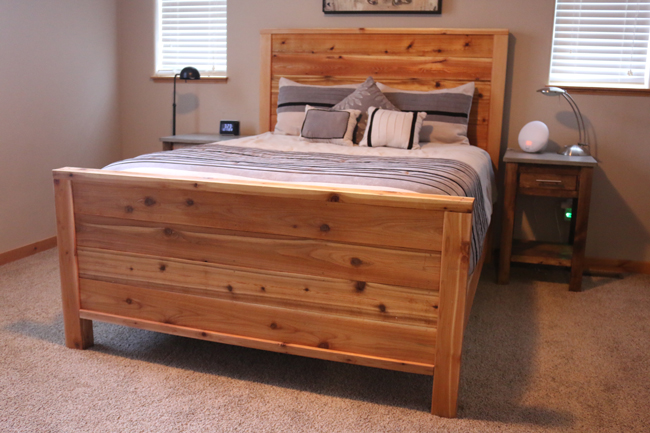
Credit: www.diypete.com
Building The Bed Frame
Building the bed frame is the most important part of making your cedar wood bed. It gives the bed its shape and strength. The frame must be strong and sturdy to hold the mattress and people comfortably. Follow clear steps to build each part carefully. Work slowly and check your measurements often.
Start by making the headboard and footboard. These parts stand at the ends of the bed. Then, attach the side rails to connect the ends. Finally, add support slats across the frame to hold the mattress well. Each step is simple and adds to the bed’s stability.
Constructing The Headboard And Footboard
Cut cedar boards to the size you want for the headboard and footboard. Use smooth, even pieces for a clean look. Attach the boards vertically or horizontally using screws or nails. Make sure they are tight and secure. Sand the edges for safety and a nice finish.
For extra strength, add horizontal braces behind the boards. These braces keep the headboard and footboard from wobbling. Check that both are the same height and width. This keeps the bed balanced and even.
Assembling The Side Rails
Measure the length between the headboard and footboard. Cut two long cedar boards for the side rails. Attach the rails to the ends of the headboard and footboard using strong brackets or bolts. Make sure the rails are level and flush with the frame ends. This creates a solid frame that holds well.
Double-check the frame’s rectangle shape. Use a carpenter’s square to verify right angles. Adjust if needed before moving on. A square frame means the bed will stand strong and fit the mattress perfectly.
Installing Support Slats
Cut several narrow cedar slats to fit between the side rails. Space them evenly to support the mattress fully. Attach each slat by screwing it to the side rails. This prevents the mattress from sagging over time. The slats add extra strength to the whole bed frame.
Make sure slats are flat and steady. Use a level tool for accuracy. Proper support makes the bed comfortable and durable.
Finishing Touches
Finishing touches give your cedar wood bed frame its final look and protection. These steps help the wood last longer and look great in your bedroom. Take your time with each step to ensure the best result.
Applying Stain Or Paint
Choose a stain or paint that matches your room’s style. Stain shows the wood’s natural beauty and grain. Paint offers more color options and hides imperfections. Use a brush or cloth to apply evenly. Let it dry fully before moving on.
Adding Protective Coating
Protective coating shields your wood from scratches and moisture. Use clear varnish, polyurethane, or lacquer for a strong finish. Apply thin, even layers with a clean brush. Allow each coat to dry before adding the next. This step keeps your bed frame looking new for years.
Final Assembly And Adjustments
Put all parts of the bed frame together carefully. Tighten screws and bolts to make it sturdy. Check for any rough edges and sand if needed. Make sure the bed frame is level and stable. Now your cedar wood bed frame is ready to use.
Maintenance Tips
Maintaining your cedar wood bed frame keeps it strong and beautiful for years. Regular care prevents damage and helps the wood age gracefully. Simple steps make a big difference in preserving its natural charm.
Cleaning And Care
Dust your bed frame often with a soft cloth. Use a damp cloth for sticky spots, but avoid soaking the wood. Mild soap and water work well for cleaning. Dry the surface quickly to stop moisture damage. Avoid harsh chemicals that can harm the wood’s finish.
Repairing Minor Damage
Small scratches and dents are common but easy to fix. Light sanding smooths rough spots. Use wood filler for deeper dents. Match the filler color to the cedar wood. Finish by applying a clear wood sealant to protect repairs.
Extending Bed Frame Life
Keep your bed frame away from direct sunlight to avoid fading. Control room humidity to stop wood from shrinking or swelling. Tighten screws and bolts regularly to maintain stability. Place felt pads under legs to protect floors and prevent moisture buildup.
Frequently Asked Questions
What Tools Do I Need To Build A Cedar Wood Bed Frame?
You need a saw, drill, screws, measuring tape, and sandpaper. These basic tools help cut, join, and smooth the wood. Safety gear like gloves and goggles is also important.
How Long Does It Take To Make A Cedar Wood Bed Frame?
Building a cedar wood bed frame usually takes two to three days. This depends on your skill level and available time. Taking breaks ensures better results and safety.
Is Cedar Wood Good For Bed Frames?
Cedar wood is strong, lightweight, and resists insects and moisture. It has a nice smell and looks attractive in bedrooms. These qualities make it a great choice for bed frames.
How Do I Protect Cedar Wood From Damage?
Apply a clear sealant or wood oil to protect the wood. This prevents moisture damage and keeps the wood looking fresh. Regular cleaning also helps maintain the bed frame.
Can I Customize The Size Of My Cedar Wood Bed Frame?
Yes, you can adjust the size to fit your mattress perfectly. Measure your mattress before cutting the wood. Custom sizes ensure comfort and proper support.
Conclusion
Building a cedar wood bed frame can be a fun and rewarding task. You get a strong, natural frame that lasts for years. The scent of cedar also keeps bugs away. With basic tools and steps, anyone can create a beautiful bed frame.
Take your time and follow each step carefully. Soon, you will have a custom bed that fits your style and space. Enjoy the comfort and pride of sleeping on something you made yourself.