
Are you ready to master a simple woodworking skill that can make a big difference in your projects? Cutting a notch in wood by hand might sound tricky, but with the right steps, you can do it cleanly and confidently.
Whether you’re fixing furniture, building a frame, or adding a custom touch, knowing how to cut a precise notch gives you control and saves you time. Keep reading, and you’ll learn an easy, step-by-step method that anyone can follow—even if you’re new to woodworking.
Your next project is about to get a whole lot better!

Credit: diy.stackexchange.com
Tools Needed
Cutting a notch in wood by hand needs the right tools. Using the proper tools makes the job easier and safer. Each tool has a specific role to help you achieve a clean, precise notch.
This section covers the tools needed to cut a notch by hand. You will learn about essential hand tools and necessary safety equipment. Prepare well to work efficiently and protect yourself.
Essential Hand Tools
A sharp handsaw is key to cutting the wood accurately. Choose a saw with fine teeth for better control.
A chisel is necessary to remove wood inside the notch. Use a chisel with a comfortable handle and a sharp blade.
A hammer or mallet helps tap the chisel gently. A wooden mallet prevents damage to the chisel handle.
A marking knife or pencil is needed to draw the notch outline. Clear lines guide your cuts and reduce mistakes.
A square or combination square ensures your lines are straight and angles are correct. Accuracy matters in woodworking.
A clamp holds the wood steady. Keeping the wood still prevents slips and improves safety.
Safety Equipment
Wear safety glasses to protect your eyes from flying wood chips. Eye protection is essential in all woodworking tasks.
Use gloves to protect your hands from splinters and cuts. Choose gloves that allow a good grip and control.
Work in a well-lit area to see your work clearly. Good lighting reduces errors and accidents.
Keep your workspace clean to avoid tripping or slipping. A tidy area helps maintain focus and safety.
Choosing The Right Wood
Choosing the right wood is important for cutting a clean notch by hand. Wood type affects how easy the work will be. It also influences the strength and look of the final piece.
Some woods are soft and easy to cut. Others are hard and need more effort. Knowing the wood grain helps avoid splitting or cracking. Picking the right wood saves time and makes the notch neat.
Types Of Wood For Notching
Softwoods like pine and cedar are good for beginners. They cut smoothly and need less force. Hardwoods such as oak and maple are tougher but last longer. These woods require sharper tools and steady hands.
Choose wood that fits your project needs. For furniture, hardwood is a better choice. For simple projects or practice, softwood works well. Avoid wood with knots or defects near the notch area.
Wood Grain And Its Impact
Wood grain is the direction of wood fibers. Cutting with the grain is easier and cleaner. Cutting across or against grain can cause splinters and rough edges.
Look at the grain pattern before marking the notch. Plan your cuts to follow the grain. This reduces the chance of breaking or tearing the wood. Straight grain wood is best for notching.
Marking The Notch
Marking the notch correctly is the first step in cutting wood by hand. Clear and precise marks guide your saw and chisel. Accurate marking saves time and prevents mistakes. This step ensures your notch fits perfectly with the other wood pieces.
Measuring And Marking Techniques
Start by measuring the notch size carefully. Use a tape measure or ruler for accuracy. Double-check the measurements before marking. Mark the width and depth of the notch on the wood surface. Draw light lines first, so you can erase errors. Make sure the lines are straight and visible.
Using A Square And Pencil
A square helps keep your marks at right angles. Place the square on the wood edge. Align it with the measuring marks. Use a sharp pencil to draw along the square’s edge. This creates clean, straight lines for the notch. Darken the lines if needed for better visibility. Precise lines make cutting easier and more accurate.
Making The Initial Cuts
Making the initial cuts is a key step in cutting a notch in wood by hand. This stage sets the shape and depth of the notch. Accurate and careful cuts ensure a clean, precise result.
Start with the right tools and clear marking lines. Take your time and focus on steady, controlled movements. This helps prevent mistakes and damage to the wood.
Saw Selection And Handling
Choose a saw with fine teeth for better control. A backsaw or dovetail saw works well for small, precise cuts. Avoid large saws that may remove too much wood.
Hold the saw firmly but not too tight. Keep your wrist steady and use smooth strokes. Saw slowly to follow your marked lines closely. Good saw handling reduces splintering and keeps the cut straight.
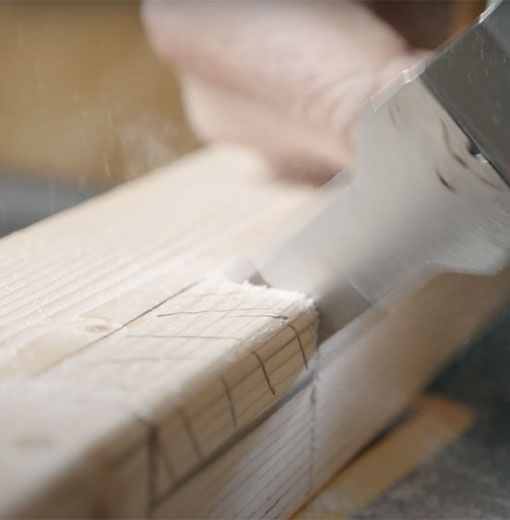
Cutting Along The Marked Lines
Mark the notch area clearly with a pencil or knife. Follow these lines exactly when cutting. Start by making vertical cuts at the notch edges.
Cut just inside the lines to allow for fine adjustments later. Use short, gentle strokes to avoid slipping. Check the depth regularly to match the notch size.
Stay focused and keep your hand steady. Precise cuts here make the rest of the process easier and the final notch cleaner.
Removing The Waste Wood
Removing the waste wood is a crucial step in cutting a notch by hand. It shapes the notch and prepares it for a clean finish. This step needs patience and careful work to avoid mistakes. Using the right tools and techniques helps create a smooth, precise notch.
Chiseling Techniques
Start by placing the wood securely on a flat surface. Use a sharp chisel to remove small pieces of wood. Hold the chisel at a slight angle, with the bevel side facing the waste wood. Tap the handle gently with a mallet to control the cut depth.
Work slowly, removing thin layers of wood. Avoid forcing the chisel. Let the tool do the work. Keep the chisel straight to prevent uneven cuts. Clear out the waste wood inside the notch carefully, stopping often to check progress.
Cleaning Up The Notch
After removing most waste wood, focus on smoothing the notch edges. Use the chisel to pare down rough spots. Light, controlled strokes help achieve a cleaner look. Check the notch for flatness and even depth.
Use sandpaper to smooth the wood further if needed. Wipe away dust with a dry cloth. A clean notch ensures better fit and stronger joints. Take your time for a neat finish.
Smoothing And Finishing
Smoothing and finishing the notch is a key step in woodworking. It makes the notch safe to handle and improves its look. Proper finishing also helps the wood fit better with other pieces. Taking time here ensures a clean, professional result. Small details matter a lot.
Sanding The Notch Edges
Use fine sandpaper to smooth the notch edges. Sand lightly to remove splinters and rough spots. Move the sandpaper in the wood grain direction. This prevents scratches and keeps the surface even. Check the edges often to avoid sanding too much. Softening sharp corners also prevents injury.
Checking For Fit And Adjustments
Test the notch by fitting the matching wood piece. It should slide in without forcing. Tight spots need careful trimming with a chisel or file. Keep checking fit after each adjustment. A snug fit is better than a loose one. Patience here leads to stronger joints and better results.
Common Mistakes To Avoid
Cutting a notch in wood by hand requires care and attention. Many beginners make mistakes that affect the quality of their work. Avoiding common errors can help you achieve a clean, precise notch. Focus on the right techniques and tools for the best results.
Cutting Too Deep Or Shallow
Cutting too deep weakens the wood and can cause splitting. It also makes the notch larger than needed. Cutting too shallow means the notch won’t fit properly. Measure twice and cut once. Use a marking tool to guide your cuts. Check the depth frequently as you work.
Ignoring Wood Grain Direction
Wood grain affects how the wood cuts and splits. Cutting against the grain can cause rough edges and tear-out. Always observe the grain direction before cutting. Cut along the grain to keep edges smooth. Take your time to avoid damaging the wood fibers.

Credit: www.youtube.com
Tips For Better Results
Cutting a notch in wood by hand requires patience and skill. Small tips can improve your work greatly. Focus on simple habits that make the process smoother and safer.
These tips help you get cleaner cuts and save time. They also reduce mistakes and make your project look better.
Practice On Scrap Wood
Start by practicing on leftover wood pieces. This helps you get a feel for the tools and wood grain. Experiment with different cuts and angles. Practice builds confidence and sharpens your technique. It also helps you avoid ruining the final piece.
Maintaining Sharp Tools
Sharp tools make cutting easier and safer. Dull blades can slip and cause rough edges. Regularly sharpen your saws, chisels, and knives. Clean tools after each use to prevent rust and buildup. Sharp, clean tools give you better control and cleaner notches.
Credit: smart-toolgroup.com
Frequently Asked Questions
How Do I Mark The Wood Before Cutting A Notch?
Use a pencil and square to draw clear lines where the notch will go. Mark both width and depth carefully.
What Hand Tools Are Best For Cutting A Wood Notch?
A handsaw and chisel work well together. Saw along the marked lines, then clean edges with a chisel.
How Deep Should I Cut The Notch In Wood?
The depth depends on your project needs. Usually, cut to the line you marked, no deeper.
Can I Cut A Notch In Hardwood By Hand?
Yes, but hardwood needs more effort. Use sharp tools and cut slowly to avoid splitting.
How Do I Clean Up The Notch Edges After Cutting?
Use a sharp chisel to smooth rough edges. Light sanding can also help for a neat finish.
Conclusion
Cutting a notch in wood by hand takes patience and care. Use the right tools and follow steps slowly. Mark your wood clearly before you start cutting. Keep your hands steady and work safely. Practice makes your cuts cleaner and neater.
With time, you will feel more confident. This simple skill helps in many wood projects. Try it out and enjoy your handiwork.