
Are you ready to add a special touch to your holiday decorations this year? Making your own wood Christmas tree stand is easier than you might think.
Not only will it hold your tree securely, but it will also bring a warm, handmade charm to your home. Imagine the pride you’ll feel showing off a sturdy, custom stand that you built yourself. In this guide, you’ll discover simple steps and tips to create a beautiful and reliable wood tree stand.
Keep reading, and you’ll be one step closer to crafting a festive centerpiece that lasts for years to come.

Credit: www.youtube.com
Materials Needed
Gathering the right materials is the first step to build a wood Christmas tree stand. This helps ensure the project goes smoothly. Choose quality items that fit your design and tree size.
Below are the key materials you will need for a sturdy, reliable stand.
Wood Pieces
Select strong wood like pine or oak. You will need a base and supporting legs. The wood should be thick enough to hold the tree’s weight without bending.
Screws And Nails
Use screws for a secure hold. Nails can be used for quick fixes. Make sure they are rust-resistant for long-lasting use.
Wood Glue
Apply wood glue to strengthen joints. It helps keep the structure stable. Use it along with screws for the best result.
Drill And Drill Bits
A drill makes holes for screws. Choose drill bits that match the screw size. This prevents wood from splitting.
Sandpaper
Sandpaper smooths rough edges. It prepares the wood for painting or sealing. Use medium grit for best results.
Measuring Tape And Pencil
Measure wood pieces accurately. Mark cutting lines with a pencil. This ensures all parts fit together well.
Wood Finish Or Paint
Choose a finish to protect the wood. Paint adds color and style. Both help the stand last longer.
Tools Required
To build a sturdy wood Christmas tree stand, gather the right tools first. Having the proper equipment makes the job easier and safer. It also helps create a clean and professional result.
This list covers all essential tools for the project. Most are common and easy to find at home or local stores. Prepare these before starting to avoid interruptions.
Measuring Tape
A measuring tape ensures precise cuts and measurements. Accuracy is key to a balanced and stable stand. Use a tape with clear markings for easy reading.
Hand Saw Or Circular Saw
A saw cuts the wood pieces to size. A hand saw works well for small jobs and beginners. A circular saw speeds up the process for larger projects.
Drill And Drill Bits
A drill makes holes for screws and bolts. Choose drill bits that match your screw size. This tool helps join the wood pieces firmly together.
Screwdriver
A screwdriver tightens screws securely. Use a manual or electric screwdriver for convenience. Proper tightening prevents wobbling and ensures durability.
Clamps
Clamps hold wood pieces in place while assembling. They keep parts steady for accurate drilling and screwing. This tool improves safety and quality.
Sandpaper Or Power Sander
Sandpaper smooths rough edges and surfaces. A power sander works faster but hand sanding gives more control. Smooth wood prevents splinters and improves appearance.
Pencil And Square
A pencil marks cut lines and drill points. A square helps draw perfect right angles. These tools improve precision and help avoid mistakes.
Choosing The Right Wood
Choosing the right wood is key to making a strong and safe Christmas tree stand. The wood needs to hold the tree steady and last for many seasons. Different types of wood have different strengths and looks. Picking the right one makes your project easier and better.
Softwood Vs. Hardwood
Softwood like pine is easy to cut and shape. It is lighter and cheaper. Hardwood like oak is stronger and heavier. Hardwood can hold bigger trees without bending. Choose based on the size of your tree and your tools.
Wood Durability
Durability means how long the wood lasts without damage. Some woods resist water and wear better than others. Cedar and redwood resist moisture well. Pine may soak up water and weaken over time. Pick wood that stays strong around water.
Wood Availability And Cost
Check which wood is easy to find near you. Some woods are expensive or rare. Pine and fir are common and budget-friendly. Oak and maple cost more but last longer. Match your choice with your budget and store options.
Wood Appearance
Wood grain and color affect the look of your stand. Pine has a light, smooth look. Oak has a rich, warm tone and visible grain. Choose wood that matches your home style or decoration ideas. Appearance matters if your stand will be visible.
Credit: www.familyhandyman.com
Cutting The Wood Pieces
Cutting the wood pieces is the first step to build your wood Christmas tree stand. Precise cuts ensure the stand fits together well and is stable. Take your time measuring and cutting each piece. This will save you effort later and make your project look neat.
Measuring Dimensions
Measure each wood piece carefully before cutting. Use a tape measure or ruler to mark exact lengths. Double-check your marks to avoid mistakes. Write down the dimensions clearly. This helps keep your work organized and accurate.
Mark straight lines with a pencil and a square tool. Straight lines guide your saw for clean cuts. Measure each piece twice to be sure. Correct measurements make assembly easier and the stand stronger.
Safe Cutting Techniques
Wear safety goggles and gloves before cutting wood. Protect your eyes from dust and wood chips. Use a stable work surface to keep wood steady. Hold the wood firmly but not too tight.
Use a saw that fits the job, like a handsaw or jigsaw. Cut slowly and steadily along the marked lines. Avoid rushing to prevent slips or uneven edges. Keep fingers away from the blade at all times.
Clean your workspace after cutting. Remove scrap pieces and sawdust. This keeps your area safe and ready for the next step.
Assembling The Base
Assembling the base is a key step in making a wood Christmas tree stand. It holds the entire structure upright. The base must be strong and balanced. This part of the project needs care and attention.
Joining The Pieces
Start by laying out the wood pieces flat. Align the edges carefully for a tight fit. Use wood glue on the joints for extra strength. Clamp the pieces together to hold them in place. Drill pilot holes before screwing the pieces. This stops the wood from splitting. Use screws that are long enough to hold the wood firmly. Check that all pieces are flush and even.
Ensuring Stability
Test the base on a flat surface. Make sure it does not wobble or tip. Add extra support braces if needed. These braces go between the base pieces. They help keep the stand steady. Sand any rough edges to avoid splinters. The base should hold the tree without shifting. Stability is crucial for safety and durability.
Adding Support Features
Adding support features is key to making a strong wood Christmas tree stand. A sturdy stand keeps the tree upright and safe. Without proper support, the tree may wobble or fall. Focus on reinforcing joints and using the right materials. These steps help your stand last longer and hold the tree firmly.
Reinforcing Joints
Reinforcing joints strengthens the connection between wood pieces. Use small wooden blocks or metal brackets at corners. Attach these supports where the legs meet the base. This prevents the joints from loosening over time. Tight joints make the stand more stable. Check all corners and add reinforcements as needed.
Using Screws And Glue
Screws and wood glue work well together for strong bonds. Apply wood glue to the edges before screwing pieces together. Screws hold the parts firmly while the glue dries. Use screws that are long enough to secure the wood. Avoid nails as they provide less grip. Tighten screws evenly to keep the stand steady.
Sanding And Finishing
Sanding and finishing give your wood Christmas tree stand a smooth, polished look. These steps protect the wood and make it last longer. Taking time to sand and finish adds beauty and strength to your project.
Smoothing Surfaces
Start sanding with medium-grit sandpaper. This removes rough spots and shapes the wood. Sand along the grain to avoid scratches. Use finer grit sandpaper to smooth the surface more. Wipe the wood clean with a cloth after sanding. Check for any rough patches and sand again if needed.
Applying Paint Or Stain
Choose paint or stain to match your style. Paint gives bright, solid colors. Stain shows the wood’s natural texture. Apply with a brush or cloth in thin, even coats. Let each coat dry fully before adding another. Finish with a clear sealant to protect the surface from wear. This step keeps your stand looking great for many years.
Securing The Tree
Securing the tree to the wooden stand is a key step in this project. A firmly attached tree keeps the setup stable and safe. It stops the tree from tipping over, which can cause damage or injury. A solid connection between the tree and stand makes decorating easier. The tree stands tall and steady, creating a lovely holiday display.
Follow simple steps to attach the tree securely. Use the right tools and materials for a strong bond. Check the fit carefully before fixing the tree in place. A tight fit means less chance of wobbling. Take time to do this step well for the best result.
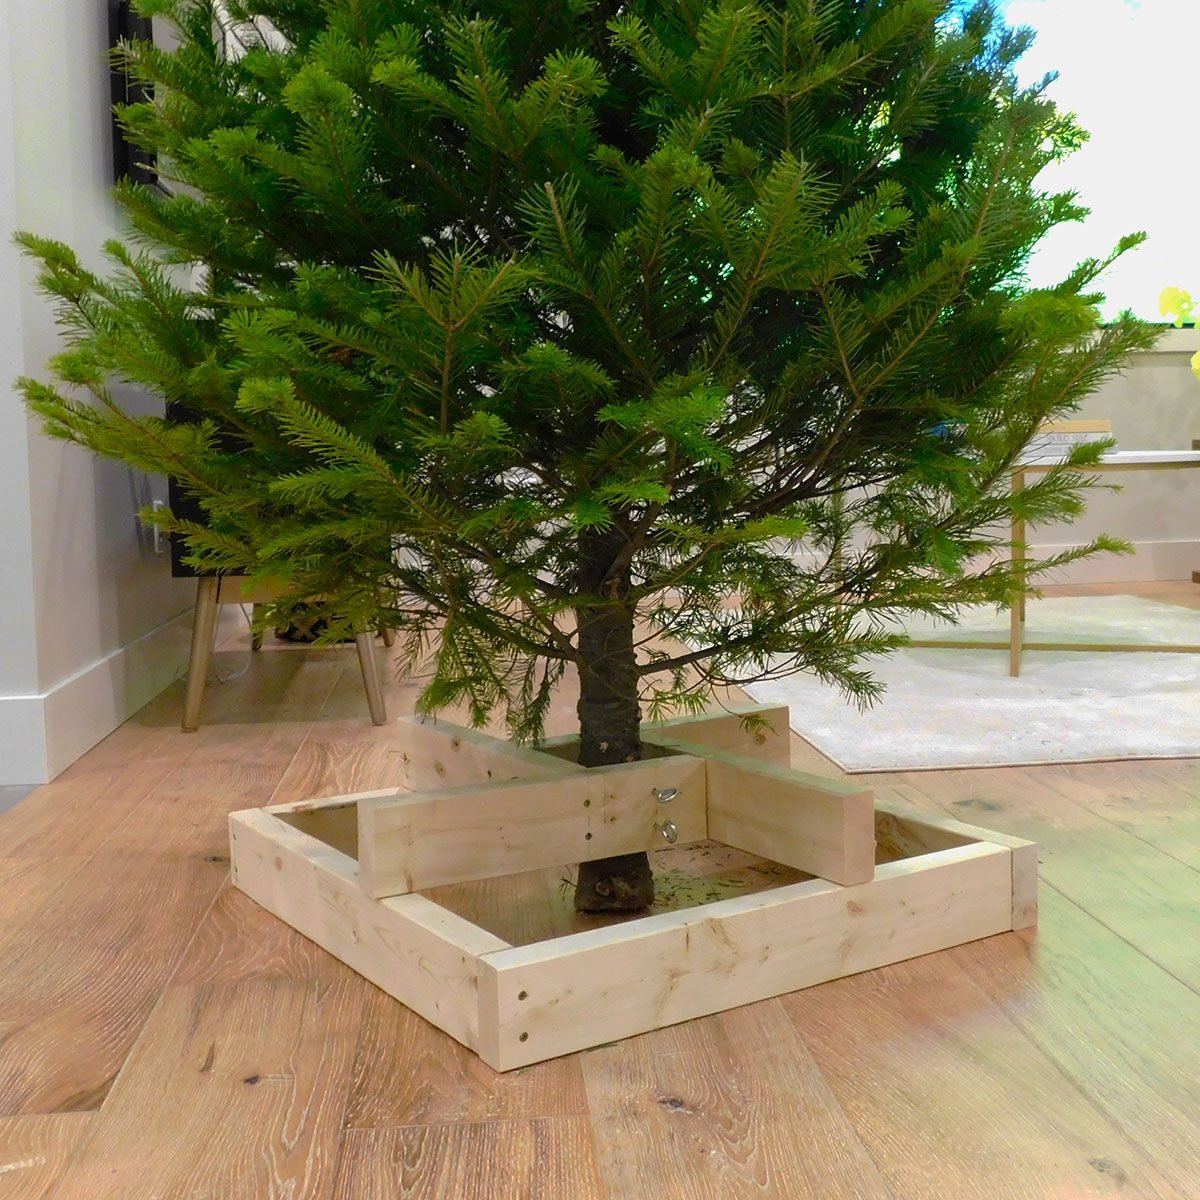
Attaching The Tree To The Stand
Start by placing the tree trunk into the center of the stand. Make sure it fits snugly without gaps. Use screws or bolts to hold the trunk firmly. Drill pilot holes first to prevent wood from splitting. Tighten the screws evenly on all sides.
Wrap a strong strap or rope around the trunk and the stand. This adds extra support and keeps the tree steady. Check that the tree is straight. Adjust before fully tightening the fasteners.
Safety Tips
Wear gloves to protect your hands while working. Use safety glasses when drilling or screwing. Keep children and pets away from the work area. Check all screws and bolts for tightness before use. Place the stand on a flat, stable surface.
Do not overload the stand with heavy decorations. Inspect the stand regularly for signs of wear or loosening. Secure the tree away from heat sources and open flames. These precautions keep your tree safe throughout the holiday season.
Customization Ideas
Customizing your wood Christmas tree stand makes it special and unique. It lets you match the stand to your home decor and personal style. Simple changes can turn a plain stand into a festive centerpiece. Explore creative ideas to make your stand truly yours.
Decorative Touches
Paint your stand with bright holiday colors. Red, green, white, or gold can brighten the room. Use stencils to add snowflakes or stars for a festive look. Attach small pine cones or holly leaves to give it a natural feel. Wrap a thin ribbon or twine around the base for extra charm. Seal the paint to protect it from water and scratches.
Personalizing Your Stand
Engrave family names or holiday messages on the wood. Use a wood burner or paint a simple design. Attach small hooks to hang ornaments or lights directly on the stand. Add felt pads to the bottom to protect your floor. Choose wood types that match your furniture or contrast for a bold look. Personal touches make the stand feel warm and welcoming.

Credit: houseon610th.com
Frequently Asked Questions
What Materials Do I Need To Make A Wood Christmas Tree Stand?
You need wood boards, screws, a drill, sandpaper, and wood glue. Choose sturdy wood like pine or oak for strong support.
How Do I Cut Wood Pieces For The Tree Stand?
Measure and mark the wood pieces before cutting. Use a saw to cut the wood carefully along the marks.
Can I Make A Wood Tree Stand Without Special Tools?
Basic tools like a handsaw and screwdriver work well. Power tools help but are not required for a simple stand.
How Do I Assemble The Wood Christmas Tree Stand?
Attach the base pieces first, then secure the vertical support. Use screws and wood glue to ensure a firm hold.
How Do I Finish The Wood Tree Stand For Safety?
Sand all edges smooth to avoid splinters. Apply a non-toxic finish or paint to protect the wood and improve look.
Conclusion
Making a wood Christmas tree stand is simple and fun. You only need a few basic tools and materials. This project adds a personal touch to your holiday decor. It also saves money compared to store-bought stands. Try different wood types or paint to match your style.
A sturdy stand keeps your tree safe and steady. Enjoy the process and the warm feeling it brings. Start your DIY stand today and brighten your festive season.