
Are you facing a woodworking project but don’t have a table saw to rip your wood? Don’t worry—there are simple, effective ways to get the job done without that expensive tool.
Whether you’re working in a small space or just want to save money, you can still achieve clean, straight cuts with tools you probably already own. You’ll discover easy methods to rip wood safely and accurately, so your project turns out just the way you want.
Keep reading, and you’ll be ready to tackle your wood cutting challenges with confidence.
Tools For Ripping Wood Without A Table Saw
Ripping wood without a table saw is possible with the right tools. These tools help you make straight cuts safely and efficiently. Each tool has its own strengths and best uses. Choose one based on your project needs and skill level.
Circular Saw
A circular saw is a powerful handheld tool. It cuts wood quickly and straight with a guide or fence. This saw works well for long boards and large sheets. Use a straight edge to keep cuts accurate.
Hand Saw
A hand saw is simple and effective. It requires no power and offers great control. Use it for small projects or thin wood. It takes more effort but gives precise results.
Jigsaw
A jigsaw is versatile for curved and straight cuts. It is less precise for long, straight rips. Use a guide to improve accuracy. Best for small or detailed wood pieces.
Track Saw
A track saw combines the power of a circular saw with a guide rail. It creates clean, straight cuts without a table saw. Ideal for ripping plywood or large boards. Easy to set up and use.
Handsaw Alternatives
Other handsaw options include a panel saw or a rip saw. These are designed for straight cuts without power tools. Great for quiet work and small tasks. They require patience and steady hands.

Credit: www.youtube.com
Preparing Your Workspace
Preparing your workspace is the first step to rip wood without a table saw. A well-organized area helps you work safely and efficiently. Clear your workspace from clutter and dirt. Good lighting is important to see your markings and cuts clearly. Take time to set up a space where you can move freely and handle wood safely.
Setting Up A Stable Work Surface
Use a solid, flat surface to work on. A sturdy workbench or strong sawhorses work well. Make sure the surface does not wobble or move. Clamp your wood firmly to prevent slipping. Stability helps you make straight, clean cuts. Avoid working on uneven or soft surfaces like grass or dirt.
Marking And Measuring Wood Accurately
Measure your wood carefully with a tape measure or ruler. Mark the cut line clearly using a pencil or chalk. Use a square or straight edge to draw straight lines. Double-check your measurements before cutting. Accurate marking keeps cuts precise and reduces waste. Take your time to avoid mistakes.
Safety Precautions
Wear safety glasses to protect your eyes from wood chips. Use hearing protection if you use power tools. Keep your hands away from the cutting area. Wear gloves to protect your hands from splinters. Ensure your workspace is well ventilated. Remove loose clothing and tie back long hair. Safety keeps accidents far away.
Using A Circular Saw For Straight Cuts
Using a circular saw for straight cuts is a reliable way to rip wood without a table saw. This tool is common in many toolboxes and can make precise cuts with practice. The key is to prepare the saw and the wood properly to get clean, straight edges.
Start by selecting the right blade and adjusting the saw for the cut depth. Use a guide or fence to keep the saw straight while cutting. Follow simple techniques to ensure the cut stays on track from start to finish.
Choosing The Right Blade
Select a blade with many teeth for smooth cuts. A blade with 40 to 60 teeth works well for ripping wood. Avoid blades that are dull or damaged because they cause rough cuts and can be dangerous.
Use a carbide-tipped blade to improve durability and cutting quality. Match the blade size to your circular saw for safe operation.
Setting The Depth And Fence
Adjust the blade depth so it sticks out about 1/4 inch below the wood. This reduces splintering and makes the cut cleaner. Too deep a cut increases kickback risk and wastes energy.
Attach a straight edge or rip fence to the wood. Clamp it tightly to prevent movement. The fence acts as a guide to keep the saw blade aligned with your cut line.
Techniques For Straight Ripping
Start the saw before touching the wood. Move the saw slowly and steadily along the fence. Keep both hands on the saw for control.
Do not force the saw; let the blade do the work. Check the cut line frequently to stay on track. If needed, mark the wood clearly with a pencil or chalk before cutting.
Ripping Wood With A Hand Saw
Ripping wood without a table saw is easy with the right hand saw. This simple tool lets you cut wood along the grain. It works well for small projects or when you don’t have power tools. You only need a steady hand and the right technique to get clean cuts.
Selecting The Best Hand Saw Type
Choose a saw designed for ripping wood. Look for a saw with large, sharp teeth. A rip saw is best because it cuts with the grain. Crosscut saws cut across the grain and are not ideal for ripping. The handle should feel comfortable in your hand. This helps you control the saw better and reduces fatigue.
Proper Sawing Technique
Start by marking your cut line clearly on the wood. Use a straight edge or square for accuracy. Hold the saw at a slight angle, about 45 degrees. Begin with gentle, short strokes to create a groove. Once the groove is set, use longer, steady strokes. Keep the saw moving smoothly without forcing it. Let the teeth do the cutting work.
Tips For Maintaining A Straight Line
Keep your eye on the mark as you saw. Check the cut often from different angles. Use a guide or clamp a straight board next to your cut line. This helps the saw follow the line more easily. Take breaks to clear sawdust from the groove. Sawdust can hide the line and cause mistakes.
Jigsaw Ripping Methods
Using a jigsaw to rip wood can be a helpful alternative without a table saw. It works well for straight or slightly curved cuts on thinner boards. Success depends on the blade choice and how you guide the tool. Safety and control are key to avoid mistakes or injuries.
Blade Selection For Wood Ripping
Choose a blade designed for wood with fine teeth. A blade with 10 to 14 teeth per inch (TPI) works best for ripping. Avoid blades meant for metal or multi-purpose use. A narrow blade provides better control and cleaner cuts. Change blades often to keep cuts smooth.
Guiding The Jigsaw For Precision
Clamp a straight edge to your wood as a guide. Hold the jigsaw firmly and follow the guide closely. Move the saw slowly to prevent the blade from bending. Keep the base plate flat on the surface for stability. Mark your cut line clearly before starting the saw.
Limitations And Best Use Cases
A jigsaw is not ideal for thick or very hard wood. It struggles with very long, straight cuts compared to a table saw. Best for thinner panels, plywood, or small boards. Avoid ripping wide pieces or making repetitive cuts. Use the jigsaw for quick jobs or where a table saw is not available.
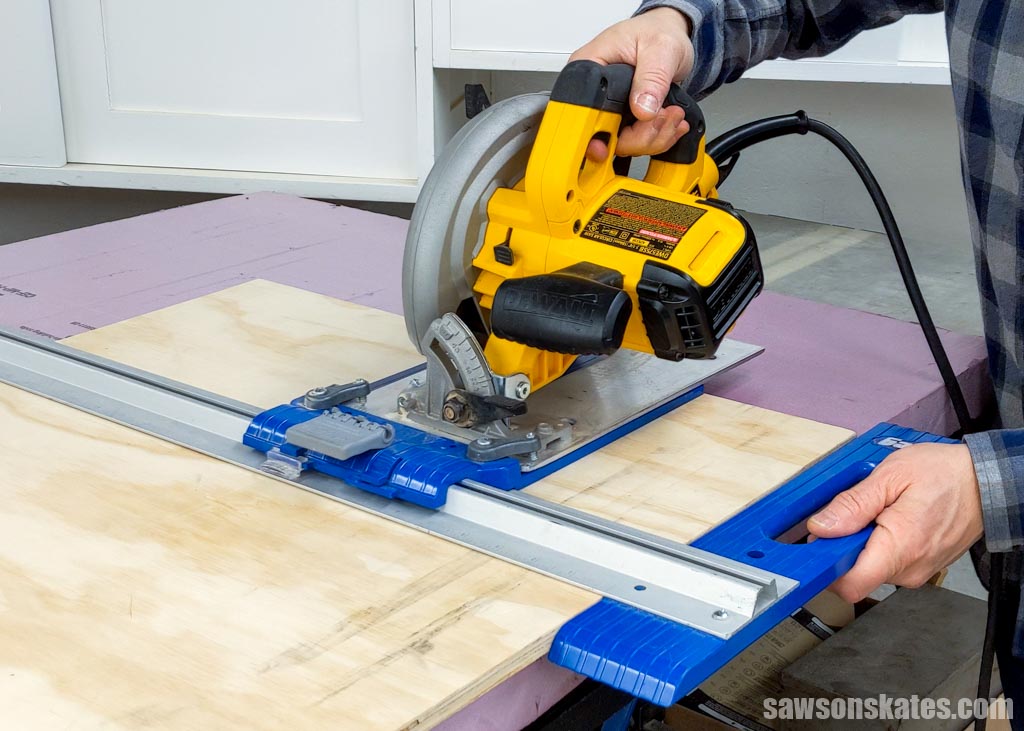
Using A Track Saw For Cleaner Cuts
A track saw is a great tool for ripping wood without a table saw. It offers clean and straight cuts with ease. This tool is perfect for woodworkers who want accuracy and smooth edges. The guide track keeps the saw steady and reduces mistakes.
Setting Up The Track
Place the track on the wood along the cut line. Make sure it is tight and does not move. Use clamps to hold the track in place for safety. Check that the track is straight before starting to cut.
Advantages Over Other Methods
The track saw gives better control than a circular saw alone. It produces straighter cuts with less tear-out. It is easier to handle and safer than a table saw. The track saw is portable and works well in tight spaces.
Step-by-step Cutting Process
First, mark your cut line clearly on the wood. Next, align the track with the mark and clamp it down. Turn on the saw and let it reach full speed. Slowly guide the saw along the track to make the cut. After cutting, turn off the saw and wait for the blade to stop. Remove the clamps and track carefully. Your wood piece now has a clean, straight edge.
Clamping And Stabilizing Wood Pieces
Clamping and stabilizing wood pieces is a key step when ripping wood without a table saw. It keeps the wood steady and safe during cuts. Proper clamping reduces errors and helps you achieve straight, clean edges. It also prevents the wood from shifting, which can cause accidents or damage.
Choosing the right clamps and placing them correctly makes the process easier and more accurate. Securing the wood tightly lets you focus on cutting without worry. This section covers types of clamps, how to position them, and ways to stop movement while cutting.
Types Of Clamps To Use
Bar clamps and C-clamps work well for ripping wood. Bar clamps hold large pieces firmly and spread pressure evenly. C-clamps are good for smaller projects or tight spaces. Spring clamps offer quick, light pressure for thin wood. Use clamps with padded jaws to avoid marks on the wood. Choose clamps that fit your wood size and project needs.
Positioning For Accuracy
Place clamps near the cutting line but not too close. This keeps the saw blade clear while holding the wood tight. Clamp the wood to a flat surface or workbench for support. Use multiple clamps if the wood is long or wide. Make sure the wood is level and flush with the surface to get a straight cut.
Preventing Movement During Cuts
Tighten clamps enough to stop any wood wobble. Check the wood before cutting by trying to move it by hand. Add extra clamps if needed for stability. Use non-slip pads under the wood or clamps for better grip. Avoid over-tightening, which can damage the wood or tools. Steady wood means safer, cleaner cuts every time.
Finishing And Smoothing Cut Edges
After cutting wood without a table saw, the edges often feel rough and uneven. Finishing and smoothing these edges improves the wood’s appearance and safety. It also helps the wood fit better in your project. Use simple tools and techniques to achieve smooth, clean edges.
Sanding Techniques
Sanding is the easiest way to smooth cut edges. Start with coarse sandpaper, like 80 grit, to remove rough spots. Then switch to medium grit, around 120, for a smoother finish. Finish with fine grit, such as 220, to make the edge feel soft. Always sand along the grain to avoid scratches.
Using A Plane For Clean Edges
A hand plane creates very clean, straight edges. Hold the plane firmly and push it along the wood’s edge. Take thin shavings with each pass. This method removes uneven parts and leaves a flat surface. Adjust the blade depth for finer or deeper cuts. A plane works best on hardwood and straight grain.
Removing Tear-out
Tear-out happens when wood fibers split during cutting. It leaves rough, splintered edges. To fix this, use a sharp chisel or sandpaper. Lightly scrape or sand the torn fibers until smooth. Another tip is to tape the cut line before cutting. This helps reduce tear-out from the start.
Common Mistakes To Avoid
Ripping wood without a table saw can be tricky. Many people make mistakes that lead to poor cuts or accidents. Avoiding common errors helps you work safely and get better results.
Focus on the right steps and tools. Careful planning prevents wasted wood and frustration. Keep your workspace clean and organized. This section covers key mistakes to avoid for a smooth experience.
Incorrect Measurements
Measuring wood incorrectly causes uneven cuts. Double-check your measurements before cutting. Mark the wood clearly with a pencil or chalk. Use a straight edge or ruler for accuracy. Cutting without precise measurements wastes wood and time.
Improper Tool Handling
Holding tools the wrong way risks injury and poor cuts. Use both hands to control the saw or handsaw. Keep your hands away from the cutting path. Move slowly and steadily for a clean cut. Avoid forcing the tool through the wood.
Ignoring Safety Guidelines
Skipping safety rules leads to accidents and injuries. Always wear safety glasses and gloves. Keep your work area free of clutter. Use clamps to hold the wood steady. Follow the tool manufacturer’s instructions carefully.
Credit: sawsonskates.com

Credit: www.reddit.com
Frequently Asked Questions
What Tools Can I Use To Rip Wood Without A Table Saw?
You can use a circular saw, hand saw, or a track saw to rip wood. Clamps and a straight edge help guide the cut for accuracy.
How Do I Ensure Straight Cuts Without A Table Saw?
Use a straight edge or a guide clamp to keep your saw aligned. Mark your cut line clearly with a pencil before cutting.
Is It Safe To Rip Wood With A Circular Saw?
Yes, with proper safety gear and stable support, ripping wood with a circular saw is safe. Keep your hands away from the blade and work slowly.
Can I Rip Thick Wood Without A Table Saw?
Thick wood can be ripped using a circular saw or hand saw, but it may take more effort. Multiple passes might be needed for very thick pieces.
What Is The Best Way To Support Wood During Ripping?
Use saw horses or a sturdy workbench to support wood while cutting. Secure the wood with clamps to prevent movement during the cut.
Conclusion
Ripping wood without a table saw is possible with simple tools. Using a circular saw or hand saw can give clean cuts. Take your time and measure carefully before cutting. Safety gear is important to protect yourself during work. Practice these tips to improve your woodcutting skills.
You don’t need fancy equipment to get the job done. Stay patient and enjoy the process of working with wood. This approach saves money and space in your workshop. Keep trying and you will get better each time.