
If you have an above ground pool, you know how important it is to have safe and sturdy steps. Building your own wood steps not only saves money but also lets you customize them to fit your space perfectly.
In this guide, you’ll learn simple, step-by-step instructions to create strong and attractive wooden steps. Whether you’re a beginner or have some DIY experience, these easy tips will help you enjoy your pool more safely and comfortably. Ready to build steps that last?
Keep reading to find out how!
Planning Your Wood Steps
Planning your wood steps is the first step to a safe and sturdy pool entrance. Careful planning saves time and effort later. It helps you avoid mistakes that cost money. Good planning means knowing your pool’s size, the space around it, and what materials work best. Getting these details right makes building easier and faster.
Measuring Pool Height And Space
Start by measuring the height from the ground to the pool’s edge. This tells you how many steps you will need. Also, measure the space around the pool where the steps will go. Make sure there is enough room for the steps to fit comfortably. Write down these numbers for your building plan.
Choosing The Right Wood
Select wood that resists water and weather damage. Cedar and pressure-treated pine are good choices. They last longer and stay strong near water. Avoid soft woods that can rot quickly. Choose smooth wood to prevent splinters. This keeps your steps safe and neat.
Gathering Tools And Materials
Collect all tools before you start building. You will need a saw, drill, screws, measuring tape, and level. Get enough wood boards for the steps and supports. Also, have sandpaper and wood sealant ready. Having everything at hand speeds up the building process.

Credit: 100things2do.ca
Preparing The Site
Preparing the site is the first important step to build wood steps for your above ground pool. A well-prepared site ensures the steps are safe and stable. It makes the building process easier and faster.
Take your time to prepare the ground properly before starting construction. This will help avoid problems later. Focus on clearing, leveling, and setting a strong base for the steps.
Clearing And Leveling The Ground
Remove grass, rocks, and debris from the area where you want to build the steps. Clear the space wide enough for the steps and some extra room around them.
Use a shovel or rake to smooth the ground. Make sure the surface is flat and even. A level ground keeps the steps steady and prevents wobbling.
Marking Step Layout
Use stakes and string to mark the shape and size of the steps on the ground. Measure the width and depth of each step carefully.
Double-check your measurements. Marking the layout clearly helps you build the steps in the right place and size.
Setting A Solid Foundation
Dig shallow holes for footings or place concrete blocks under the steps. This supports the weight and stops the wood from touching the soil.
Add gravel or sand under the footings for better drainage. A strong foundation prevents the steps from sinking or shifting over time.
Cutting Wood Components
Cutting the wood components is an important step in building steps for an above ground pool. It shapes the pieces that will hold the steps together. Each cut must be accurate to ensure the steps fit well and stay strong over time.
Using the right tools and following the measurements carefully makes the process easier. Safety is also key. Smooth edges prevent splinters and accidents. Let’s explore how to measure, cut, and finish the wood parts.
Measuring And Marking Wood
Start by measuring the wood pieces carefully. Use a tape measure to get exact lengths. Mark the wood with a pencil to show where to cut. Double-check the marks before cutting. This prevents mistakes and wasted wood.
Mark the stringers, which support the steps, and the treads, where you step. Clear marks help guide your saw for clean cuts.
Cutting Stringers And Treads
Use a saw suitable for the wood type. A circular saw works well for straight cuts. Cut slowly and follow the marked lines closely. Cut the stringers first since they need precise angles to hold the treads.
Next, cut the treads to the marked size. These should be flat and wide enough to step on comfortably. Keep the saw steady to avoid rough edges or splinters.
Sanding Edges For Safety
After cutting, sand all edges smoothly. Use medium-grit sandpaper to remove splinters and rough spots. Sanding makes the steps safe to use, especially when wet. Pay attention to corners and cut ends.
Well-sanded edges also improve the wood’s look and help the finish stick better. Take your time to ensure a smooth, safe surface for every step.
Assembling The Steps
Assembling the steps is a key part of building wood steps for an above ground pool. This process makes the steps strong and safe to use. Follow each step carefully to create a sturdy set of stairs.
Attaching Stringers
Stringers are the sides that support the steps. Place them on a flat surface. Align them parallel and space them to match the width of the pool entry. Use clamps to hold them steady. Attach the bottom ends to a stable base or ground. Make sure the stringers are level and evenly spaced.
Installing Treads And Risers
Treads are the flat parts you step on. Risers are the vertical boards between treads. Start by attaching the risers to the stringers. Use a square to keep them straight. Then, place the treads on top of the stringers. Check that each tread is level and flush with the risers. This ensures safe and comfortable steps.
Securing With Screws And Brackets
Use exterior-grade screws to hold all parts together. Drive screws through the treads and risers into the stringers. Add metal brackets for extra strength at corners and joints. Brackets help prevent wobbling and increase the durability of the steps. Tighten all screws firmly but avoid splitting the wood.
Finishing Touches
Finishing touches are key to making your wood steps safe and long-lasting. These final steps protect the wood and improve safety. They also give your steps a clean, polished look. Take time to apply sealant, add non-slip surfaces, and check stability.
Applying Weatherproof Sealant
Start by applying a weatherproof sealant to all wood surfaces. This helps protect against rain, sun, and moisture. Use a brush or sprayer to cover every corner and edge. Allow the sealant to dry fully before using the steps. Reapply the sealant every year for best results.
Adding Non-slip Surfaces
Non-slip surfaces prevent accidents on wet steps. Use adhesive non-slip tape or mats on each step. Choose materials that stick well and resist water. Place strips evenly on the treads for good grip. This simple addition keeps swimmers safe when climbing in and out.
Inspecting For Stability
Check each step for firmness and strength before use. Press down on steps to see if they wobble or move. Tighten screws and bolts as needed to secure the frame. Make sure the steps sit flat on the ground. A stable set of steps reduces the risk of falls and injuries.
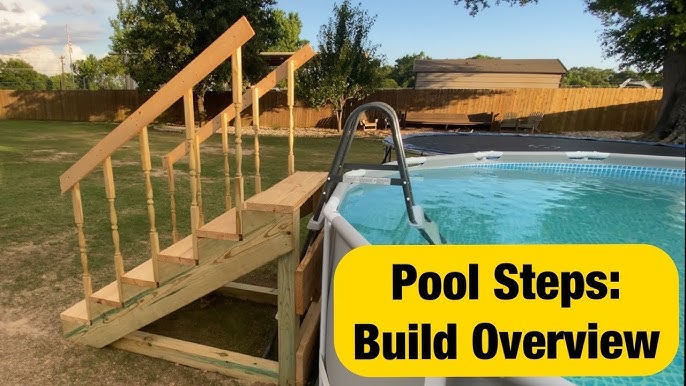
Credit: www.youtube.com
Maintaining Your Wood Steps
Maintaining your wood steps for an above ground pool keeps them safe and looking good. Wood can wear down from sun, water, and foot traffic. Regular care helps the steps last longer and stay sturdy. Follow these simple steps to protect your investment and enjoy your pool safely.
Regular Cleaning Tips
Clean your wood steps often to remove dirt and debris. Use a soft brush and mild soap with water. Avoid harsh chemicals that can damage the wood. Rinse well to remove soap residue. Let the steps dry completely before using them again.
Checking For Damage
Look for cracks, splinters, or loose nails regularly. Check the wood for signs of rot or soft spots. Tighten any loose screws or nails to keep the steps stable. Replace damaged wood pieces quickly to prevent accidents. Early repair saves time and money.
Reapplying Sealant
Apply a water-resistant sealant every year to protect the wood. Choose a sealant made for outdoor wood. Clean the steps thoroughly before sealing. Use a brush or roller for even coverage. Let the sealant dry fully before using the steps again.

Credit: www.youtube.com
Frequently Asked Questions
How Do I Start Building Wood Steps For An Above Ground Pool?
Begin by measuring the height from the ground to the pool’s edge. Plan the number of steps and gather treated wood for durability.
What Materials Do I Need For Wood Steps Construction?
You need pressure-treated lumber, screws, a saw, drill, measuring tape, and sandpaper. These ensure strong and safe steps.
How Can I Make Wood Steps Safe For Wet Conditions?
Use non-slip paint or tape on the steps. Also, seal the wood to prevent water damage and rot.
How Long Does It Take To Build Wood Steps For A Pool?
It usually takes 4 to 6 hours for basic steps. Time depends on your skill and tools available.
Can I Build Wood Steps Without Professional Help?
Yes, with careful planning and basic tools, you can build safe wood steps yourself. Follow instructions closely for best results.
Conclusion
Building wood steps for your above ground pool is easier than it seems. Follow clear measurements and use sturdy materials. Take safety seriously by securing each step firmly. Regularly check for any loose parts or wear. A well-built set of steps adds both function and style.
Enjoy safe and easy pool access all summer long. Your effort will pay off with a solid, reliable structure. Simple tools and patience create great results every time.