
Is your lamp switch not working, leaving your favorite light useless? You don’t have to live in the dark or rush to buy a new lamp.
Fixing a lamp switch is easier than you think, and you can do it yourself with just a few simple steps. Imagine saving money and gaining a handy skill that keeps your home bright. Keep reading to discover how to bring your lamp back to life quickly and safely.
Your perfect lighting solution is just a few clicks away!
Tools Needed
Fixing a lamp switch requires a few basic tools. These tools help you work safely and efficiently. Having the right tools ready makes the repair easier and faster.
Screwdriver
A screwdriver is essential to open the lamp base. Most lamps use small screws, so a flathead or Phillips screwdriver works well. Choose the one that fits your lamp’s screws.
Wire Strippers
Wire strippers remove the plastic coating from wires safely. This tool exposes the copper wire without damage. It helps prepare the wires for reconnecting the switch.
Multimeter
A multimeter checks if the switch has power. It measures electrical current, voltage, and resistance. This tool confirms if the switch is faulty or working.
Electrical Tape
Electrical tape insulates wires after repair. It prevents short circuits and protects against shocks. Use good quality tape for safe results.
Replacement Switch
A new switch is needed if the old one is broken. Make sure to get the correct size and type for your lamp. This ensures proper fit and function.
Safety Tips
Fixing a lamp switch can be simple, but safety must come first. Small mistakes can cause electric shocks or fire. Follow these safety tips to protect yourself and your home.
Safety is about careful steps and clear focus. Take your time and avoid rushing.
Turn Off The Power
Always switch off the lamp and unplug it from the socket. This stops electricity flow. Never work on a lamp that is still connected to power.
Use Insulated Tools
Use tools with insulated handles. These tools protect you from electric shocks. Avoid using metal tools without insulation.
Check For Damaged Wires
Look closely at the lamp wires. Broken or frayed wires can be dangerous. Replace any damaged wires before fixing the switch.
Work In A Dry Area
Keep the work area dry. Water and electricity are a harmful mix. Do not fix the lamp switch near wet places.
Wear Protective Gear
Wear gloves and safety glasses. They protect your hands and eyes from sparks or debris. Safety gear lowers risk of injury.
Identifying The Problem
Before fixing a lamp switch, find the exact problem. This helps save time and effort. A clear check can tell if the issue is simple or needs more work.
Check The Power Source
First, see if the lamp is plugged in well. A loose plug can stop power flow. Try another outlet to be sure. Sometimes, the socket might not work.
Inspect The Bulb
Look at the bulb closely. A burnt-out bulb will not light up. Replace the bulb with a new one. This is a quick way to fix the issue.
Examine The Switch
Touch the lamp switch and listen for a click sound. No sound can mean a broken switch. Check for dirt or damage around it. A faulty switch often needs repair or replacement.
Credit: www.youtube.com
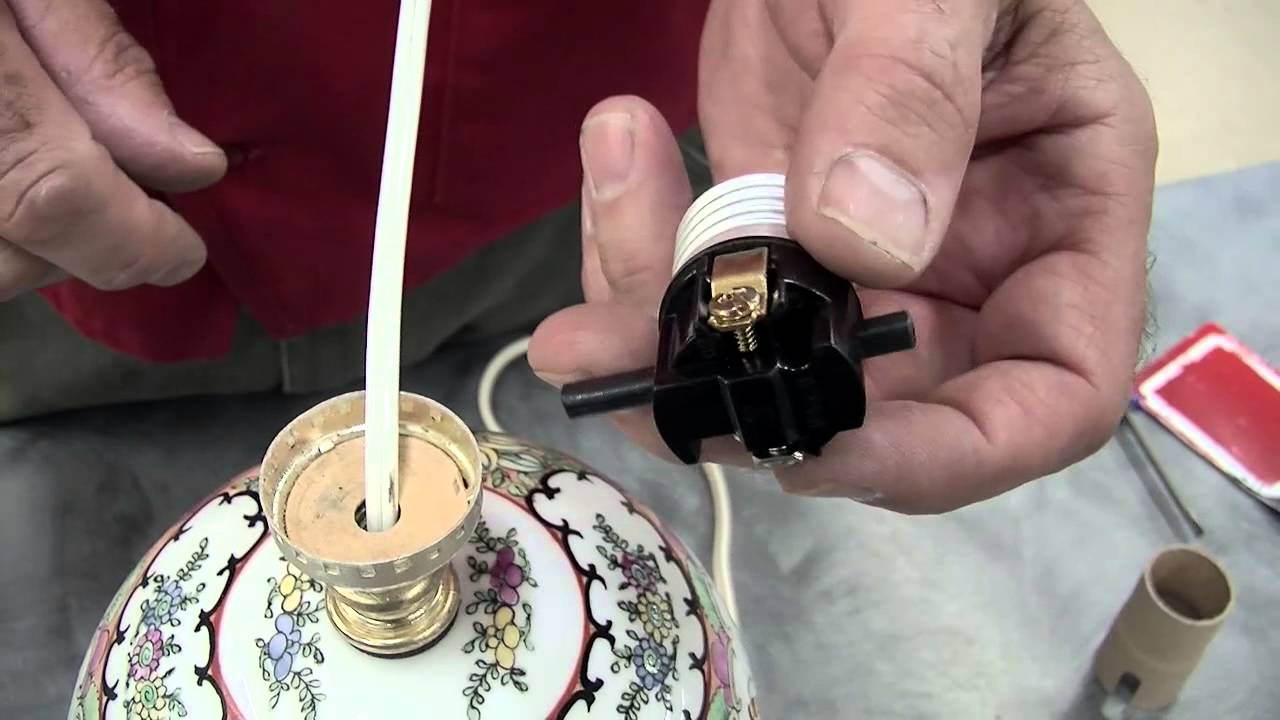
Removing The Lamp Switch
Removing the lamp switch is the first step in fixing it. This part controls the on and off function. Carefully taking it out helps you check for problems and replace it if needed.
Follow these steps to remove the switch safely and correctly.
Unplug The Lamp
Always unplug the lamp before starting any work. This stops any risk of electric shock. Make sure the cord is not touching any water or wet surface. Safety is the top priority.
Access The Switch Housing
Find the switch housing on the lamp. It is usually near the bulb or on the lamp base. Use a screwdriver to open the housing carefully. Keep the screws in a safe place. Gently pull out the switch to see the wires connected to it.
Repairing The Switch
Repairing the switch is a key step to fix a lamp that does not turn on. The switch controls the flow of electricity to the bulb. Small problems in the switch can stop the lamp from working. Fixing these problems can often save money and avoid buying a new lamp.
Start by checking the switch carefully. Look for dirt, loose parts, or broken pieces. These are common issues that cause switches to fail. Follow simple steps to clean, tighten, or replace parts and get the lamp working again.
Clean The Contacts
Contacts inside the switch carry electricity. Dirt or corrosion can block the flow. Use a small brush or cloth to clean these contacts gently. A bit of rubbing alcohol can help remove grime. Clean contacts restore good electrical connection.
Tighten Loose Connections
Loose wires or screws can cause the switch to fail. Check all connections inside the switch. Use a screwdriver to tighten any loose screws. Make sure wires are firmly attached. Tight connections keep the electricity flowing smoothly.
Replace Damaged Parts
Broken or worn parts need replacement. Look for cracked plastic or broken metal pieces. Remove damaged parts carefully. Use a new switch or parts from a hardware store. Replacing parts can bring the lamp back to life quickly.
Testing The Repair
Testing the repair is an important step after fixing a lamp switch. It helps you check if the switch works correctly and if the lamp is safe to use. Take your time to test carefully. This step ensures the problem is fully solved.
Turn On The Power
Start by plugging the lamp back into the power outlet. Make sure the lamp switch is in the off position before you plug it in. Then, switch the lamp on. If the lamp lights up, the repair likely worked.
Check The Switch Function
Press the switch several times. The lamp should turn on and off without any delay or flicker. If the switch feels loose or does not click properly, the repair may need another check.
Look For Safety Issues
Watch for sparks, unusual sounds, or smells. These signs mean the lamp switch is not fixed correctly. If you see or hear any of these, unplug the lamp immediately. Safety is the top priority.
Test With Different Bulbs
Try using bulbs with different wattages. The switch should work well with all of them. This test helps confirm the repair is solid and the switch can handle normal use.
When To Replace The Switch
Knowing when to replace a lamp switch saves time and keeps your lamp safe. A switch that is faulty can cause flickering or stop the lamp from working. Sometimes, repairing the switch is not enough. Understanding the signs helps you decide the right moment to replace it.
Ignoring a bad switch can lead to bigger problems like electrical shorts or shocks. Replacing the switch ensures your lamp works properly and lasts longer. Here are clear signs that show you should replace the lamp switch.
Switch Does Not Turn On Or Off
If the lamp switch does not respond or feels stuck, it likely needs replacement. A switch that fails to control the lamp is no longer functional. Trying to fix it might waste your time and effort.
Visible Damage Or Wear
Cracks, loose parts, or burned spots on the switch mean it is unsafe. Physical damage often leads to poor connections inside the switch. Replacing it prevents further damage or electrical hazards.
Flickering Light
Light that flickers or goes on and off randomly points to switch problems. Loose or broken contacts inside the switch cause this issue. A new switch restores steady and reliable lighting.
Unusual Heat Or Smell
Heat or burning smell from the switch signals an electrical problem. This can be dangerous and may cause fire. Replacing the switch immediately is the safest choice.
Switch Feels Loose Or Wobbly
A switch that moves too much or feels loose inside the lamp needs replacement. Loose switches fail to make proper contact and can break easily. Secure switches improve lamp performance and safety.

Credit: www.wikihow.com

Credit: www.wikihow.com
Frequently Asked Questions
How Do I Know If My Lamp Switch Is Broken?
A broken lamp switch often causes the lamp not to turn on. Flickering light or no response when toggling the switch are common signs.
Can I Fix A Lamp Switch Without Special Tools?
Yes, basic tools like a screwdriver and a voltage tester are usually enough. Most lamp switches are simple to replace or repair at home.
What Are The Steps To Replace A Faulty Lamp Switch?
First, unplug the lamp and remove the old switch carefully. Then, connect the new switch wires and secure it in place before testing.
How Long Does It Take To Repair A Lamp Switch?
Repairing or replacing a lamp switch usually takes about 10 to 20 minutes. It depends on your comfort with basic electrical tasks.
Is It Safe To Fix A Lamp Switch On My Own?
Yes, as long as you unplug the lamp first and follow safety steps. Avoid working on live circuits to prevent electric shock.
Conclusion
Fixing a lamp switch can save you money and time. You only need a few tools and some care. Always remember to unplug the lamp first. Follow each step slowly and check your work. A working switch means better light and less waste.
Now, your lamp should shine bright again. Try fixing other small things around your home too. It feels good to solve problems yourself. Keep practicing, and you will get better each time. Simple repairs like this bring comfort and confidence.