
Is your Dyna Glo heater not lighting up like it used to? A faulty thermocouple might be the reason.
Don’t worry—you can fix this yourself, even if you’ve never done it before. In this guide, you’ll learn exactly how to replace your Dyna Glo thermocouple step-by-step. By the end, your heater will be working safely and efficiently again. Keep reading to discover the simple fixes that can save you time and money.
Tools Needed
Replacing a Dyna Glo thermocouple requires a few simple tools. Having the right tools makes the job easier and safer. This section lists all the tools needed for the task.
Adjustable Wrench
An adjustable wrench helps to loosen and tighten nuts. It fits different sizes of fittings on the thermocouple.
Needle-nose Pliers
Needle-nose pliers grab small parts and wires. They help remove and place the thermocouple carefully.
Screwdriver
A screwdriver is useful to open the access panel on the heater. Usually, a Phillips head screwdriver works best.
Replacement Thermocouple
A new thermocouple matches the old one exactly. Check the model number before buying.
Work Gloves
Work gloves protect your hands from sharp edges and heat. Always wear gloves for safety.
Flashlight
A flashlight helps you see inside the heater clearly. It is helpful if the area is dark.
Credit: www.zoro.com
Safety Precautions
Safety is the top priority when replacing a Dyna Glo thermocouple. Taking the right steps protects you from accidents and damage. Read each precaution carefully before starting. Do not rush the process. A slow, careful approach ensures a safe and smooth repair.
Turn Off The Gas Supply
Always shut off the gas supply before beginning any repair. This prevents gas leaks that can cause fires or explosions. Locate the main gas valve and close it tightly. Double-check that no gas is flowing to the heater.
Disconnect The Power Source
Unplug the heater from the electrical outlet. This stops any chance of electric shock during the repair. Even if your model uses batteries, remove them before proceeding. Safety first, always.
Work In A Well-ventilated Area
Good airflow reduces the risk of inhaling fumes or gas. Open windows and doors. Use fans if needed. Fresh air keeps the environment safe and comfortable.
Use Proper Tools And Equipment
Select the right tools for the job. Avoid makeshift or damaged tools. Using correct equipment reduces mistakes and injury. Wear gloves and safety glasses to protect your hands and eyes.
Check For Gas Leaks After Replacement
After installing the new thermocouple, inspect all connections. Use a soapy water solution to spot leaks. Bubbles form if gas escapes. Fix any leaks before turning the heater back on.
Locate The Thermocouple
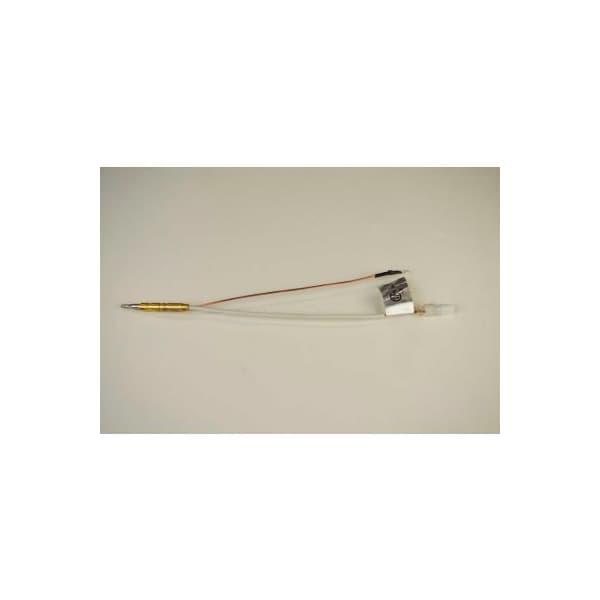
Locating the thermocouple is the first step in replacing it on your Dyna Glo heater. The thermocouple is a small but crucial part that senses heat and helps control the gas flow. Finding it can feel tricky, but the process is straightforward once you know where to look.
The thermocouple sits near the burner assembly, close to the pilot light. This position allows it to detect the pilot flame’s heat and keep the heater running safely. Knowing its location helps you remove and replace it without damaging other parts.
Identify The Burner Area
Start by locating the burner area inside your Dyna Glo heater. The burner is usually at the bottom or side, where the gas flame appears. The thermocouple will be close to this burner. Look for small metal parts around the pilot light.
Spot The Pilot Light
The pilot light is a small flame that stays lit to ignite the burner. The thermocouple is near this flame. It looks like a thin metal rod with a wire attached. This rod senses the heat from the pilot light and controls gas flow.
Trace The Thermocouple Wire
Follow the thin wire connected to the metal rod. The wire runs from the thermocouple to the gas control valve. Tracing this wire helps confirm you found the right part. The thermocouple is the piece that connects directly to the valve.

Credit: www.amazon.com
Remove The Old Thermocouple
Removing the old thermocouple is the first step to replacing it on your Dyna Glo heater. This part senses the pilot light’s heat and helps keep the heater safe. Taking it out carefully avoids damage to other parts. Follow these simple steps to remove the old thermocouple with ease.
Turn Off The Gas Supply
Start by turning off the gas valve. This stops gas flow to the heater. Safety first. Without gas, you can work without risk. Wait a few minutes to make sure no gas is left in the lines.
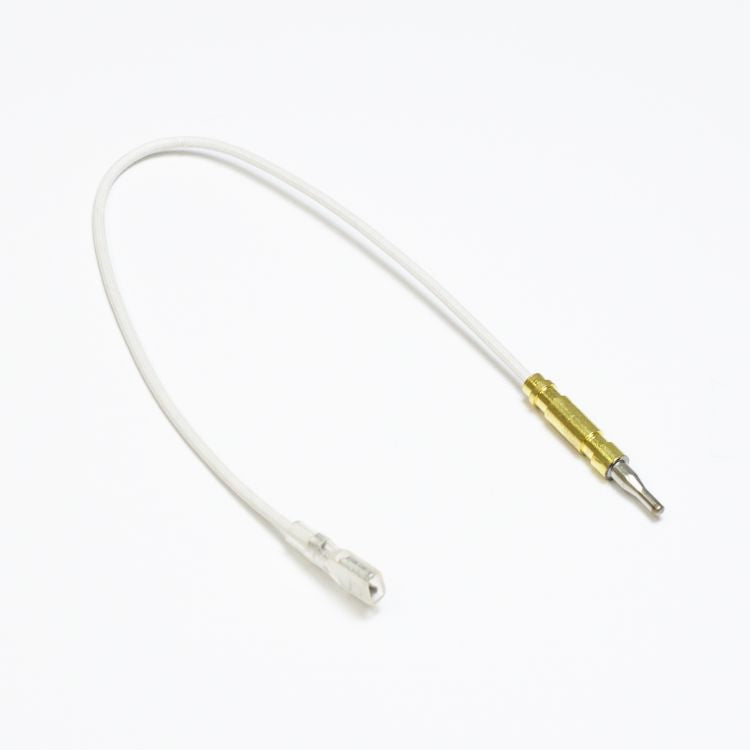
Open the heater panel to find the thermocouple. It is a thin copper tube near the pilot light. It looks like a small metal rod with a wire attached. Identifying it correctly makes removal easier.
Disconnect The Thermocouple
Use a wrench to loosen the nut that holds the thermocouple. Turn it counterclockwise. Be gentle to avoid breaking the threads. Once loose, pull the thermocouple away from the gas valve.
Remove The Thermocouple From The Pilot Assembly
The other end of the thermocouple fits into the pilot assembly. Slide it out carefully. Sometimes it may be stuck due to heat or dirt. Wiggle it slightly to free it without bending or breaking.
Install The New Thermocouple
Installing the new thermocouple in your Dyna Glo heater is a key step. It ensures the heater works safely and efficiently. This process requires care and attention to detail. Follow each step to fit the new part correctly. This will help your heater run smoothly.
Prepare The New Thermocouple For Installation
Unpack the new thermocouple carefully. Check if it matches the old one in size and shape. Avoid touching the tip with bare hands. Oil from skin can damage it. Keep it clean and ready for fitting.
Attach The Thermocouple To The Burner
Place the thermocouple tip near the burner flame. It must sense the heat directly. Secure the other end to the gas valve. Use a wrench to tighten the connection gently. Do not overtighten to avoid damage.
Reconnect The Thermocouple Wire
Find the wire from the thermocouple. Connect it to the control valve terminal. Make sure the connection is firm and secure. Loose wires can cause heater failure. Check the connection twice before moving on.
Test The New Thermocouple
Turn on the heater and watch the flame. The flame should stay steady and blue. If the flame goes out, check the thermocouple again. Make sure it is properly positioned and connected. A working thermocouple keeps the flame safe.
Test The Replacement
Testing the replacement thermocouple is a crucial step. It ensures your Dyna Glo heater works safely and efficiently. Without testing, you might not notice problems until the heater fails or acts dangerously.
Follow simple steps to verify the new thermocouple functions correctly. This check can save you time and avoid costly repairs later.
Turn On The Heater And Observe The Pilot Light
First, turn on your Dyna Glo heater. Look closely at the pilot light. It should stay lit steadily. If it flickers or goes out, the thermocouple may not be working right.
Check For Consistent Flame
Watch the flame for a full minute. The flame must be steady and blue. A weak or yellow flame could mean the thermocouple is faulty or not positioned well.
Listen For Unusual Sounds
Quiet operation is a good sign. Listen for any strange noises like popping or hissing. Odd sounds might indicate gas flow issues or a poor thermocouple connection.
Test The Safety Shutoff Function
Gently blow out the pilot light. The gas valve should close quickly. This shows the thermocouple senses the flame properly and stops gas flow for safety.
Use A Multimeter For Electrical Testing
Set a multimeter to millivolts. Connect it to the thermocouple leads. Heat the thermocouple tip with a lighter. A good thermocouple produces a small voltage signal.
Troubleshooting Tips
Troubleshooting a Dyna Glo thermocouple can save time and money. It helps spot problems early before parts get damaged. Understanding simple checks can keep your heater working well. Follow these tips to find common issues fast.
Check For Loose Connections
Loose wires often cause thermocouple failure. Turn off the heater first. Inspect the wire connections at the thermocouple and gas valve. Tighten any loose nuts or screws carefully. Secure connections improve the flow of electricity needed for operation.
Clean The Thermocouple Tip
Dirt or soot can block the thermocouple’s heat sensor. Use fine sandpaper or steel wool to clean the tip gently. Wipe away dust with a dry cloth. A clean tip ensures accurate temperature reading and proper gas valve function.
Test With A Multimeter
A multimeter can check if the thermocouple works correctly. Set it to millivolts and connect the leads to the thermocouple ends. Heat the tip with a lighter. A reading around 20 millivolts means the thermocouple is good. Low or no voltage shows it needs replacement.
Inspect The Pilot Flame
The pilot flame must touch the thermocouple tip fully. A weak or yellow flame may not heat the sensor properly. Adjust the gas flow or clean the pilot assembly if needed. A strong blue flame ensures correct operation.
Replace Damaged Parts Promptly
Look for cracks or bends in the thermocouple. Damaged parts do not work well and can cause safety issues. Replace any faulty components quickly to keep your heater safe and efficient.
Credit: ghpgroupinc.com
Frequently Asked Questions
What Is A Dyna Glo Thermocouple?
A thermocouple is a safety device that senses flame in your heater.
How Do I Know If My Thermocouple Needs Replacing?
Signs include no heat, pilot light won’t stay on, or gas smell.
What Tools Are Needed To Replace A Dyna Glo Thermocouple?
You need a wrench, screwdriver, and possibly pliers for removing parts.
How Long Does It Take To Replace A Thermocouple?
Usually, it takes about 15 to 30 minutes to replace it.
Can I Replace The Thermocouple Myself Safely?
Yes, with proper care and by turning off the gas first.
Where Is The Thermocouple Located In A Dyna Glo Heater?
It is near the pilot light, usually close to the burner.
How Do I Remove The Old Thermocouple Properly?
Turn off gas, unscrew the thermocouple from the gas valve and pilot.
How To Install A New Thermocouple In Dyna Glo?
Place it near the pilot flame, screw it securely to the gas valve.
What Should I Do If The Heater Still Won’t Work After Replacement?
Check connections are tight and pilot light is strong and steady.
How Often Should I Replace The Thermocouple In My Heater?
Replace it every few years or when you notice heating problems.
Conclusion
Replacing your Dyna Glo thermocouple is easier than it seems. Follow each step with care and patience. Check all connections for safety before testing. A properly working thermocouple ensures your heater runs smoothly. Regular maintenance helps avoid bigger problems later.
Take your time and work safely. Your heater will thank you with reliable warmth. Simple fixes like this save time and money. Keep your home cozy and comfortable all season.